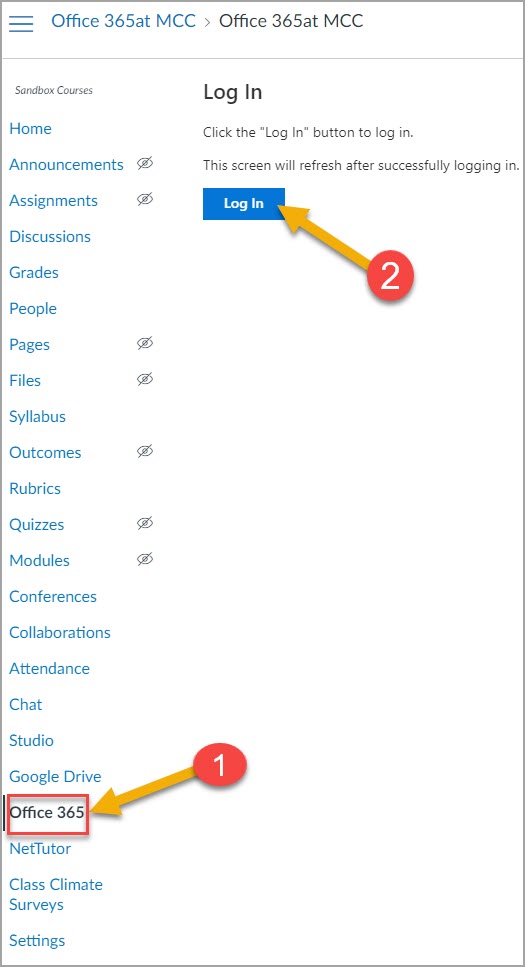
ADAPT: LibreTexts’ Free Homework System

ADAPT logo

ADAPT is a free and open online homework system from LibreTexts. Think of it as your all-in-one hub for creating engaging assessments. ADAPT solves a common open educational resource (OER) challenge by bringing different homework technologies (like H5P, WeBWorK, and iMathAS) under one roof. This gives you the freedom to mix and match from a vast library of existing questions to create engaging assignments for your students, without getting bogged down by technology.

Key Features

  • Large, customizable question library
  • Question types (can include interactives, simulations, 3D models, code):
    • Canvas-like questions: multiple-choice, true/false, fill-in-the-blank, essays, matching, drop downs, categorization, ordering, hot spots
    • Highlight table or text
    • Drag and drop
    • Sketcher (molecular structure building)
    • Discuss-it (discussion board with audio, video, and/or text inputs)
    • Learning trees (students start with a “root” problem and are offered branching pathways based on how they do)
  • Grading options (auto, manual, feedback, apply late policies, multiple attempts, randomized order)
  • View data on students engagement and performance to adjust teaching

Explore this sample ADAPT assignment to see some of the questions that can be built. You can view this video from LibreTexts (8:58 – 14:50) alongside the sample assignment to get detailed explanations of each question type.


How to Get Started with ADAPT

Step 1: Get Instructor Account

Register for a LibreOne Account (this gives you access to all of LibreTexts’ applications).

Step 2: Create Your First Course

Once you log in and click into ADAPT, your dashboard will be empty. Here is how you can create a course:

  1. Click “New Course”.
  2. Fill in Course Details.
  3. Check “Yes” for LMS.
  4. Click “Save”.
Screenshot pointing to "New Course" button
Screenshot of Course Details and pointing our LMS sections and "Save" button

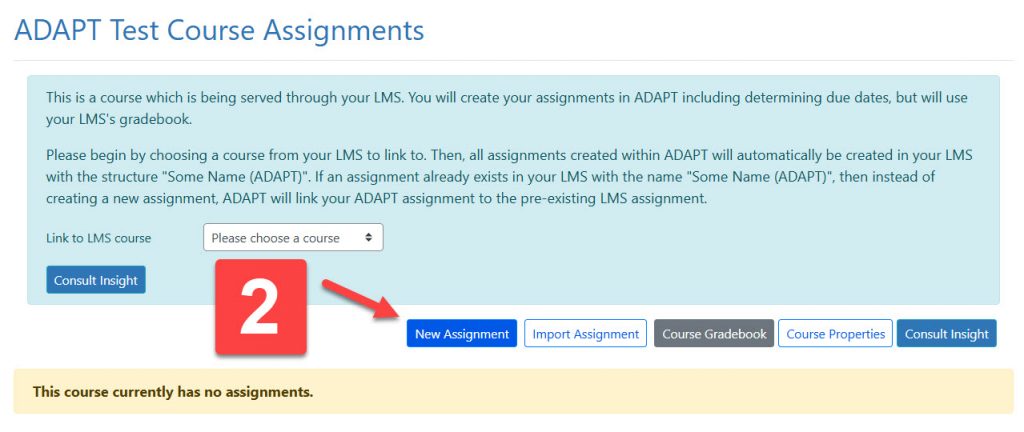
Step 3: Build an Assignment

  1. Click into the course that was just created.
  2. Click “New Assignment”.
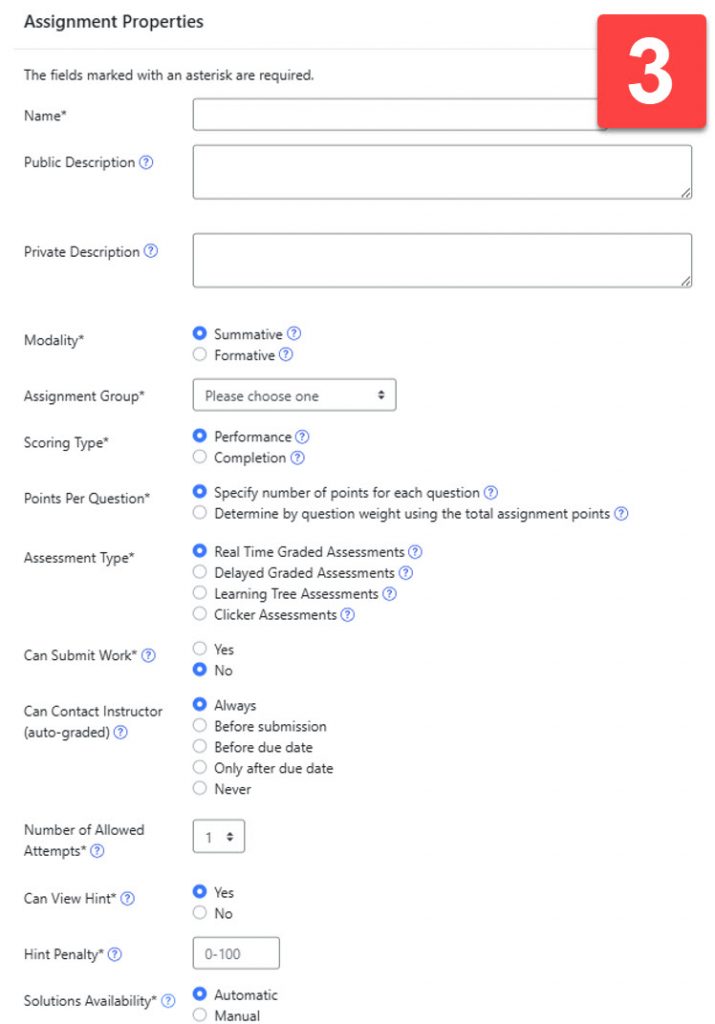
  3. Set assignment properties.
  4. Click “Save”.
Screenshot pointing to "New Assignment"
Screenshot showing Assignment Properties

Add Questions from Existing ADAPT Library

  1. Click on the assignment that you’d like to add questions to.
  2. Click “Add Questions”.
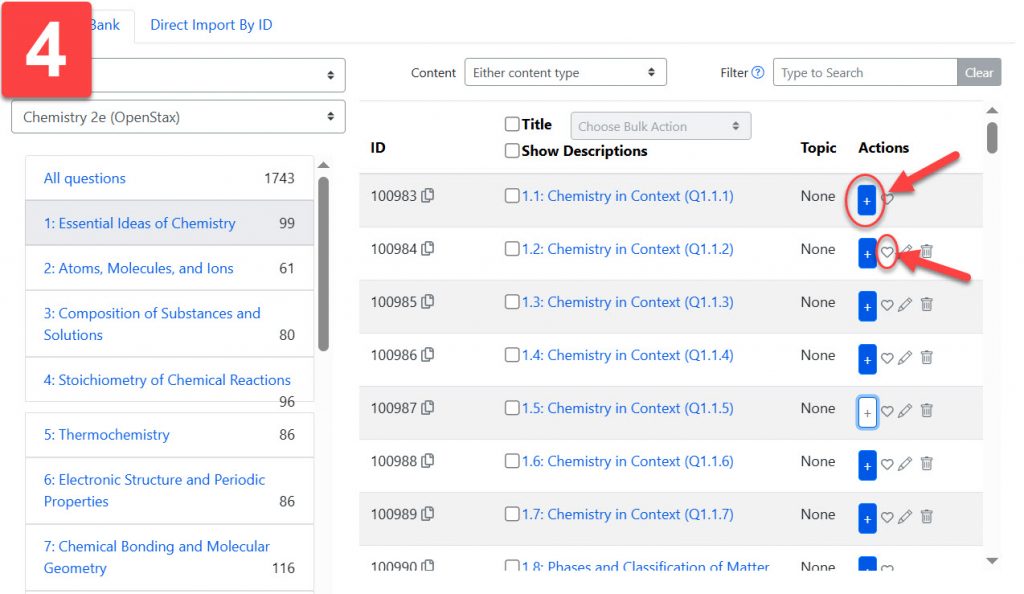
  3. Choose a question source
    • “Search Questions” lets you filter questions by several different properties.
    • “My Questions” takes you to a library of questions that you have adapted or created.
    • “My Favorites” shows you questions that you have favorited.
    • “My Courses” allows you to select questions from other courses that you have created.
    • “Commons” contains questions for courses that have been curated by the ADAPT/LibreTexts team. They could be courses matching a specific textbook or ones geared towards a course/topic.
    • “All Public Courses” shows you questions created and made publicly available by other ADAPT users.
  4. Browse questions available to you. Clicking on a question will allow you to preview it in a pop-up window. Click the “+” icon to add them to your assignment. Clicking the heart icon will allow you to add questions to a Favorites folder to be used at a later time.
Screenshot pointing to "Add Questions"
Screenshot pointing to "Question Source" dropdown menu
Screenshot pointing to plus and heart icons next to questions

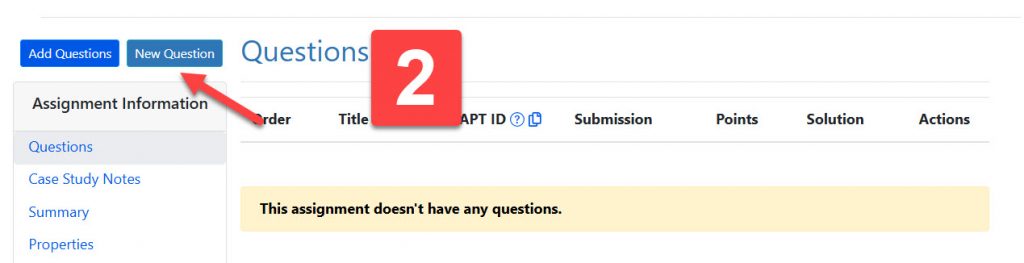
Create Own Questions

  1. Click on the assignment that you’d like to add questions to.
  2. Click “New Question”.
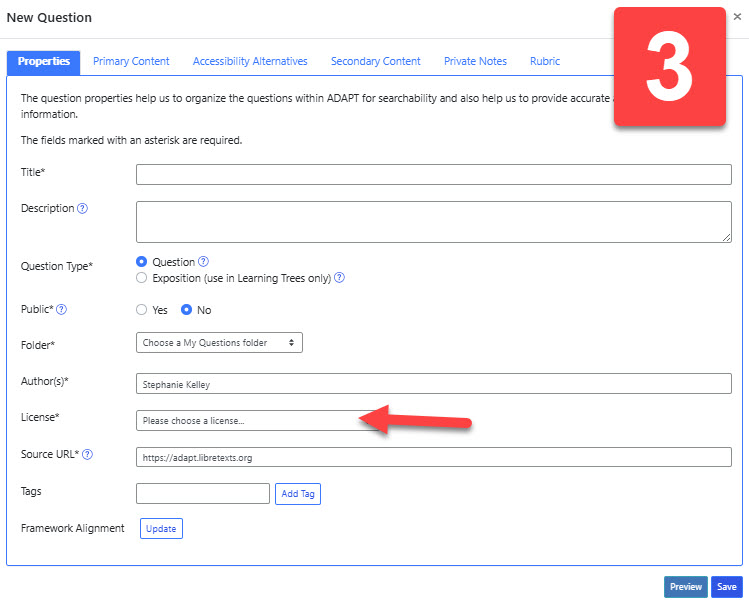
  3. Fill in “Question Properties”
    • When selecting a License, an open one is preferable so others can benefit from your work!
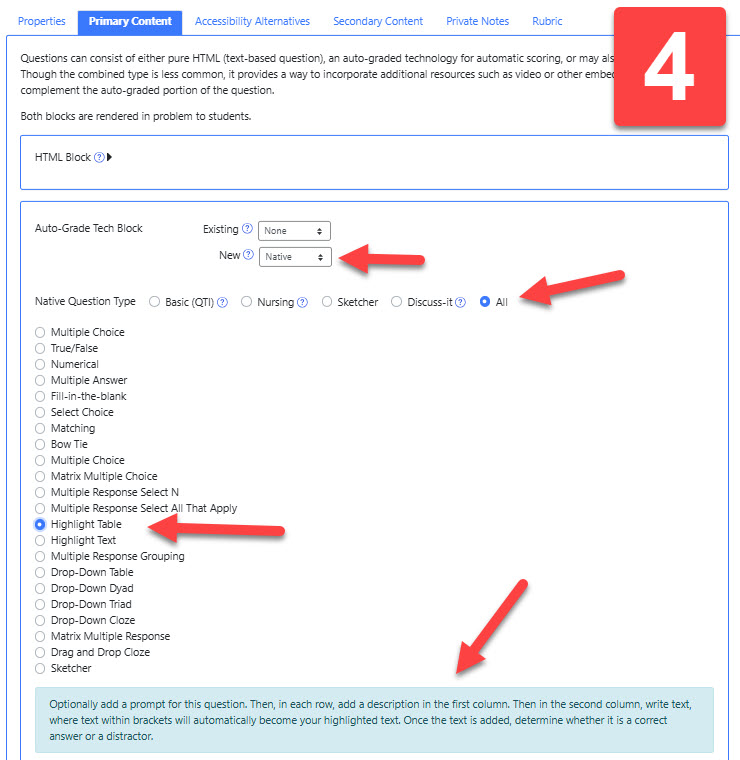
  4. Fill in “Primary Content”
    • Use “HTML Block” if the question you are creating is purely text-based.
    • If you would like to import H5P, WeBWorK, or iMathAS content that you have, go to the “Auto-Grade Tech Block” and “Existing” to make a selection.
    • To build a question using ADAPT’s templates, go to “Auto-Grade Tech Block” and next to “New” select “Native”.
      • Next to “Native Question Type” select “All” to see all the types of questions you can build. When you select a question type, the blue box below will explain what kind of interaction students will experience and how to format your question.
  5. Click “Save”.
Screenshot pointing to "New Question"
Screenshot pointing to "Licenses" on Questions Properties
Screenshot pointing to mentioned items in the "Auto-Grade Tech Block"

Step 4: Share with Students in Your MCC Canvas Course

  1. In Canvas, create a new assignment that you would like to use ADAPT for.
  2. Next to “Submission Type,” select “External Tool” and then select “ADAPT”.
  3. Once to click “Save”, you will be directed to select the ADAPT course and assignment that you would like to link to the Canvas assignment. Click “Link Assignment” once you’ve made your selections.
  4. Alternatively, you can go to your ADAPT course and link it to a Canvas course. Doing this will automatically populate the Canvas course with all the assignments you’ve created in the linked ADAPT course.
Screenshot pointing to "Submission Type" and External Tool: ADAPT
Screenshot of linking assignment to LMS
Screenshot pointing to dropdown for linking ADAPT course to LMS

Step 5: Grade an Assignment

By default, ADAPT courses are set for students to access and use them from within the LibreTexts website rather than from within Canvas. So, the course properties must be set to enable the ADAPT course to interact with Canvas Grades.

  1. Make sure your ADAPT course is set to interact with your Canvas gradebook.
    • Click on the course properties icon next to the course.
    • Check the box for “Yes” next to “LMS”. Click “Save”.
  2. Click the checkmark icon next to the assignment you would like to grade and this will take you to ADAPT’s grader.
    • The grader will allow you to view and grade both open-ended and automatically graded submissions.
    • You can grade by student or by question.
  3. Click “Submit” after each grade that you enter
Screenshot pointing to course properties
Screenshot pointing to checkbox next to "LMS" and "Save" button

ADAPT Training & Support Resources

Reset Your Canvas Course Content

Overview

From time to time, you may want to delete all of the content in a Canvas course site. This is most typically needed early in the course building process. For example, after importing content from another course, you may realize that you imported from the wrong course. The directions described below will delete all content from your course site, but leave the course roster intact.

Warning about Deleting All Course Content

WARNING: This step deletes all existing content from your course. Take steps to preserve any content you want to keep (for example, copy and paste to a Word doc, copy select course elements to a sandbox course, import the course into another empty shell, etc.) before proceeding. DO NOT complete these steps in a current term course that is currently in process!

Reset Course Content in a Canvas Course

Canvas Guide: How do I reset course content?

1. Navigate to the course with the content you wish to delete.

2. From the course navigation menu, click the Settings link.

Settings

3. In the sidebar, click the Reset Course Content link.

Reset Course Content

4. Click the Reset Course Content button.

A completely new course shell with a new ID (the number following “https://miracosta.instructure.com/courses/…”) will be generated. All users previously enrolled in the course will remain enrolled.

Made a Mistake?

If for some reason you reset your course and it was a mistake report it as soon as possible. We have Test and Beta instances of Canvas we may be able to refer to for the content and/or to restore the original course.

Contact Karen Turpin, Instructional Technology Specialist at kturpin@miracosta.edu or Canvas Faculty Support 24/7 at 1- 833-345-2890 for assistance.

Try These 10 Things To Fix Your Computer Problem Before You Call Support

Troubleshooting computer problems is part of modern life when you teach online. Before you make that support call, try your hand at fixing some of the most common problems yourself.

  1. Check your Course Management System (CMS) Status
    Is it a maintenance time? Or is  Canvas currently experiencing an outage?
    1. Canvas Status Updates
    2. Stay Up To Date with Changes Happening within Canvas
  2. Clear Browser Cache (history, cookies, etc.)
    Clearing your browser cache often will resolve the problem by allowing your computer to download the latest version of the webpage and/or software.
  3. Try a Different Browser
    If you have cleared your browser cache and things are still not working as you expect try a different browser. Example: if you are using Chrome, try Firefox and visa versa. Ensure that your browsers are up to date. You can always download the latest version free online.
    1. Chrome
    2. Firefox
    3. Which browsers does Canvas support?
  4. Restart your Computer
    Many faculty and staff solve their problems with this simple step. Always a good option to try.
  5. Check your Internet Connection Speed
    A slow connection could be why your CMS system is running slow.  Share your result with your internet service provider as necessary to resolve.
  6. Enable Browser Cookies
    Cookies are small files which are stored on a user’s computer. They are designed to hold a modest amount of data specific to a particular client and website, and can be accessed either by the web server or the client computer. This allows the online server to deliver a page tailored to a particular user, or the page itself can contain some script which is aware of the data in the cookie and so is able to carry information from one visit to the website (or related site) to the next.
  7. Enable Java
    It strongly recommended to have the latest version to ensure proper functionality of our online systems.
    1. Review ‘What is Java and Why do I need it?
    2. Download Java
  8. Manage Pop-Up Blockers
    Pop-up windows, or pop-ups, are windows that appear automatically without your permission. They vary in size but usually don’t cover the whole screen. They are often required for certain online website applications to work properly.
  9. Make sure that your Operating System is fully updated. 
    Neglecting updates could deprive you of important bug and performance fixes.
    1. Apple Computer
    2. PC Computer 
  10. Check your Device Settings

Office 365 Integration in Canvas

MiraCosta College Canvas supports an LTI integration with Microsoft Office 365 in Assignments, Collaborations, Modules, Course Navigation, and the Rich Content Editor. This integration allows students and instructors to use, create, share, and collaborate on Office 365 files within Canvas. Users can also view their OneDrive files directly in Canvas.

Enable the Office 365 Integration in Canvas

  1. Enter your Canvas course
  2. Click Settings on the course menu
  3. Click the Navigation tab
Zoom Canvas LTI Step 2 and 3
  1. Click the 3 dots to the right ofOffice 365 and select Enable.
  2. Click the Save button
Office 365 step 4 and 5

Log on to Office 365 as a Faculty / Staff Member

  1. Click the Office 365 course menu item which will appear in your course menu.
  2. Click the Log In button.
  1. Enter your Faculty / Staff MCC email address

    Example: kturpin@miracosta.edu
  2. Click the Next button
  1. Click the Accept button on the Permissions requested page.
    Note: This page will only display the first time you log on to the Office 365 Integration in Canvas.
Step #5 Permissions Page

Now you can access Office 365 documents from inside of Canvas.

Faculty Office 365 Guides for Canvas

Faculty & Student Office 365 Help and FAQS

  • General MiraCosta Office 365 help and FAQs
    You will need your MiraCosta credentials to access this.
  • Students log on to Office 365 with their  MiraCosta Student Email Address
    They may also use their SURF ID + “@student.miracosta.edu
    Example: W71234567@student.miracosta.edu
  • Faculty Support & Student Support for Office 365 is provided by the ITS Help Desk. 
    • Telephone: (760) 795-6850

Adding Faculty Evaluators, TLC Staff, Community Ed Students, Substitute Instructors, and TAs to Canvas classes

Students and Instructors are automatically enrolled from SURF to your Canvas course several times a day.

For the roles called out below, follow the specified directions to have the user enrolled within your course with the appropriate role.

  • Faculty Evaluator:  Work with your dean when you need to provide access to a peer, your chair, etc. to conduct an evaluation. Approved evaluators are handled by your dean through the Office of Instruction’s procedures. The evaluator will be added on SURF and uploaded to Canvas for the allowable period of time. During that time, the evaluator will have the ‘Evaluator’ Canvas role. The Evaluator Canvas role has the same permissions as the student role.
  • The Learning Centers (TLC) ASIC, STEMLC, & Writing Center: Contact Amy Paopao at (760) 757-2121 ext. 6389 or apaopao@miracosta.edu. On the People roster, within Canvas, the user will be assigned the ‘TLC Staff ‘ Canvas role.
  • Community Education Student: Contact Karen Turpin at kturpin@miracosta.edu. Include the confirmation of student enrollment through community education. On the People roster, within Canvas, the user will be assigned the ‘Student Other’ Canvas role.
  • Substitute Instructors, & TAs: Work with your dean to provide access to Canvas for the substitute instructor or TA. Approved substitute instructors and TAs are handled by your dean through the Office of Instruction’s procedures. The substitute instructor or TA will be added on SURF and uploaded to Canvas for the allowable period of time. During that time, the substitute instructor will have the ‘Teacher’ Canvas role and the TA will have the ‘TA’ Canvas role.

1 2 3 4 5 6 13