MiraCosta College has an unlimited license to Turnitin, GradeMark, and Peer Review, and Turnitin is available within Canvas. No separate login or password is required for faculty or students.
The primary difference between the two tools is that the Turnitin LTI 1.3 integration is best used if faculty prefer to use Turnitin for grading and feedback; the Turnitin Plagiarism Framework is preferred by faculty who want Turnitin for plagiarism prevention but like to use the Canvas grading and feedback tools.
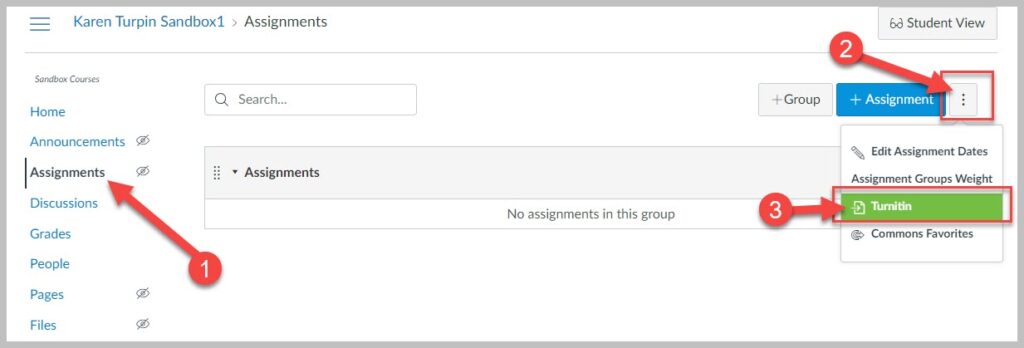
Create a Turnitin LTI 1.3 Assignment in MCC Canvas:
Click on Assignments from the course navigation menu.
Testing a Turnitin Assignment with your MCC Sample Student
Turnitin is an LTI tool that is globally installed on our Canvas system. LTI tools are not native to Canvas so they will not work in the internal Canvas Student View. You must log off of Canvas, as an instructor, then log on with your MCC Sample Student account. Now you will be able to experience a Turnitin assignment within your Canvas course as a student.
Turnitin Plagiarism Framework is available within Canvas and offers a tighter integration between a Canvas assignment and Turnitin than the Turnitin 1.3 LTI Canvas integration. No separate login or password is required for faculty or students.
The primary difference between the two tools is that theTurnitin LTI 1.3 integration is best used if faculty prefer to use Turnitin for grading and feedback; the Turnitin Plagiarism Framework is preferred by faculty who want Turnitin for plagiarism prevention but like to use the Canvas grading and feedback tools.
MiraCosta College has an unlimited license to Turnitin, GradeMark, and Peer Review.
Testing a Turnitin Assignment with your MCC Sample Student
Turnitin is an LTI tool that is globally installed on our Canvas system. LTI tools are not native to Canvas so they will not work in the internal Canvas Student View. You must log off of Canvas, as an instructor, then log on with your MCC Sample Student account. Now you will be able to experience a Turnitin assignment within your Canvas course as a student.
We suggest you use LTI 1.3 for Canvas (New Standard). LTI 1.1 (Classic Old Standard) is still currently available, however we can not guarantee for how long.
MiraCosta College has an unlimited license to Turnitin, GradeMark, and Peer Review, and Turnitin is available within Canvas. No separate login or password is required for faculty or students. If you are starting out with Turnitin we suggest you either use the updated LTI 1.3 for Canvas (New Standard) or the Turnitin Canvas Plagiarism Framework integration.
The primary difference between the two tools is that the Turnitin LTI 1.3 integration is best used if faculty prefer to use Turnitin for grading and feedback; the Turnitin Plagiarism Framework is preferred by faculty who want Turnitin for plagiarism prevention but like to use the Canvas grading and feedback tools.
Testing a Turnitin Assignment with your MCC Sample Student
Turnitin is an LTI tool that is globally installed on our Canvas system. LTI tools are not native to Canvas so they will not work in the internal Canvas Student View. You must log off of Canvas, as an instructor, then log on with your MCC Sample Student account. Now you will be able to experience a Turnitin assignment within your Canvas course as a student.
Zoom provides a reliable, easy-to-use, mobile-friendly tool for live, recordable online presentations, meetings, and discussions with audio, video, chat, screen sharing, polling, and more. It can be used within Canvas or independently.
Zoom Pro is available to all MiraCosta faculty and staff at no charge. Students don’t use the Zoom Pro account but can use free Zoom basic accounts. Nobody at MiraCosta should be paying anything to use Zoom!
The version of Zoom that MiraCostans use changed after the fall 2020 semester; MiraCosta Zoom is now accessed at miracosta-edu.zoom.us rather than conferzoom.org or cccconfer.zoom.us. Faculty need to sign in to Zoom with their MiraCosta College login and password to obtain unlimited pro (“licensed”) access to all features of Zoom, including:
Unlimited meeting lengths and very large numbers of attendees
Recordings “in the cloud” so that you do not need to manage large files of your recorded meetings
Auto-transcription of your cloud-based Zoom recordings
This page includes basic technical how-to information and resources on using Zoom in general, and Zoom use in tandem with Canvas. Please see our separate Teaching with Zoom at MiraCosta College page for more detailed tips about teaching securely, effectively, and accessibly with Zoom.
Log On to Zoom at MiraCosta College
To access your Zoom account via the web go to: https://miracosta-edu.zoom.us Sign in with your MiraCosta College employee account and two-factor authentication (2FA).
How do I get a Zoom account? If you had a pro Zoom account through ConferZoom prior to 2021, it should have been automatically migrated to the MiraCosta Zoom, and there’s nothing you need to do. If you did not previously have a Pro Zoom account, and need to create a MiraCosta Zoom account, sign in to the MiraCosta Help Desk in the Portal and select the User Accounts option.
What if I’m having trouble with my Zoom account? Sign in to the MiraCosta Help Desk in the Portal and click the User Accounts button to request help.
What happened to my Zoom recordings made before 2021? They are still in your Zoom account! The old links to Zoom recordings will still work, but a message will briefly appear when people click an old link. If you update an old recording link with the new MiraCosta Zoom URL (replace cccconfer.zoom.us with miracosta-edu.zoom.us in the link) it will work seamlessly.
What happened to my recurring Zoom meetings I set up before 2021? Similar to your recordings, old links to recurring Zoom meetings will still work, but a message will appear when people click an old link. If you go to your Zoom account, you’ll see that your meetings have been migrated in, and you can get a new invitation. You can also simply update a meeting link created before 2021 with the new MiraCosta Zoom URL (replace cccconfer.zoom.us with miracosta-edu.zoom.us in the link).
What happened to Reports from Zoom meetings held before 2021? They are gone, sorry.
How much storage do I have for Zoom recordings? As of spring 2021, there is not a limit; however, this may change in the future if we do not manage our recordings well. Please delete recordings that you do not need.
Zoom Documentation
The following Zoom trainings, documentation, and resources can help you stay informed:
You can schedule and share Zoom meetings and recordings directly within Canvas, using the Zoom integration. To get started and learn more about the Zoom/Canvas integration, see directions below.
Note: You may also share individual Zoom meeting links and recordings in Canvas without using the integration.
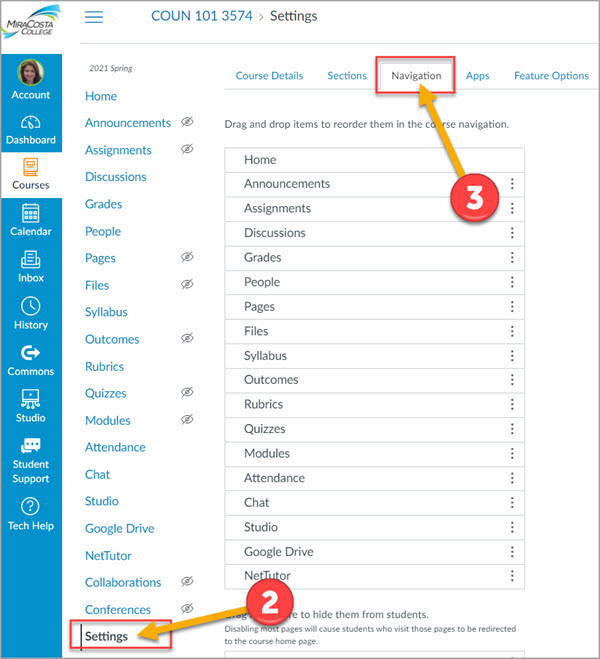
Canvas Integration with Zoom
Enter your Canvas course
Click Settings on the course menu
Click the Navigation tab
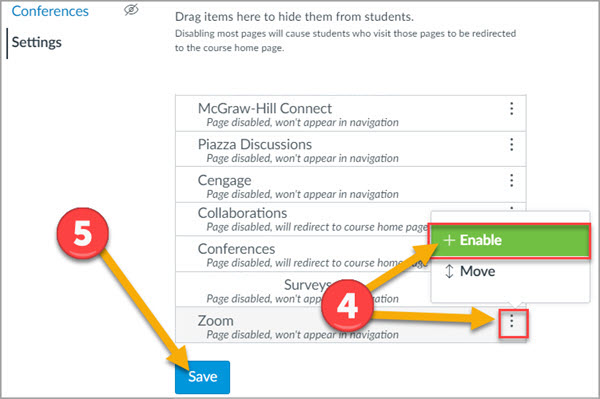
Click the 3 dots to the right of Zoom and select Enable.
Click the Save button
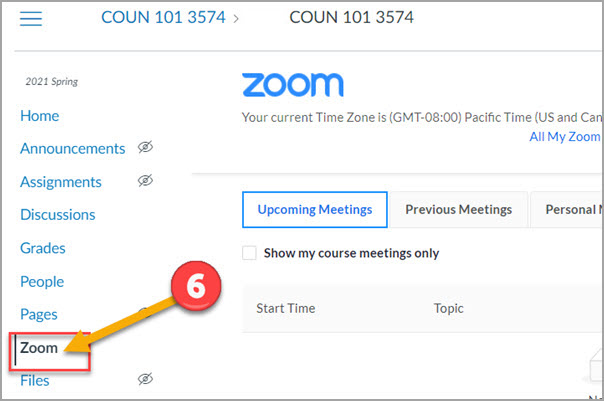
Click the Zoom course menu item which will appear in your course menu.
Now you can schedule and access Zoom meetings from inside of Canvas.
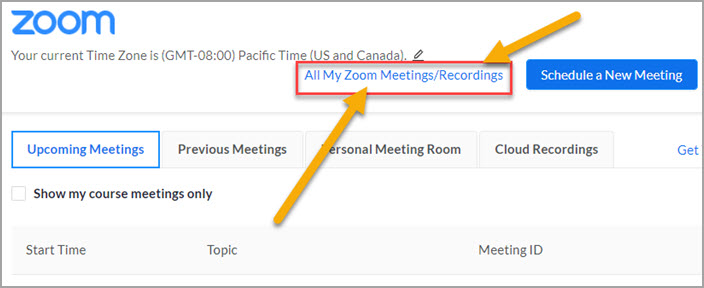
Viewing All My Zoom Meetings in Canvas
When you first enter Zoom on Canvas you will see only the Zoom meetings associated with the Canvas course you entered from. To see and access all Zoom meetings within your account, click the link ‘All My Zoom Meetings‘.