Downloading Zoom Recordings and more….

Beginning October 2, 2025, all Zoom recordings created between 2017 and July 31, 2024, will be automatically deleted in accordance with the California Community Colleges Chancellor’s Office directive. It is advised to download all Zoom recordings that you would like to keep prior to this date and hosting those Zoom recordings on an alternate media server.

Step 1: Download the Zoom recording files.

View a webinar by Jill Ringer that will walk you through the Zoom download process.

View a handout on how to download Zoom recordings.

Step 2: Upload your Zoom recording files to a streaming media service.

Canvas Studio

This option is integrated directly in Canvas. At this time we do not have any storage limits so this is the most ideal and probably easiest place to store your Zoom recordings. For future zoom recordings you can even have those recordings automatically upload to Canvas Studio.

Canvas Studio

Here are some guides that will walk you through the process of uploading video files & using Canvas Studio.

Zoom Connection to Canvas Studio

Canvas Studio supports an integration with Zoom that allows Zoom to automatically upload future recorded meetings into Studio. Here is how you can authorize the Studio Zoom integration in your Canvas Studio Settings.

Zoom Video Migration FAQs

How do I ensure that the video captions also migrate?

If downloading the video to your computer and saving it to One Drive, make sure to also save the .cc.vtt file and add it to the MP4 file.

Canvas Studio generates auto captions to all Zoom videos uploaded to its library. Be sure to review the captions for accuracy.

Who do I contact if I need help?

Got questions?

Contact the following:

ITS Helpdesk: (760) 795-6850

Jill Ringer from ITS: [email protected]

Karen Turpin: [email protected]

Nadia Khan: [email protected]

Fall 2025 Online Ed tips & resources for MiraCosta

Welcome to fall, colleagues! Please see below for important reminders of key online education resources to help all faculty to enable student success!

New and Noteworthy …

  • Late in spring, we added a new tool to Canvas called Adjust-All which makes copying previous Canvas courses for reuse a lot easier. It enables you to change all course item due dates and announcement publication dates in one place, rather than having to access each item individually.
  • This summer, we’ve added another tool to Canvas to make your life easier as you reuse Canvas courses: TidyUP. TidyUP makes it quick and simple to identify and delete files, folders, pages, and assignments that are no longer in use, making your Canvas course less cumbersome and easier for you and your students to use.
  • In case you haven’t heard from other sources, all Zoom recordings from prior to July 2024 will be deleted in early October. This is a decision made at the CCC system level and we can’t change it! So if you rely on older Zoom recordings, you’ll need to download those over to Canvas Studio (most recommended!) or another video storage/streaming solution. ITS and Online Education will be offering support for this in multiple ways over the next 6 weeks.

Expectations and Recommendations for Faculty

Support for You

Support for Your Students – Please help your students to be aware of and make use of these important services and resources!

  • Student Online Academic Readiness workshops – In collaboration with the library, I’ll be offering a number of these during the first half of the term – see all dates and times on the MiraCosta Online site and in Canvas announcements. These workshops provide tech tips, engage students with resources MiraCosta provides to support them, as well as reviewing habits and attitudes of successful online students. Encourage your students to attend and, if you like, find out which of your students participated in order to incentivize their attendance.
  • Online Student Support Access Points – the Student Support Hubin Canvas, accessed via the Student Support button on the left in Canvas, gives quick access to online support from the library, Learning Centers, counseling, career center, open computer lab staff, student help desk, health services, CARE team, and more! The Ask the Spartan chat integrated into MiraCosta’s website provides both automated responses and the opportunity to connect to Live Chat with staff from many student support areas. The Help Hut and Online Education webpages are also great starting points for students to connect with all kinds of support services when they’re not in Canvas.
  • Tech Support – Also at lower left in Canvas is a button for students to quickly access Tech Help options, including 24×7 phone and chat support from Canvas, and our local MiraCosta ITS help desk. Our ITS team is also offering in-person workshops for students to help them with tech basics – see Canvas announcements for where and when these will be offered!
  • Technology Needs – Be sure to share the form for students to fill out if they need a laptop and/or wifi hotspot to succeed this semester/year!

MiraCosta’s Online Education Tools

Select the links for a detailed MiraCosta-specific overview (and often, recorded Flex workshops) for each tool below. Please don’t hesitate to contact me if you have questions about these or other resources.

  • Canvas – goes without saying (well, I said it)
  • Adjust-All and TidyUP– as noted above, new tools to make it easier to copy and reuse Canvas courses
  • Zoom – if you’re using Zoom, make sure you’re using a pro Zoom account through MiraCosta. 
  • Canvas Studio – enables faculty and students to create videos while inside Canvas. Faculty can create interactive discussion or quiz activities based on video. Auto-captioning and caption clean up tools are high-quality and easy to use, but not automatic!
  • Pronto is an incredible mobile-friendly and Canvas-integrated messaging platform that’s ready to use in every course.
  • Pope Tech helps faculty detect and correct accessibility issues within Canvas. The PopeTech dashboard tool (via the Pope Tech Accessibility course menu item) provides a course-level guide for addressing all accessibility issues in a course in one place.
  • SensusAccess provides multi-format course material accessibility and file type conversion options for students. If you notice an S symbol next to your page title and next to items in the Modules view, that’s SensusAccess.
  • Perusall is a social annotation tool available within Canvas that makes it easy for students to comment/discuss right on a text, document, or image.
  • Lab Archives Electronic Notebook is an online notebook especially useful for translating lab manuals and student notes/work into the online environment.
  • PlayPosit – This video interaction tool offers more complexity and options than Studio. Studio is a great place to start, but if you’re looking for more types of interactivity to add to your videos, PlayPosit is great. 
  • Turnitin – help students learn to properly cite sources and avoid plagiarism. Also provides grading and peer review tools for written work. Turnitin has included an AI detection capability for instructors, but please beware of false positives should you use it. Most experts agree that AI detection tools are extremely unreliable.

Best wishes for a fantastic fall!

– Jim

Jim Julius, Ed.D.
Faculty Coordinator, Online Education

Adjust-All

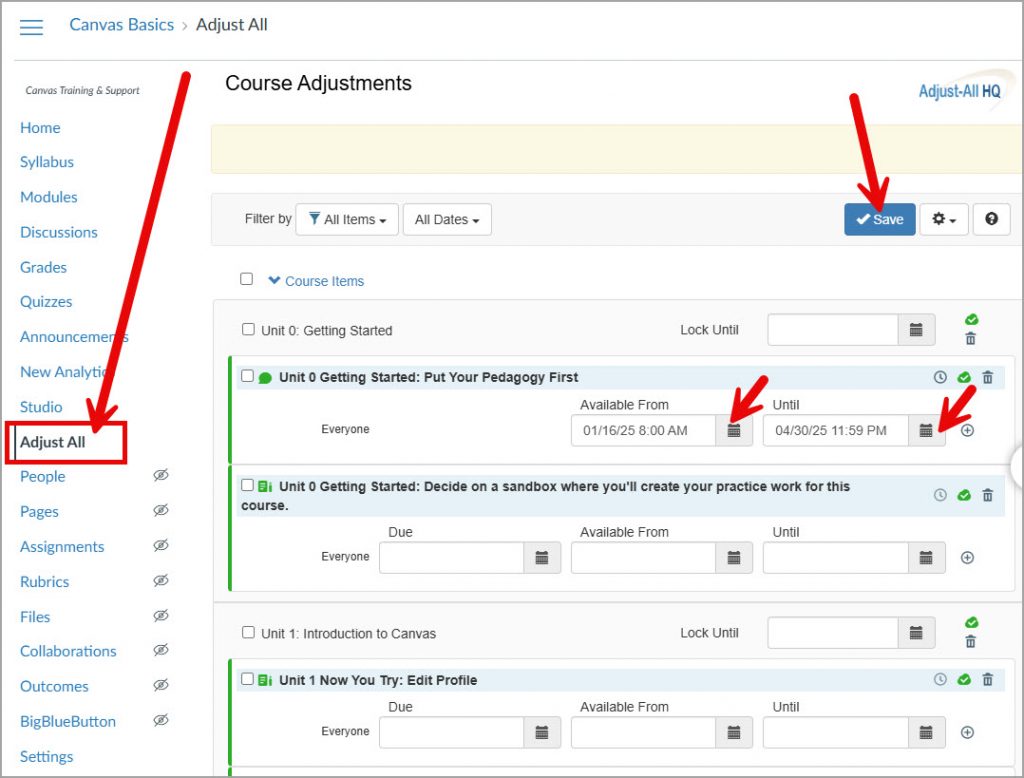
Adjust-All is a simple Canvas tool that enables you to change all course item due dates and announcement publication dates in one place, rather than having to access each item individually.

View a short (3½ minutes) video that will show you how it works!

Adjust-All Tips

  • The first time you use Adjust-All, you’ll need to click the blue Authorize button – it’s fine 😊
  • This tool is only available to faculty – students won’t see it in your course menu.
  • There are a few other things you can do with Adjust-All. Click the gear icon at top right to see options for bulk adjustments to dates or publishing status.
  • See the Adjust-All user guide for more tutorials and guides to using Adjust-All.

Adjust-All Limitations

  • Doesn’t work to update publish or to-do dates for Pages
  • Doesn’t work with New Quizzes
  • An assignment that is included in multiple modules may need to be updated multiple times within Adjust-All

MCC Canvas

You’ll find “Adjust All” toward the bottom of each Canvas course’s navigation menu. Adjust the dates of your course items, and click Save.

Adjust All in Canvas

ADAPT: LibreTexts’ Free Homework System

ADAPT logo

ADAPT is a free and open online homework system from LibreTexts. Think of it as your all-in-one hub for creating engaging assessments. ADAPT solves a common open educational resource (OER) challenge by bringing different homework technologies (like H5P, WeBWorK, and iMathAS) under one roof. This gives you the freedom to mix and match from a vast library of existing questions to create engaging assignments for your students, without getting bogged down by technology.

Key Features

  • Large, customizable question library
  • Question types (can include interactives, simulations, 3D models, code):
    • Canvas-like questions: multiple-choice, true/false, fill-in-the-blank, essays, matching, drop downs, categorization, ordering, hot spots
    • Highlight table or text
    • Drag and drop
    • Sketcher (molecular structure building)
    • Discuss-it (discussion board with audio, video, and/or text inputs)
    • Learning trees (students start with a “root” problem and are offered branching pathways based on how they do)
  • Grading options (auto, manual, feedback, apply late policies, multiple attempts, randomized order)
  • View data on students engagement and performance to adjust teaching

Explore this sample ADAPT assignment to see some of the questions that can be built. You can view this video from LibreTexts (8:58 – 14:50) alongside the sample assignment to get detailed explanations of each question type.


How to Get Started with ADAPT

Step 1: Get Instructor Account

Register for a LibreOne Account (this gives you access to all of LibreTexts’ applications).

Step 2: Create Your First Course

Once you log in and click into ADAPT, your dashboard will be empty. Here is how you can create a course:

  1. Click “New Course”.
  2. Fill in Course Details.
  3. Check “Yes” for LMS.
  4. Click “Save”.
Screenshot pointing to "New Course" button
Screenshot of Course Details and pointing our LMS sections and "Save" button

Step 3: Build an Assignment

  1. Click into the course that was just created.
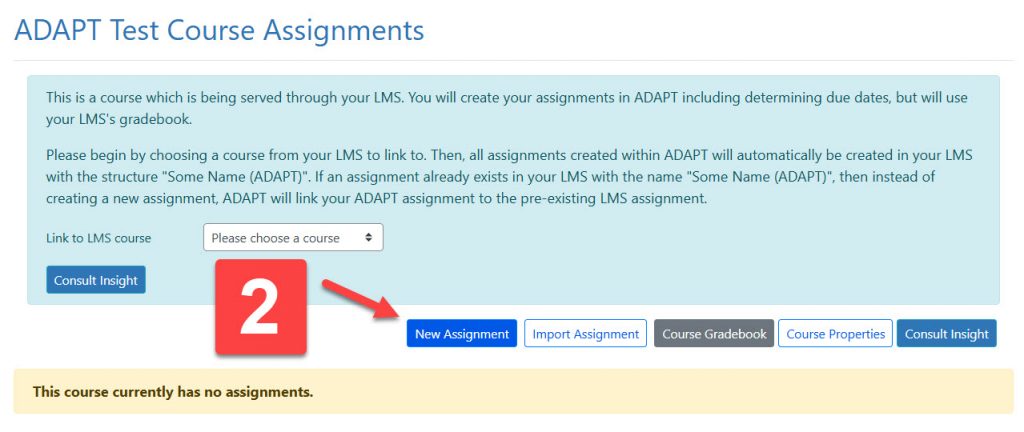
  2. Click “New Assignment”.
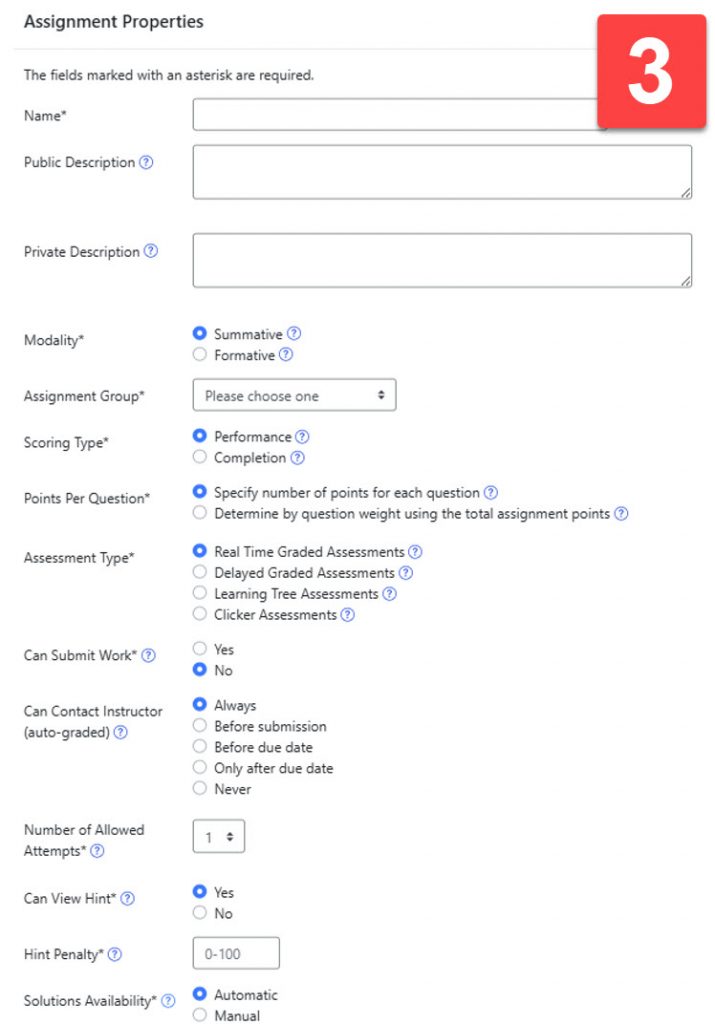
  3. Set assignment properties.
  4. Click “Save”.
Screenshot pointing to "New Assignment"
Screenshot showing Assignment Properties

Add Questions from Existing ADAPT Library

  1. Click on the assignment that you’d like to add questions to.
  2. Click “Add Questions”.
  3. Choose a question source
    • “Search Questions” lets you filter questions by several different properties.
    • “My Questions” takes you to a library of questions that you have adapted or created.
    • “My Favorites” shows you questions that you have favorited.
    • “My Courses” allows you to select questions from other courses that you have created.
    • “Commons” contains questions for courses that have been curated by the ADAPT/LibreTexts team. They could be courses matching a specific textbook or ones geared towards a course/topic.
    • “All Public Courses” shows you questions created and made publicly available by other ADAPT users.
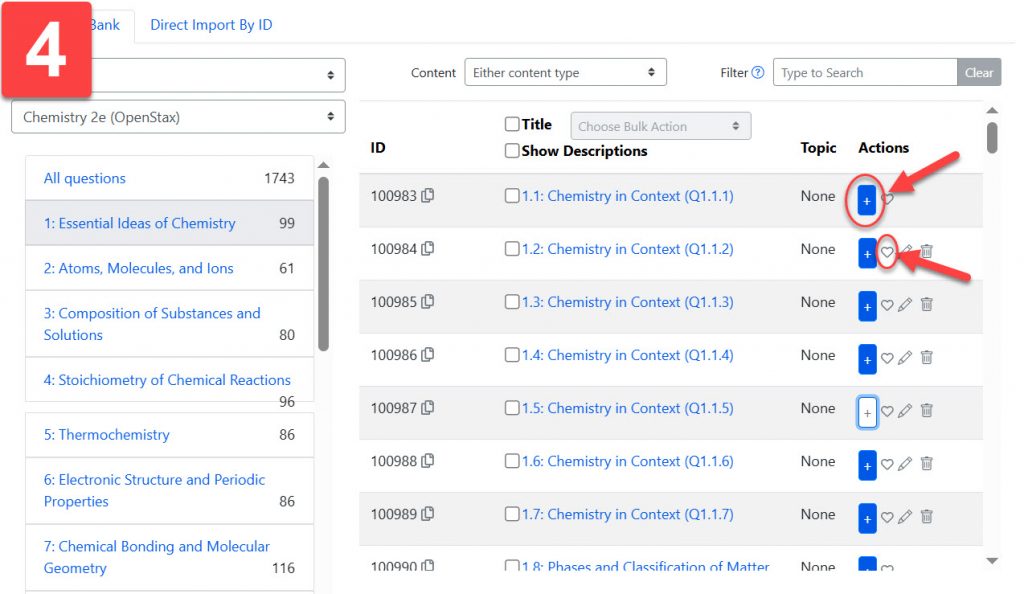
  4. Browse questions available to you. Clicking on a question will allow you to preview it in a pop-up window. Click the “+” icon to add them to your assignment. Clicking the heart icon will allow you to add questions to a Favorites folder to be used at a later time.
Screenshot pointing to "Add Questions"
Screenshot pointing to "Question Source" dropdown menu
Screenshot pointing to plus and heart icons next to questions

Create Own Questions

  1. Click on the assignment that you’d like to add questions to.
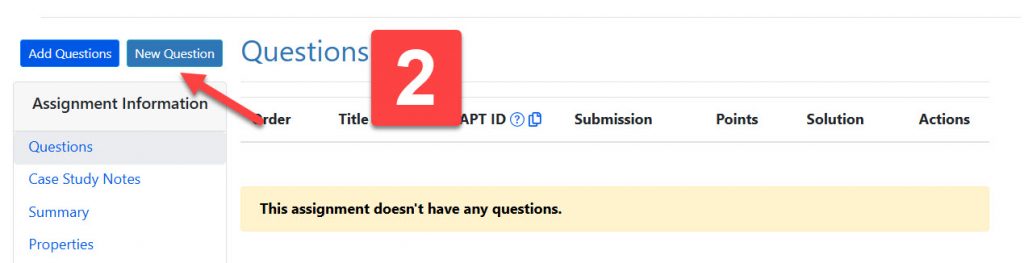
  2. Click “New Question”.
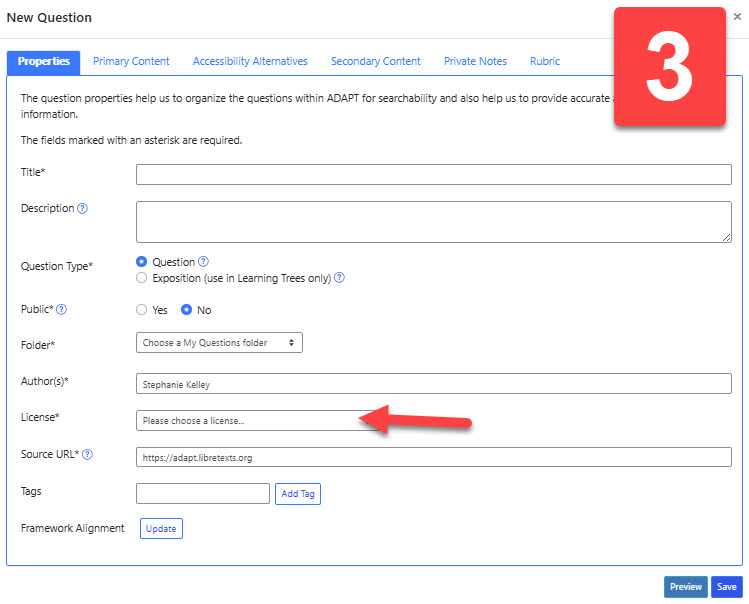
  3. Fill in “Question Properties”
    • When selecting a License, an open one is preferable so others can benefit from your work!
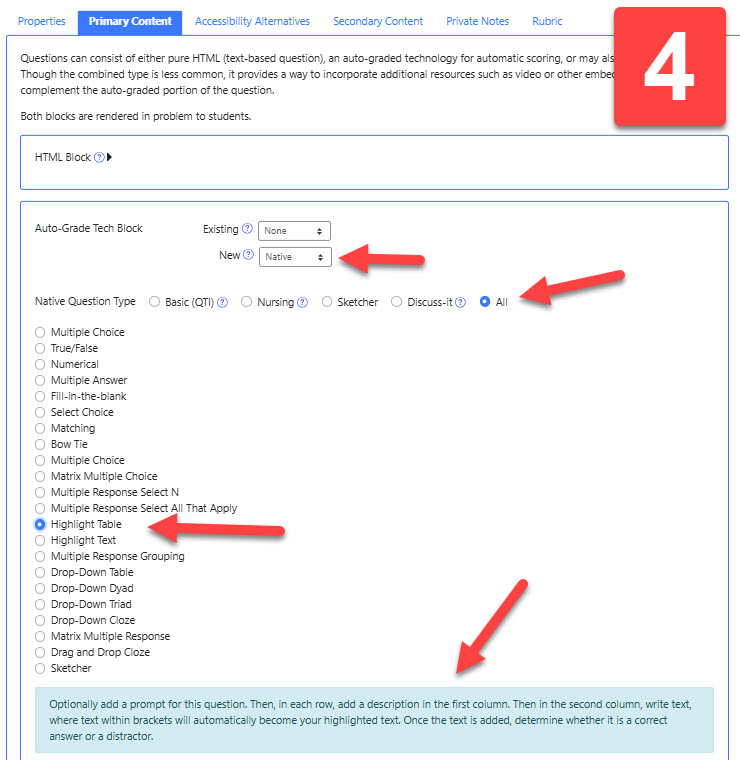
  4. Fill in “Primary Content”
    • Use “HTML Block” if the question you are creating is purely text-based.
    • If you would like to import H5P, WeBWorK, or iMathAS content that you have, go to the “Auto-Grade Tech Block” and “Existing” to make a selection.
    • To build a question using ADAPT’s templates, go to “Auto-Grade Tech Block” and next to “New” select “Native”.
      • Next to “Native Question Type” select “All” to see all the types of questions you can build. When you select a question type, the blue box below will explain what kind of interaction students will experience and how to format your question.
  5. Click “Save”.
Screenshot pointing to "New Question"
Screenshot pointing to "Licenses" on Questions Properties
Screenshot pointing to mentioned items in the "Auto-Grade Tech Block"

Step 4: Share with Students in Your MCC Canvas Course

  1. In Canvas, create a new assignment that you would like to use ADAPT for.
  2. Next to “Submission Type,” select “External Tool” and then select “ADAPT”.
  3. Once to click “Save”, you will be directed to select the ADAPT course and assignment that you would like to link to the Canvas assignment. Click “Link Assignment” once you’ve made your selections.
  4. Alternatively, you can go to your ADAPT course and link it to a Canvas course. Doing this will automatically populate the Canvas course with all the assignments you’ve created in the linked ADAPT course.
Screenshot pointing to "Submission Type" and External Tool: ADAPT
Screenshot of linking assignment to LMS
Screenshot pointing to dropdown for linking ADAPT course to LMS

Step 5: Grade an Assignment

By default, ADAPT courses are set for students to access and use them from within the LibreTexts website rather than from within Canvas. So, the course properties must be set to enable the ADAPT course to interact with Canvas Grades.

  1. Make sure your ADAPT course is set to interact with your Canvas gradebook.
    • Click on the course properties icon next to the course.
    • Check the box for “Yes” next to “LMS”. Click “Save”.
  2. Click the checkmark icon next to the assignment you would like to grade and this will take you to ADAPT’s grader.
    • The grader will allow you to view and grade both open-ended and automatically graded submissions.
    • You can grade by student or by question.
  3. Click “Submit” after each grade that you enter
Screenshot pointing to course properties
Screenshot pointing to checkbox next to "LMS" and "Save" button

ADAPT Training & Support Resources

Office 365 Integration in Canvas

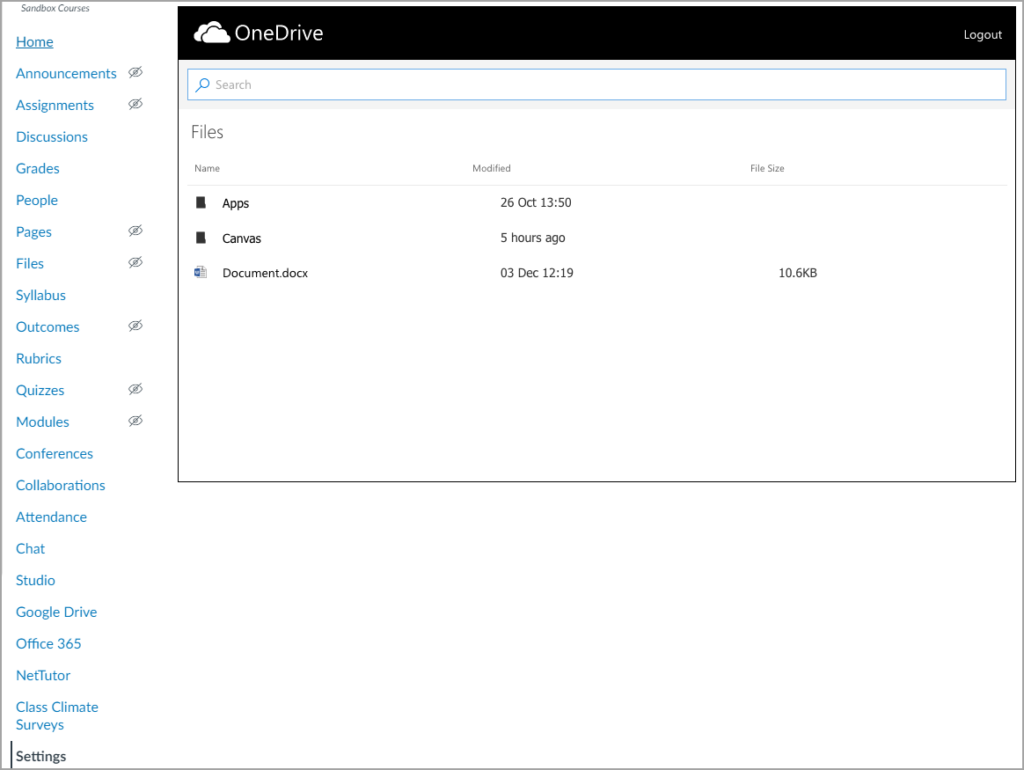
MiraCosta College Canvas supports an LTI integration with Microsoft Office 365 in Assignments, Collaborations, Modules, Course Navigation, and the Rich Content Editor. This integration allows students and instructors to use, create, share, and collaborate on Office 365 files within Canvas. Users can also view their OneDrive files directly in Canvas.

Enable the Office 365 Integration in Canvas

  1. Enter your Canvas course
  2. Click Settings on the course menu
  3. Click the Navigation tab
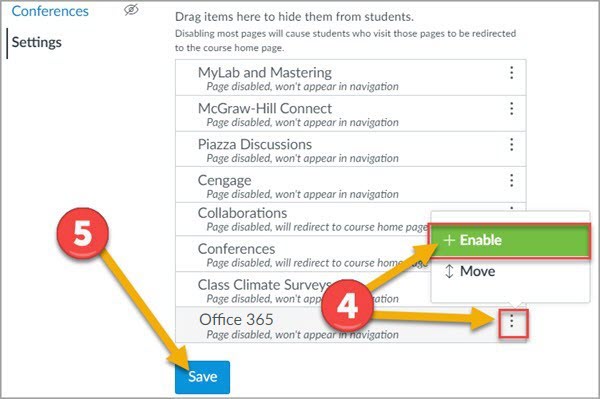
Zoom Canvas LTI Step 2 and 3
  1. Click the 3 dots to the right ofOffice 365 and select Enable.
  2. Click the Save button
Office 365 step 4 and 5

Log on to Office 365 as a Faculty / Staff Member

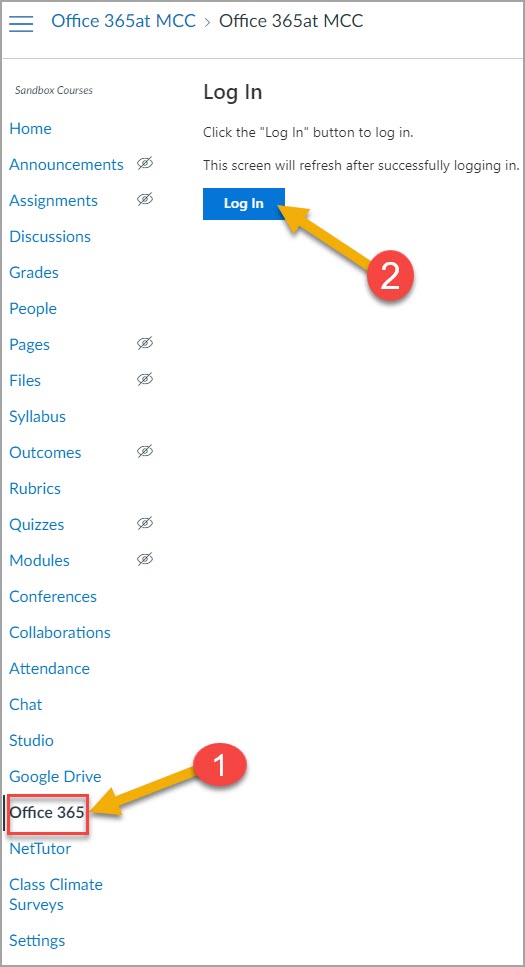
  1. Click the Office 365 course menu item which will appear in your course menu.
  2. Click the Log In button.
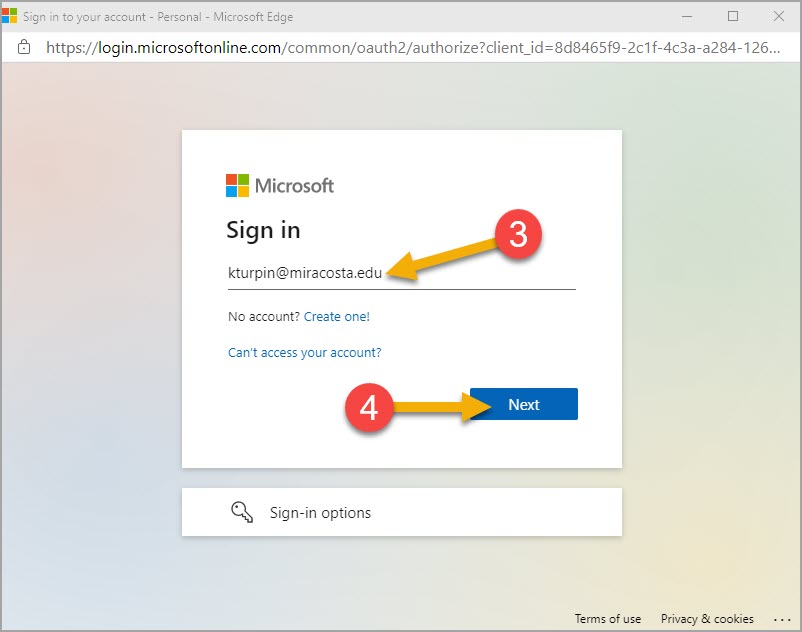
  1. Enter your Faculty / Staff MCC email address

    Example: [email protected]
  2. Click the Next button
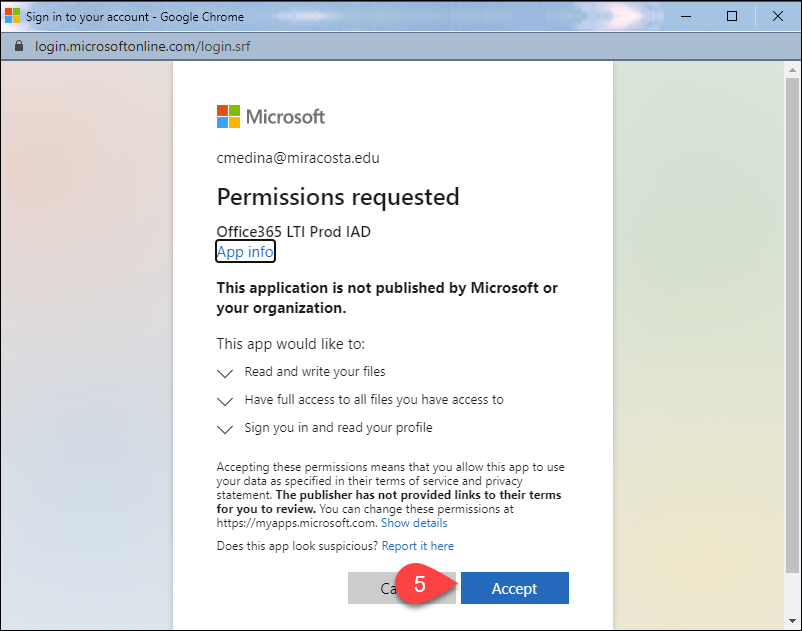
  1. Click the Accept button on the Permissions requested page.
    Note: This page will only display the first time you log on to the Office 365 Integration in Canvas.
Step #5 Permissions Page

Now you can access Office 365 documents from inside of Canvas.

Faculty Office 365 Guides for Canvas

Faculty & Student Office 365 Help and FAQS

  • General MiraCosta Office 365 help and FAQs
    You will need your MiraCosta credentials to access this.
  • Students log on to Office 365 with their  MiraCosta Student Email Address
    They may also use their SURF ID + “@student.miracosta.edu“
    Example: [email protected]
  • Faculty Support & Student Support for Office 365 is provided by the ITS Help Desk. 
    • Telephone: (760) 795-6850
1 … 3 4 5 6 7 … 14