
Pronto – Connect, Collaborate, Communicate

Pronto Flex Workshop Recordings


Pronto logo

Pronto is an app that works within and outside of Canvas to enable seamless, fun, and effective communication between faculty and students, and among students.

If you do not want Pronto to be available for any class, opt out via the Pronto Course Management tool.

Some stats as of October 2025, after 3.5 years of institutionally licensing Pronto at MiraCosta:

  • nearly 20,000 MiraCostans have signed in to Pronto
  • over 421,000 messages have been sent across almost 13,500 groups

What Pronto Offers

  • Real-time Chat Without having to share phone numbers or other contact information, now you have real-time messaging across each class and to individuals. Send text messages, files, images, emojis, and GIFs!
  • Group Creation Groups you set up in Canvas automatically get a Pronto group. But anyone can also create Pronto groups on their own. Pronto groups created within the Pronto app remain available indefinitely, while Pronto groups tied to a Canvas class will end once the class is completed.
  • Announcements Keep your entire course in the loop by sending a message to the whole class. It’s like sending a real-time announcement to your entire class. Keep everyone updated on assignments, tech glitches, emergency alerts, and any other important information you need to get out instantly. You can send one Announcement to multiple Pronto groups at once if you wish.
  • Message Translation Pronto gives everyone a voice by allowing them to send messages in their preferred language, and Pronto then automatically translates messages into the recipient’s preferred language.
  • Live-stream & Group Video Chat
    • Broadcast live video to your classes, and record your video sessions for replay. This may be a nice alternative to Zoom for things like office hours, group meetings, and more. Viewers interact using the chat button. It keeps the process smooth. Here is a video from Fabiola Torres of Glendale CC on how she uses the live-stream feature for class.
    • Chat via live video with up to 10 people simultaneously. Perfect for group projects!
    • Live 1:1 video chat any time for face-to-face interaction with a student. Or live-stream with a student and they can chat (they don’t have to be on camera).
  • File Sharing & Storage Share any file type—documents, spreadsheets, slideshows, photos, videos, and more. All files stored in Pronto remain available through Pronto for easy retrieval with no storage limits. Pronto integrates with all reputable cloud storage repositories, including Dropbox, OneDrive, iCloud, and Google Drive.
  • Task Management Keeps students organized and accountable by assigning tasks. Tasks allows you to create reminders for yourself or others in groups—attach files, photos, or videos and assign due dates with auto-reminders for each task. Here is a video from Professor Gomez of Glendale CC demonstrating how to assign a task.
  • Accessibility and Privacy Pronto is both WCAG 2.0 AA and FERPA compliant. Pronto keeps you connected to everyone without sharing personal contact information.
  • Viewing Data Pronto lets you know who has seen your messages, so you can decide whether to follow up in different ways with those who may not have viewed a message.

Check out this brief introduction to Pronto from MiraCosta faculty member Tanessa Sanchez:

Pronto Faculty Introduction

Where Can I Access Pronto?

Pronto is available 4 ways:
  1. Pronto icon Directly within Canvas. If you are enrolled in any published course where Pronto is active, you will see the Pronto icon at the bottom left of Canvas, in the Global Navigation menu (you may need to scroll the menu down).
    Selecting the Pronto icon will open up Pronto to the latest chat you have had open or the course/group with which you are currently engaged.
  2. Through any web browser at miracosta.pronto.io .
  3. Via the mobile app, which is available for free in the Apple and Google app stores (search Pronto: Team Communication).
  4. Via a desktop app, available at pronto.io/download

Getting Started with Pronto

To jump in and try out Pronto, self-enroll in a MiraCosta faculty Pronto practice course in Canvas. Once you are in, you’ll see some directions to get started and try it out!

The first time you use Pronto, you’ll need to provide your MiraCosta email address and then enter a code that Pronto will send to your email. If you are not yet enrolled in any course that is published and uses Pronto, you may need to wait until that occurs for this step to work.

To get started on your own, check out the General Pronto Overview. You may also wish to review the Canvas/Pronto integration guide, check out Pronto’s 3-part YouTube introductory series for faculty, and/or watch this 6 minute video:

When does Pronto become available in a class?

Pronto only becomes active for a Canvas course after it is published. NOTE: this doesn’t happen automatically – Pronto becomes active for a newly-published course once the next synchronization between Pronto and Canvas occurs – this happens daily at 7 pm PST. But if you want to make Pronto active immediately after publishing a course, you can manually enable Pronto in the Pronto course management tool.

Do I have to use Pronto?

No, Pronto is available but you can ignore it. Doing so will still allow your students to use it. If you wish to turn off Pronto temporarily or permanently for a class, you can do that too. (Even if you like having Pronto on most of the time, you may wish to shut it off during an exam, for example.)

Use the Pronto Course Management tool to turn off Pronto for a particular class. Learn more about Pronto Course Management.

Pronto and Combined Courses

If you electively combine course sections into one Canvas course, you’ll need to use the separate Pronto groups associated with each section rather than messaging with Pronto to the entire combined class in order to maintain FERPA compliance. Some notes on this process from MiraCosta professor Serena Mercado:

  • After publishing the combined Canvas course, the merged course showed up on my Pronto list.  
  • In Pronto, when expanding the course (click the arrow on the right of the course name), it was divided into two sections (with REALLY long names)
  • Hovering over each name makes three vertical dots appear to the right of the name.
  • If you click on the three dots, you are given the option to nickname the individual sections, so they are more easily identifiable.

If you teach a stacked course or cross-listed course where different sections are automatically combined into one Canvas course, there are no FERPA concerns as described above, but Pronto will still default to multiple sections. This video demonstrates how to use one Pronto group to communicate with the entire class (all sections).

Technical support, tips and resources

Support for Pronto is provided via the Pronto support site or by contacting [email protected]. A few important notes/tips:

  • Students added to your Canvas class will not be able to use Pronto for the class until the next Pronto synchronization occurs. You can use the Pronto Course Management tool to manually force Pronto to synchronize with a course if necessary.
  • Faculty can’t see Pronto in Canvas’s Student View. If you wish to experience Pronto within your course as your students would, you need to use your “fake student” account. But rest assured that the student experience with Pronto is just about identical to what you see on the faculty side.
  • On mobile devices, Pronto will not show up within the Canvas app or inside of Canvas in a mobile browser. Use the free Pronto app (search your app store for “Pronto: Team Communication”)
  • If you manually add anyone to your Canvas class, they won’t be part of the Pronto group that includes you and your students unless you do one of the following:
    • In the Add People process in Canvas, be sure to click the Section drop-down menu and choose the section that ends in -SURF
    • If you’ve already completed the Add People process and need to have someone (such as an SI tutor) interacting with your students in Pronto, go to the Canvas course’s People roster, find the name, click the three dots at far right, choose Edit Sections, and then select the section that ends in -SURF

Here are some excellent additional Pronto resources:

Credits

Thanks to Fabiola Torres of Glendale CC; MiraCosta’s Tanessa Sanchez, Serena Mercado, Mariana Silva, Dawn Bell, and Kristi Reyes; and Matt Baugh from Pronto for resources that helped to develop this page.
Spring 2026 Online Education @ MiraCosta

Dear colleagues, happy 2026! Please see below for reminders of resources to help you and your students to succeed in online environments this spring. If you didn’t see my email last week with updates about new and useful tools for getting your Canvas courses ready for the semester, I’d invite you to first check that out. And definitely look for the online ed Flex workshops coming this week.

Support for You

  • Our Canvas start-of-term checklist can help you prepare your classes. New to Canvas? We have lots of resources to help you get started.
  • The TIC website is a great starting point for all kinds of information and support for teaching with online technologies – see the last section of this email for specific TIC links to MiraCosta technologies supporting online teaching and learning. 
  • Ongoing faculty support – You can set a meeting with Instructional Designer Nadia Khan, for help with Canvas and teaching with tech. We have another instructional designer also available for 1-1 support, Stephanie Kelley, especially for faculty working on use of OER/ZTC course materials.
  • Tech Support – Canvas options include 24×7 phone and chat support. Just click the Tech Support button at lower left in Canvas! Zoom and other MiraCostatech support for faculty is available through the MiraCosta employee help desk.

Expectations and Recommendations for Faculty Teaching Online

Support for Your Students – Please help your students to be aware of and make use of these important services and resources!

  • Student Online Academic Readiness workshops – In collaboration with the library, I’ll be offering a number of these across the first nine weeks of the term – see all dates and times on the MiraCosta Online site and in Canvas announcements. These workshops engage students with resources MiraCosta provides to support them, as well as habits and attitudes of successful online students. Encourage your students to attend and, if you like, find out which of your students participated in order to incentivize their attendance. Faculty are welcome to attend as well!
  • Technology Needs – Be sure to share the form for students to fill out if they need a laptop and/or wifi hotspot to succeed this semester.
  • Tech Support – At lower left in Canvas is a button for students to quickly access Tech Support options, including 24×7 phone and chat support from Canvas, and our local MiraCosta student help desk.
  • Online Student Support Access Points – the Student Support Hub in Canvas, accessed via the Student Support button on the left in Canvas, gives quick access to online support from the library, Learning Centers, counseling, career center, open computer lab staff, student help desk, health services, CARE team, and more! The Ask the Spartan chat integrated into MiraCosta’s website provides both automated responses and the opportunity to connect to Live Chat with staff from many student support areas. The Help Hut and Online Education webpages are also great starting points for students to connect with all kinds of support services when they’re not in Canvas.

MiraCosta’s Online Education Tools

Select the links for a detailed MiraCosta-specific overview (and often, recorded Flex workshops) for each tool below. Please don’t hesitate to contact me if you have questions about these or other resources.

  • Canvas – we all use Canvas, right?
  • Adjust-All and TidyUP– make it easier to copy and reuse Canvas courses
  • DesignPLUS – a brand new Canvas visual design tool
  • Zoom – if you’re using Zoom, make sure you’re using a pro Zoom account through MiraCosta. 
  • Canvas Studio – enables faculty and students to create videos while inside Canvas. Faculty can create interactive discussion or quiz activities based on video. Auto-captioning and caption clean up tools are high-quality and easy to use, but not automatic!
  • Pronto is an incredible mobile-friendly and Canvas-integrated messaging platform that’s ready to use in every course.
  • Pope Tech helps faculty detect and correct accessibility issues within Canvas. The PopeTech dashboard tool (via the Pope Tech Accessibility course menu item) provides a course-level guide for addressing all accessibility issues in a course in one place.
  • SensusAccess provides multi-format course material accessibility and file type conversion options for students. If you notice an S symbol next to your page title and next to items in the Modules view, that’s SensusAccess.
  • Perusall is a social annotation tool available within Canvas that makes it easy for students to comment/discuss right on a text, document, or image.
  • Lab Archives Electronic Notebook is an online notebook especially useful for translating lab manuals and student notes/work into the online environment.
  • WeVideo (formerly PlayPosit) – This video interaction tool offers more complexity and options than Studio. Studio is a great place to start, but if you’re looking for more types of interactivity to add to your videos, this is a great option. 
  • Turnitin – help students learn to properly cite sources and avoid plagiarism. Also provides grading and peer review tools for written work. Turnitin has included an AI detection capability for instructors, but please beware of false positives should you use it. Most experts agree that AI detection tools are extremely unreliable.

Professional Learning for Online Teaching – Spring Possibilities

Don’t hesitate to reach out if you have any questions! Best wishes for a great spring!

 – Jim

Jim Julius, Ed.D.
Faculty Coordinator, Online Education

MiraCosta Course Design Tool Updates

Dear MiraCosta faculty,

As you create and update spring classes in Canvas, there are some important updates that happened in the last month which you should be aware of!

  1. We’ve added DesignPLUS to Canvas. This is a powerful tool to make it way easier to design your classes with visual style and consistency. DesignPLUS gives you editing tools that used to require diving into HTML, as well as templating tools to make it easy to create a visual identity and structure that you can repeat across your course elements. Check out our TIC page on DesignPLUS to learn more. We also have FLEX workshops (via Zoom) on DesignPLUS on Monday and Tuesday (both days 11-12).
  2. Turnitin users: the Turnitin 1.1 Canvas integration is no longer available. We already had Turnitin 1.3 integration available and most of our Turnitin users were already using either that (if you like using Turnitin’s grading/feedback tools) or the Turnitin Plagiarism Framework (which uses Turnitin for similarity checking but Canvas grading and feedback tools). If you were still using the Turnitin 1.1 tools, you will need to update your courses. For more info, see our Turnitin overview as well as our Turnitin 1.3 and Turnitin Canvas Plagiarism framework guides.
  3. PlayPosit users (or anyone interested in a tool to create engaging assessments and interactions embedded in video): PlayPosit has been renamed WeVideo and now includes the ability for instructors to directly record instructional videos rather than having to import videos created elsewhere. Existing PlayPosit videos and activities should continue to work seamlessly in Canvas. We are still learning more about this upgrade and will soon have more updated information on our PlayPosit/WeVideo TIC page. If you’d like to learn more about this powerful tool for instructional video and interaction, you can register for a one hour TechConnect webinar: 1/20 at 11:30 am or 1/27 at 11:30 am.
  4. Canvas tutorial links were updated. This is the second time Canvas has done this in the last several years. If you include Canvas tutorial links in your courses to help your students (a great practice!) and those links predated the last time Canvas did this, they may no longer work. Using the Canvas link checker tool (see below) can help you catch this.

Also keep in mind these tools as you build, reuse, update, and polish courses:

  • Adjust-All enables bulk updates of course due dates, announcement timing, etc.
  • TidyUP helps strip out unneeded, outdated files and content from Canvas courses.
  • the Canvas link checker is always an important tool to use when copying forward old courses for reuse – it will quickly help you identify links which are no longer working
  • the PopeTech Dashboard is a great way to make sure your course content is fully accessible – and remember that this is an absolute requirement for all Canvas classes based on federal regulations that take effect this spring.

I’ll send out more general reminders with my comprehensive start-of-term email soon, but wanted to get this to folks who may benefit from this info now.

Jim Julius, Ed.D.
Faculty Coordinator, Online Education

WeVideo (formerly PlayPosit) in Canvas

WeVideo Flex Workshop Recordings & Updates


WeVideo (formerly PlayPosit) is an interactive video learning tool that is fully integrated with MiraCosta College’s Canvas. WeVideo allows instructors to create activities using videos from Canvas Studio, 3C Media, YouTube, Vimeo, or other video sources. WeVideo now includes access for instructors to the WeVideo’s Multimedia tool to create instructional videos, podcasts or set up assignments for learners to demonstrate learning through media.

Create an Assignment in Canvas with WeVideo interactivity?

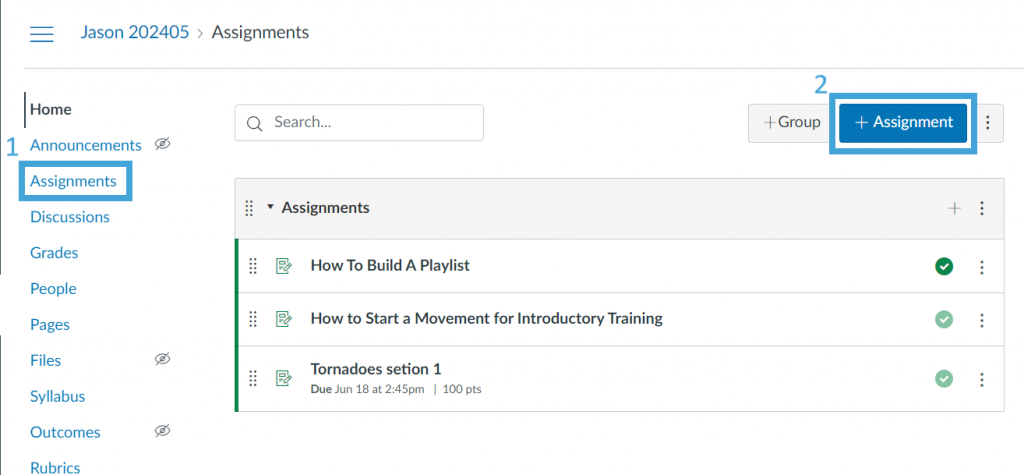
  1. In your Canvas course, click on Assignments
  2. Then + Assignment
1. Assignment, then 2. + Assignment

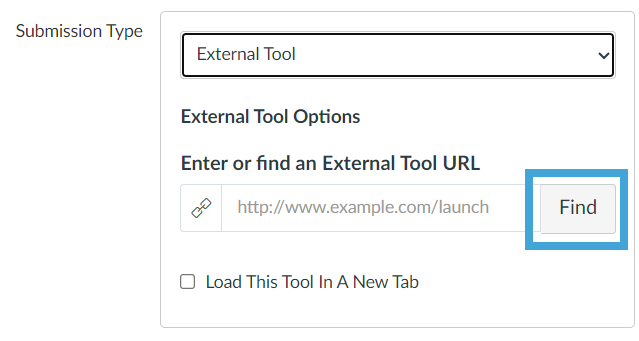
3. Enter the information for the assignment, change the submission type to External Tool, and click Find.

External Tool, then click Find button

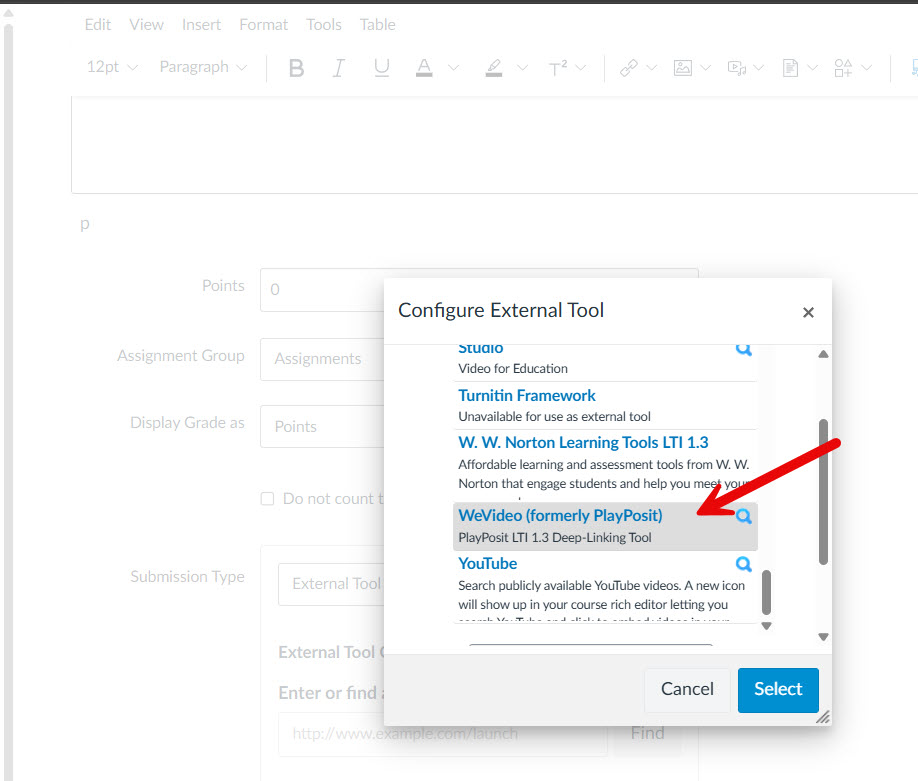
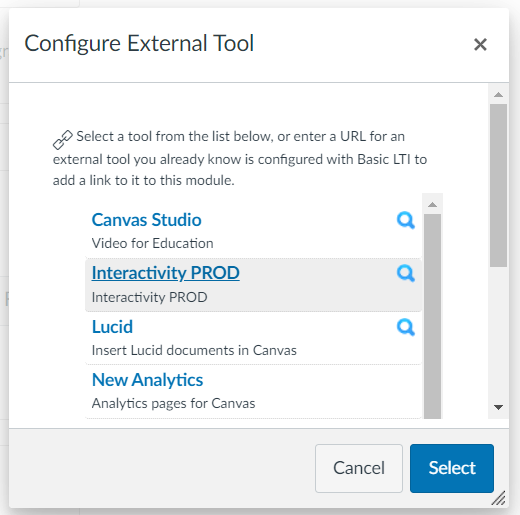
4. Select the WeVideo (formerly PlayPosit) Interactivity tool from the list.

Click WeVideo (formerly PlayPosit)

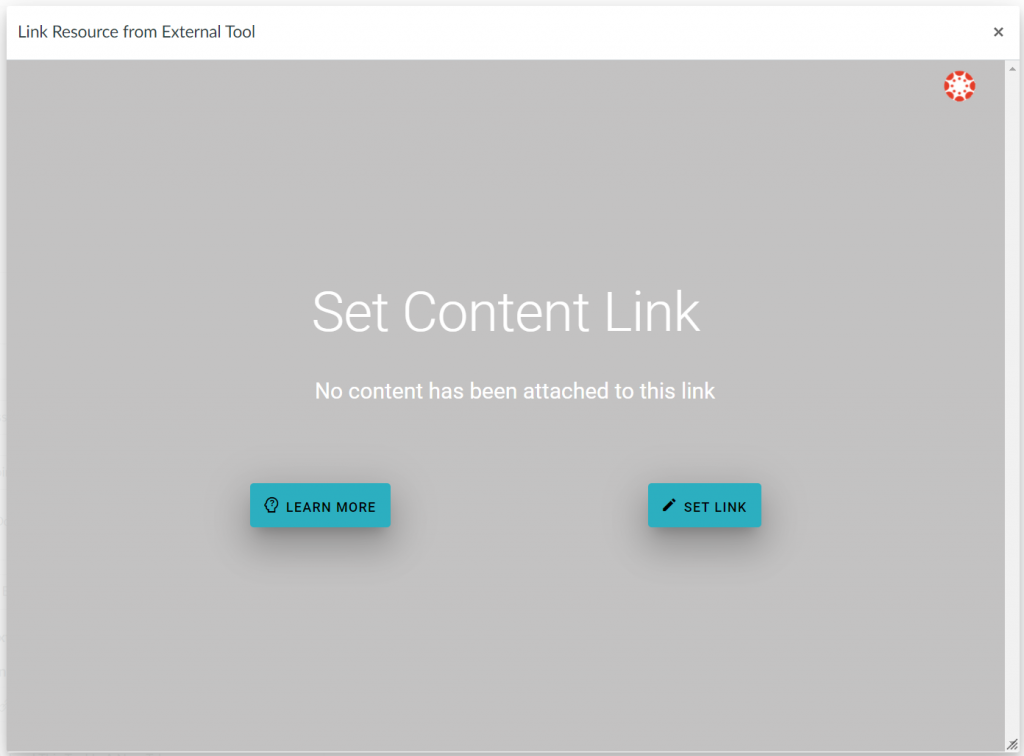
5. Click the Set Link button on the gray screen.

Set Content Link page - Click Set Link

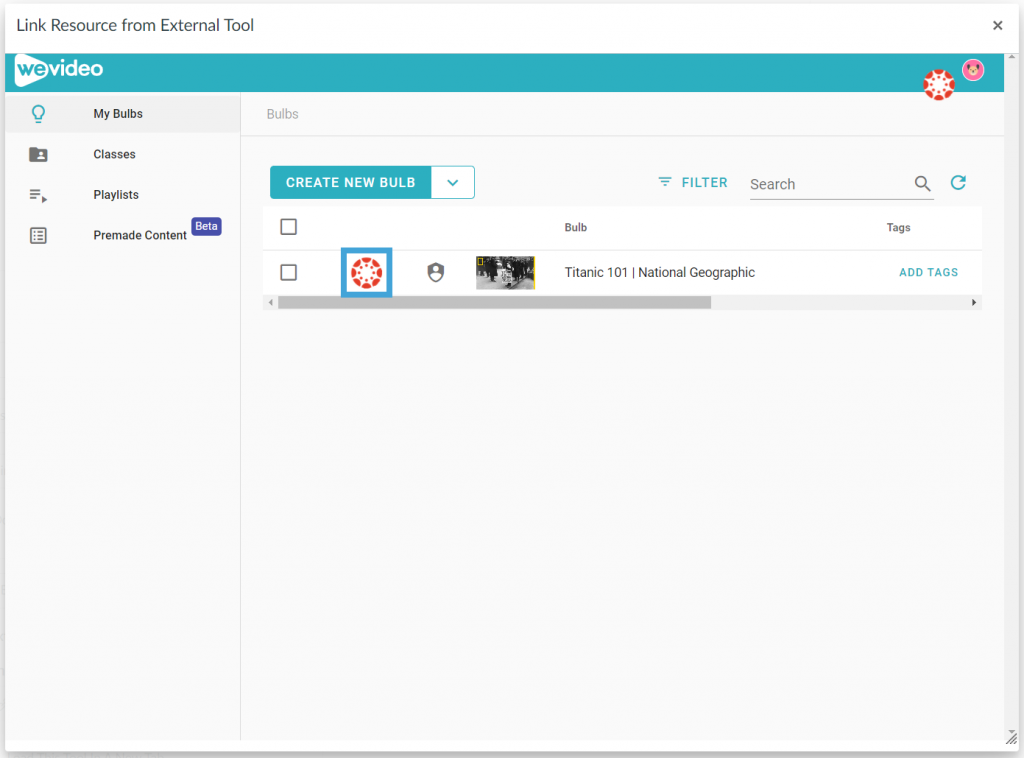
6. Click on the Canvas icon in front of the desired interactive video or playlist and click Link to assign it.

  • If you do not have an interactive video in your account yet, please follow the steps in this article to create your first interactive video.
WeVideo page - Click the Canvas Icon

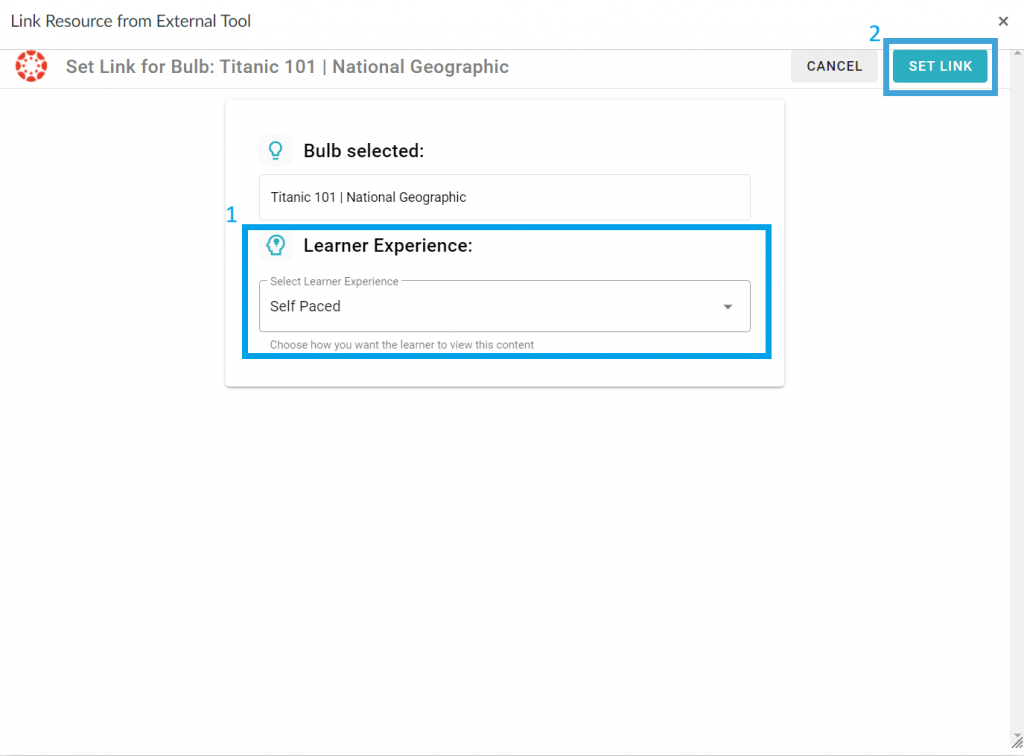
7. Select the learner experience to be Self Paced or Live Broadcast, then click Set Link.

Click the Set Link button

8. Click Select to complete the process.

Click the Select button

Adjust the grading and due date for the assignment in Canvas. Please note that if you would like to have the grades synced, the points for the assignment in Canvas must be greater than 0.

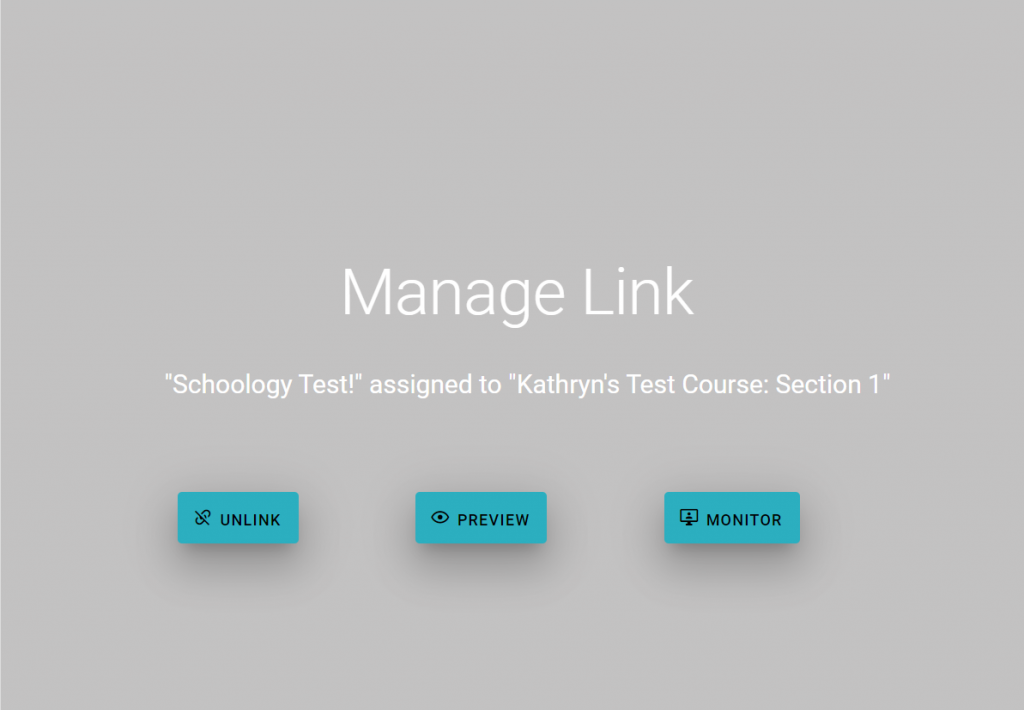
After the content is linked, you will see the following window when launching the assignment as an instructor. There will be three options:

  • Unlink: unlink the content from this assignment so you can assign it to another assignment in this class if needed. Once the content is unlinked, the learners’ grades will be archived and not visible from the monitor page. They will need to complete the activity again in the new assignment to gain their grades.
  • Preview: Preview the content that is linked to this assignment.
  • Monitor: Open the monitor page for this assignment for you to review and adjust learners’ grades. Please see the next section for more information.
Manage Link page within WeVideo

Monitor Learners’ Grades from Canvas

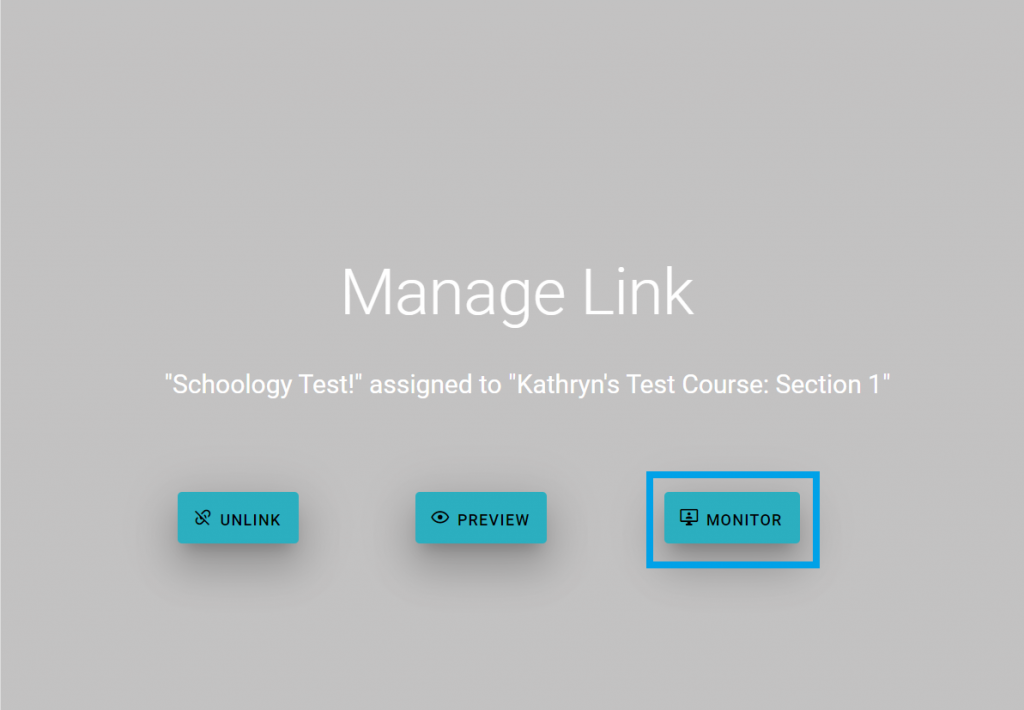
Click the Monitor button on the gray window to launch the monitor page.

Click the Monitor button

On the monitor page, you can see learners’ names, responses to each question, and their grades.

The monitor page within WeVideo

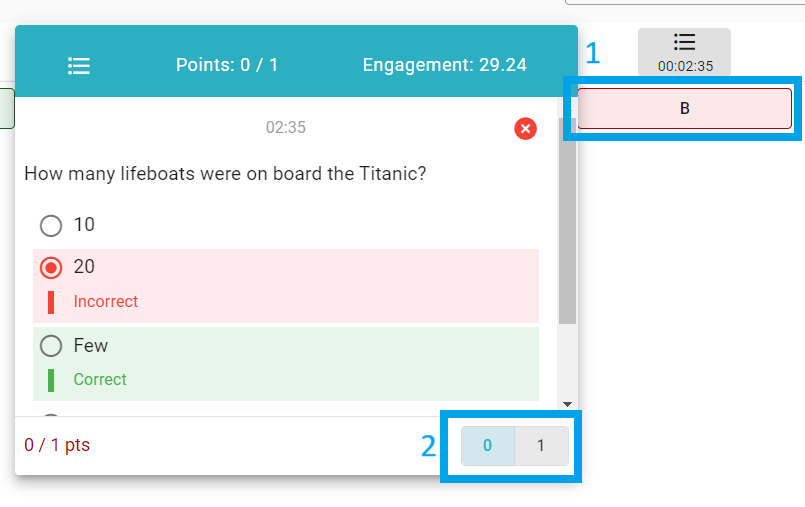
If you need to update learners’ grades or provide points to manually graded questions, click the response and assign points to it.

Points page within WeVideo

After grading, please ensure that you click the Sync Grades button at the top to sync the most updated grades to the Canvas grade book.

Sync All Grades button within WeVideo

For additional information refer to the WeVideo – ‘How do I assign Interactivity content to Canvas?’ guide

New RCE


WeVideo Support and Help

WeVideo has support services for your questions or problems.

Turnitin for Canvas LTI 1.3

MiraCosta College has an unlimited license to Turnitin, GradeMark, and Peer Review, and Turnitin is available within Canvas. No separate login or password is required for faculty or students. You have two options for how to use Turnitin with Canvas.

The primary difference between the two is that the Turnitin LTI 1.3 integration is best used if faculty prefer to use Turnitin for grading and feedback; the Turnitin Plagiarism Framework is preferred by faculty who want Turnitin for plagiarism prevention but like to use the Canvas grading and feedback tools.

Create a Turnitin LTI 1.3 Assignment in MCC Canvas:

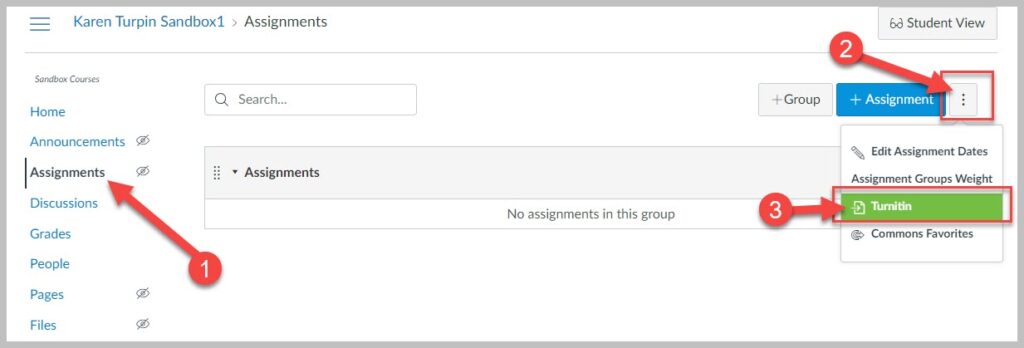
  1. Click on Assignments from the course navigation menu.
  2. Click on the 3 Dots Assignment Settings button.
  3. Click on Turnitin in the menu.
Turnitin LTI 1.3 in MiraCosta College Canvas

Turnitin Canvas LTI 1.3 Resources


Testing a Turnitin Assignment with your MCC Sample Student

Turnitin is an LTI tool that is globally installed on our Canvas system. LTI tools are not native to Canvas so they will not work in the internal Canvas Student View. You must log off of Canvas, as an instructor, then log on with your MCC Sample Student account. Now you will be able to experience a Turnitin assignment within your Canvas course as a student.

Additional information

1 2 3 4 5 … 14