MiraCosta’s Learning Centers provide great online tutoring for all students, available in Canvas through the Student Support Hub. For subjects and times where local online tutoring may not be available, the next option is eTutoring through the Western eTutoring Consortium. A third option with even more subject and time availability is NetTutor, available through the California Virtual Campus (CVC-OEI).
Regardless of which online tutoring services may best benefit your students, these are recommended practices that faculty use to help more students benefit from tutoring:
Mention online tutoring sources in your syllabus
Embed reminders about use of tutoring within instructions for assignments
Provide specific references to the opportunity for tutoring in your feedback/communication with students
Normalize tutoring as an option that can support everyone
NetTutor provides support for just about any academic subject, up to 24×7 for the most popular subject matter, and can be made available via your Canvas course menu. The link opens an interface where students select their subject for NetTutor help, with no additional login required. Students can access both the STAR-CA tutoring consortium from California and the full complement of professional NetTutor tutors.
How can you help students take advantage of NetTutor?
First, please keep in mind that if your subject is supported by local MiraCosta Learning Center tutors, you should direct your students to that support primarily. If you do want your students to consider NetTutor support:
Also with NetTutor, each instructor may specify “Rules of Engagement” that inform tutors about the approach and resources you would like them to use when working with your students. If you would like to do this, contact Jim Julius for more information.
Adding NetTutor to your Canvas course menu
Once you add NetTutor to your course menu following the directions below, click the NetTutor link to verify that your subject is available.
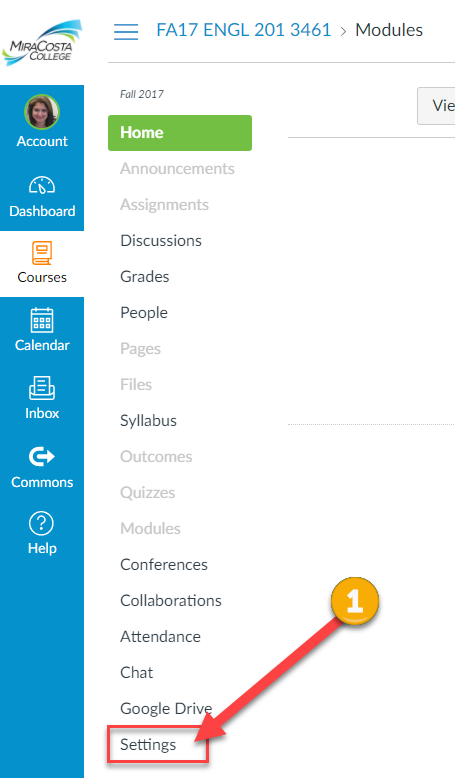
1- Click Settings at the bottom of your course menu
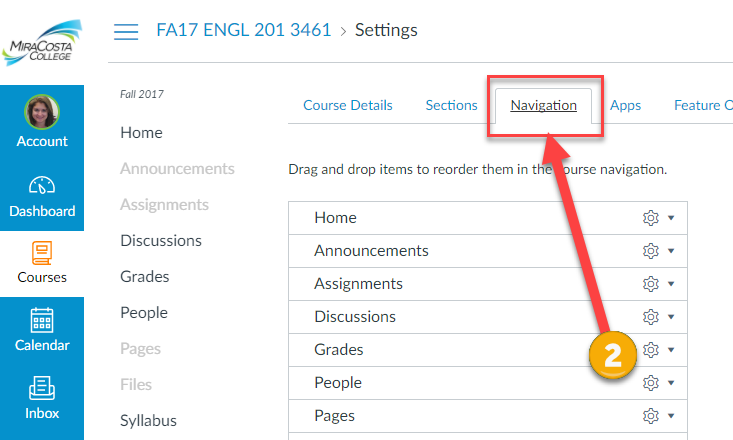
2- Click the Navigation tab
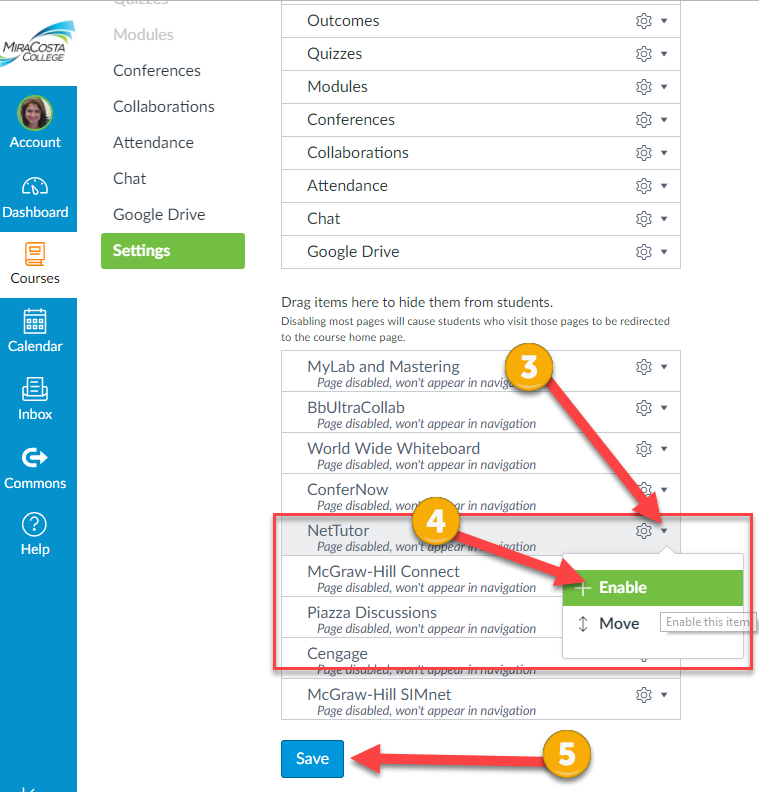
3- Click the gear icon to the right of NetTutor 4- Select +Enable 5- Click the Save button
Each semester I send out “midsemester grades” to all of my students. Students appreciate the heads up, and it often leads to conversations that benefit the students.
For those interested in sending out a “midterm report” regarding your students’ current grade in the course… consider using the message option in the “New Analytics” feature. With it, you can customize messages to go out to students based on their grade percentage (e.g., between 90% – 100%, 80% – 89%, 70% – 79%, 60% – 69%, etc.). This is an excellent way to let students know how they are currently doing in the course.
First Step: Grading and the Canvas Gradebook
Complete all grading 24 hours before sending out the midterm reports. The ‘New Analytics’ feature does not read directly from the gradebook… it has a lag of 24 hours before it is updated. Once you have finished grading… wait 24 hours before sending out the midterm reports.
As part of the grading, place a zero for any assignments overdue that are not submitted (otherwise, they are not included in the grade calculations)
Second Step: Enable the New Analytics Feature
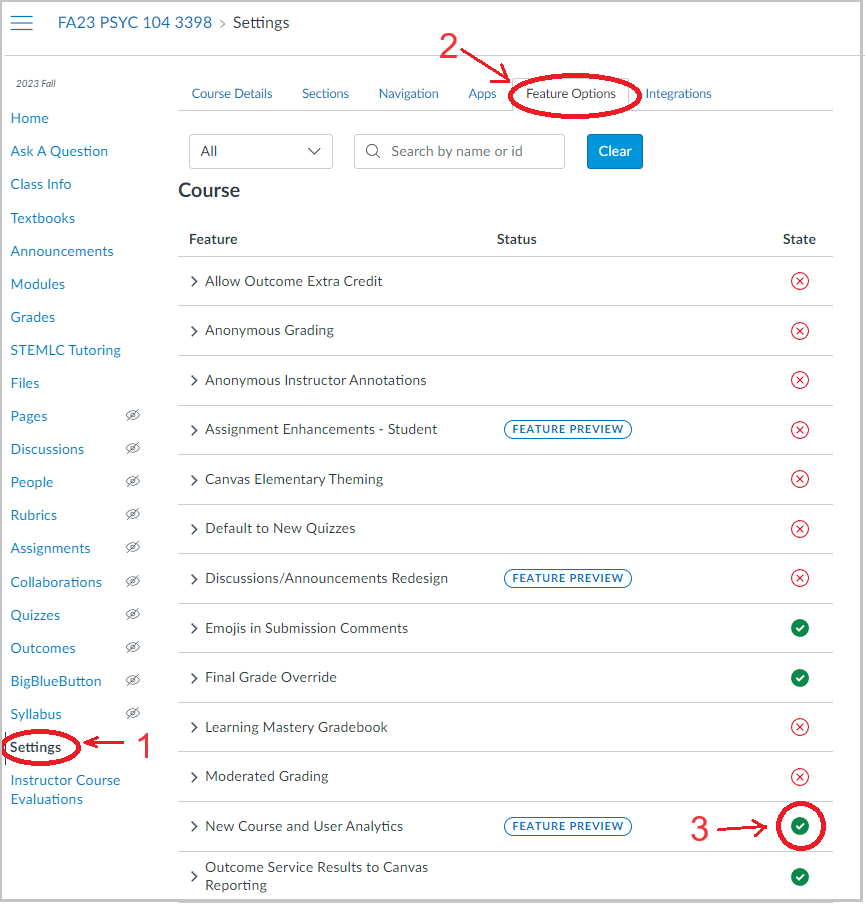
Click on the ‘Settings’ option in your Canvas Course
Click on the ‘Features Options’ tab along the top
Click the ‘New Course and User Analytics’ option
Third Step: Open the New Analytics Feature
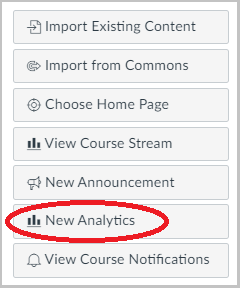
From the Home Page of your Canvas course, select ‘New Analytics’
Fourth Step: Prepare to Send Out Messages
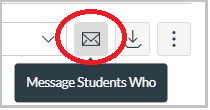
Click on the ‘Envelop’ icon.
Fifth Step: Prepare to Send Out Messages
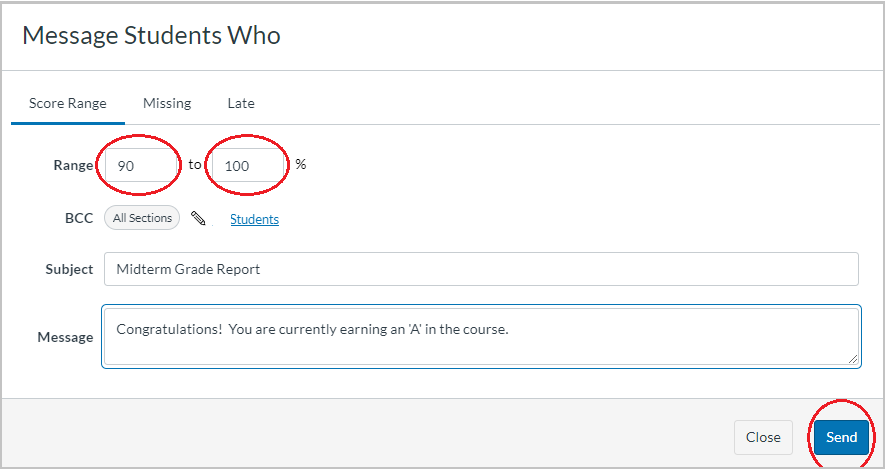
Provide the lower and upper range for grade percentage.
Type the Subject line and Message. Adjust both to be meaningful and helpful to the students receiving the message. I tend to say ‘Congratulations’ for all passing grades (A, B, and C), and let students with grades not quite passing that making a change now could help them to pass the course. For students significantly below passing, I share that a bigger ‘mid-course’ correction is needed, but that it remains within their options. Share resources, provide advice, and cheer them on.
Click ‘Send’
Repeat this process for each grade range you’ll be using (e.g., 90 – 100, 80 – 89, 70 – 79, 60 – 69, etc.).
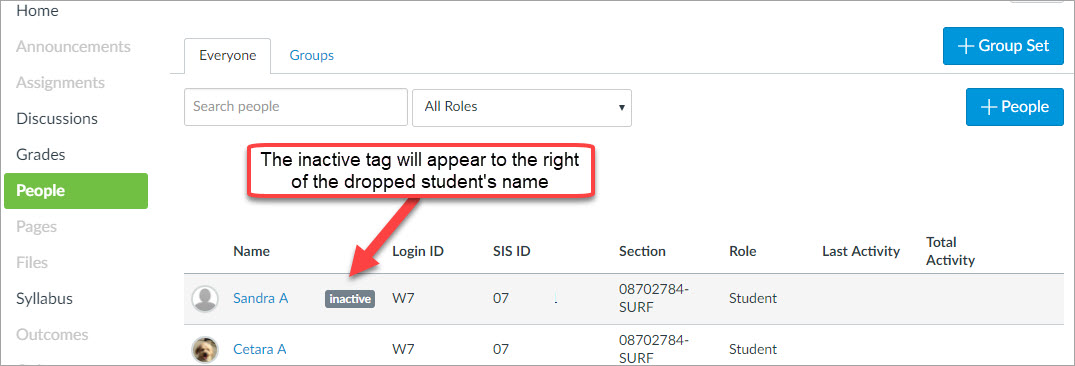
Students that drop a course in SURF after the semester has started remain on the People roster in Canvas, but with an inactive role. Students in the inactive role do not see or have access to the Canvas course, but faculty may access activities and grades of an inactive student. This is particularly helpful when a student grade is challenged or if a faculty member is evaluating whether a dropped student is eligible to be reinstated to a course.
People
Within the People roster on Canvas, students that have dropped will have the inactive tag displayed to the right of their name. This identifier will remain next to the student’s name throughout the course unless the student is reinstated to the course. Click the student’s name to access additional information about the student and review the student’s completed activities.
You cannot hide inactive students in the People roster.
Please download a PDF or download a Word version of this guide for future reference as you develop and teach merged Canvas courses.
Faculty may request to merge Canvas courses when they are teaching multiple sections of the same course in order to more efficiently share the same content across course sections, freeing up time for other instructional activity. This must be done prior to the start date of the course sections. For detailed steps on how to request combining of course sections, download the Combine your Class sections in SURF for Canvas guide. However, there are critical privacy issues faculty must be aware of if they choose to combine sections in Canvas.
*NOTE: If instructors combine multiple sections in Canvas, they are not able to offer an Honors Contract in that course.
According to Family Educational Rights and Privacy Act (FERPA) regulations, students cannot have access to student information (including the fact of their enrollment) of students in course sections other than their own (with the exception noted below). Because of this requirement, students are not allowed to interact within a Canvas course with students from another course section.
Canvas limits the visibility of students from other sections in a merged Canvas course. However, this does not cover all Canvas tools, so if you request to merge Canvas courses, you’ll need to take additional steps to protect your students’ privacy, as outlined in this document.
NOTE: FERPA restrictions do not apply to a merged Canvas course if students physically meet in the same classroom at the same time (i.e. “true cross-listed courses”). Course sections that meet simultaneously typically are combined in Canvas by default, and this document is not relevant for those merged courses.
What Canvas Does for You
In Canvas courses merged upon faculty request, students are prevented from seeing students in sections other than their own in
the full roster view of the People tool,
and the Inbox (Conversations).
[Technical note: MiraCosta enables this by setting the limit_section_privileges field to true In the enrollments feed file for students in sections being combined in Canvas.]
What You Must Do to Maintain FERPA Compliance in a Merged Canvas Course
Click Settings in your course menu and:
Under the Navigation tab, be sure that the Chat and Conferences items are hidden from students. If they are active (appearing in the top grouping of navigation items), drag them to the lower grouping or click the gear icon at the right of each and click Disable. Be sure to scroll down and click Save at the bottom.
Under the Course Details tab, scroll down and click more options. Make sure that: Let students create discussion topics is NOT checked Let students organize their own groups is NOT checked Disable comments on announcements IS checked
Click the Update Course Details button at bottom.
Ensure that each section has its own separate discussion
For graded discussions, restrict each discussion to an individual section using the Assign to option. See Canvas guide for details. See further details on section restriction under the What You May Do section below.
For ungraded discussions, use the Post to option (immediately below the discussion description) to select an individual section for the discussion.
Note – if you want each section to engage in discussions about the same topics, simply Duplicate the original discussion and modify it so it is available to a different section of students.
If/when you use Pronto
You’ll need to use the separate Pronto groups associated with each section rather than messaging with Pronto to the entire combined class. Some notes on this process from MiraCosta professor Serena Mercado:
After publishing the combined Canvas course, the merged course showed up on my Pronto list.
In Pronto, when expanding the course (click the arrow on the right of the course name), it was divided into two sections (with REALLY long names)
Hovering over each name makes three vertical dots appear to the right of the name.
If you click on the three dots, you are given the option to nickname the individual sections, so they are more easily identifiable.
If/when you create Groups
Select the option to Require group members to be in the same section when creating a group set. See Canvas guide for details.
If/when you create Collaborations
Be sure to add students to Collaborations who are enrolled in the same course section. The Collaboration setup screen doesn’t display section information for students, so you will need to refer to the People area.
If/when you send a Canvas Inbox message to students from multiple sections
Select the option to Send an individual message to each recipient. This will send a separate copy to each recipient and hide the names of the recipients in the message header. You may also compose messages addressed to all members of a specific course section.
If/when you offer synchronous (live) online sessions (e.g. use Zoom)
If a synchronous meeting is required, hold separate synchronous meetings with each section. If a synchronous meeting is optional, you may hold one meeting for both sections, but make sure students understand how to participate anonymously. If you record a synchronous meeting where student identities are revealed, share the recording only with the section that participated in the meeting. If you wish to share a recorded synchronous meeting more widely, you must ensure that student identities are not revealed. Please review the Guidance for Synchronous Instruction at MiraCosta College to Protect Student Privacy document for more details.
What You May Do: Setting Calendar Events and Assignment Due Dates by Section
Note: This section is not required for FERPA compliance but may be helpful for managing a merged course if you would like to create differentiated events/activities for different sections.
The following Canvas Guides will help you create Canvas activities/assignments specific to a particular section within a merged course:
(Discussions must be separated by section – see notes in the What You Must Do section above.)
Note that when creating events/activities that are differentiated by section, you will need to select the section name in the Assign to area, which displays only a few options and is not scrollable. If your desired section is not displayed as an option, you will need to type in the section name until it shows up as an option to select.
Section names can be seen if you click Settings in the Course Menu and then the Sections tab. You may also click People in the course menu to see which section each enrolled student is assigned to. Sections with students have names ending in -SURF; to include your test student account in any differentiated activity in a merged course, you would also need to include one of the -OTHER sections available within the merged course.
Acknowledgements
Portions of this document are adapted from material originally developed by Seattle University and modified by the Grossmont-Cuyamaca Community College district. Additional portions are adapted from material developed by Indiana University and modified by Cornell University.
I hope your fall is starting well! If you’re looking for a boost to your communication with students but haven’t tried Pronto, this might be a good moment to learn more about it!
Pronto’s a messaging tool that’s integrated with Canvas and also has a fantastic mobile app. We’ve had Pronto at MiraCosta for over 2 years now, and (I just checked) over 9600 MiraCostans have sent almost 176,000 messages with Pronto!
To learn more:
Check out our TIC page on Pronto, which includes links to recorded MiraCosta faculty-led workshops, Pronto guides, and everything else you’d need to get started.
Join our Canvas Pronto Practice course to get access to a Pronto conversation sandbox/playground with other Pronto-interested MiraCosta faculty.