Canvas Studio (Recording, 57 minutes) – 1/17/2023 workshop by Nadia Khan and Karen Turpin – Additional Resource:Presentation Slides
Studio is a video tool integrated inside of Canvas, available to all faculty and students.
With Studio:
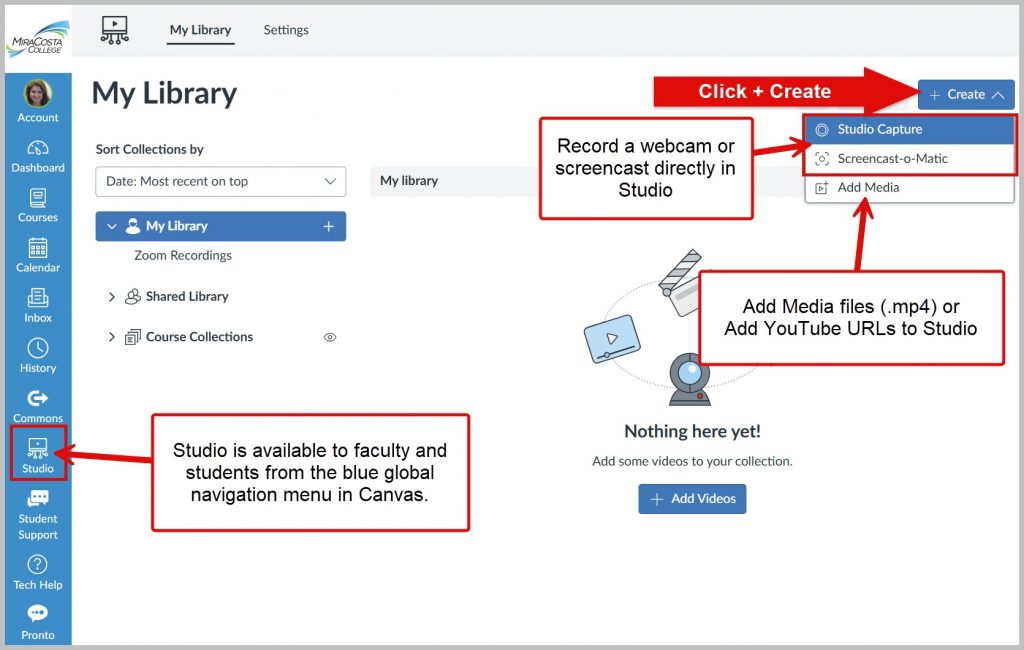
Faculty and students can easily record webcam and screencast video within Canvas
Faculty and students can create and manage a library of videos for use in Canvas (and to share outside of Canvas)
Faculty can create discussion activities that are based on video (discussion comments are tied to specific points in the video)
Faculty get data on student viewing of video
Faculty can add quiz questions into videos; students respond while watching the video; results go directly into the gradebook
Students can submit video assignments; faculty can provide feedback directly on specific moments in the video
Videos can be automatically captioned and the captions can be easily edited
Studio is available to faculty and students from the blue global navigation bar in MiraCosta Canvas.
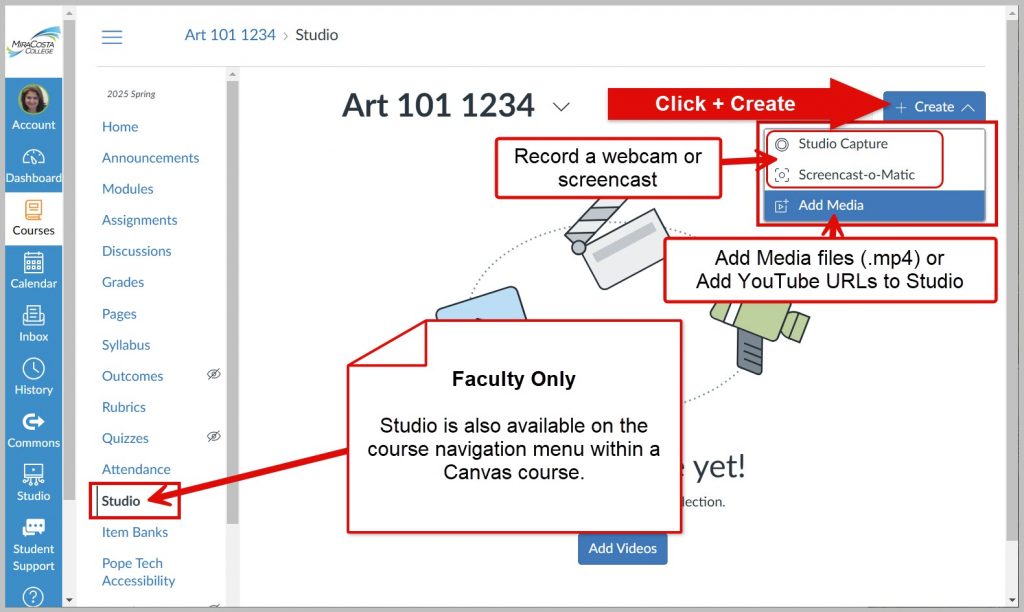
Studio is also available to faculty only on the navigation menu within a MiraCosta Canvas course to RECORD or ADD video content.
Within the Canvas Rich Content Editor, faculty and students can select Studio from the second row of icons to add a Studio video they’ve previously recorded, or to create and use a webcam or screencast video right there.
Canvas Studio supports an integration with Zoom that allows Zoom to automatically upload recorded meetings into Studio. Here is how you can authorize the Studio Zoom integration in your Canvas Studio Settings.
Zoom provides a reliable, easy-to-use, mobile-friendly tool for live, recordable online presentations, meetings, and discussions with audio, video, chat, screen sharing, polling, and more. It can be used within Canvas or independently.
Zoom Pro is available to all MiraCosta faculty and staff at no charge. Students don’t use the Zoom Pro account but can use free Zoom basic accounts. Nobody at MiraCosta should be paying anything to use Zoom!
The version of Zoom that MiraCostans use changed after the fall 2020 semester; MiraCosta Zoom is now accessed at miracosta-edu.zoom.us rather than conferzoom.org or cccconfer.zoom.us. Faculty need to sign in to Zoom with their MiraCosta College login and password to obtain unlimited pro (“licensed”) access to all features of Zoom, including:
Unlimited meeting lengths and very large numbers of attendees
Recordings “in the cloud” so that you do not need to manage large files of your recorded meetings
Auto-transcription of your cloud-based Zoom recordings
This page includes basic technical how-to information and resources on using Zoom in general, and Zoom use in tandem with Canvas. Please see our separate Teaching with Zoom at MiraCosta College page for more detailed tips about teaching securely, effectively, and accessibly with Zoom.
Log On to Zoom at MiraCosta College
To access your Zoom account via the web go to: https://miracosta-edu.zoom.us Sign in with your MiraCosta College employee account and two-factor authentication (2FA).
How do I get a Zoom account? If you had a pro Zoom account through ConferZoom prior to 2021, it should have been automatically migrated to the MiraCosta Zoom, and there’s nothing you need to do. If you did not previously have a Pro Zoom account, and need to create a MiraCosta Zoom account, sign in to the MiraCosta Help Desk in the Portal and select the User Accounts option.
What if I’m having trouble with my Zoom account? Sign in to the MiraCosta Help Desk in the Portal and click the User Accounts button to request help.
What happened to my Zoom recordings made before 2021? They are still in your Zoom account! The old links to Zoom recordings will still work, but a message will briefly appear when people click an old link. If you update an old recording link with the new MiraCosta Zoom URL (replace cccconfer.zoom.us with miracosta-edu.zoom.us in the link) it will work seamlessly.
What happened to my recurring Zoom meetings I set up before 2021? Similar to your recordings, old links to recurring Zoom meetings will still work, but a message will appear when people click an old link. If you go to your Zoom account, you’ll see that your meetings have been migrated in, and you can get a new invitation. You can also simply update a meeting link created before 2021 with the new MiraCosta Zoom URL (replace cccconfer.zoom.us with miracosta-edu.zoom.us in the link).
What happened to Reports from Zoom meetings held before 2021? They are gone, sorry.
How much storage do I have for Zoom recordings? As of spring 2021, there is not a limit; however, this may change in the future if we do not manage our recordings well. Please delete recordings that you do not need.
Zoom Documentation
The following Zoom trainings, documentation, and resources can help you stay informed:
You can schedule and share Zoom meetings and recordings directly within Canvas, using the Zoom integration. To get started and learn more about the Zoom/Canvas integration, see directions below.
Note: You may also share individual Zoom meeting links and recordings in Canvas without using the integration.
Canvas Integration with Zoom
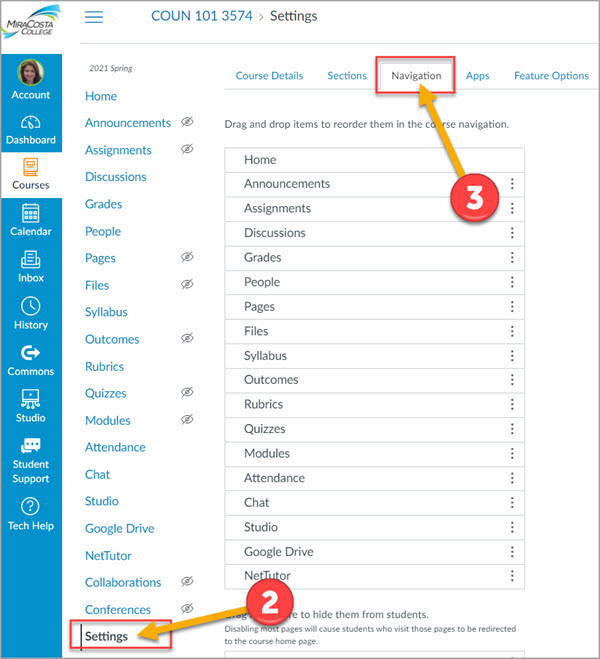
Enter your Canvas course
Click Settings on the course menu
Click the Navigation tab
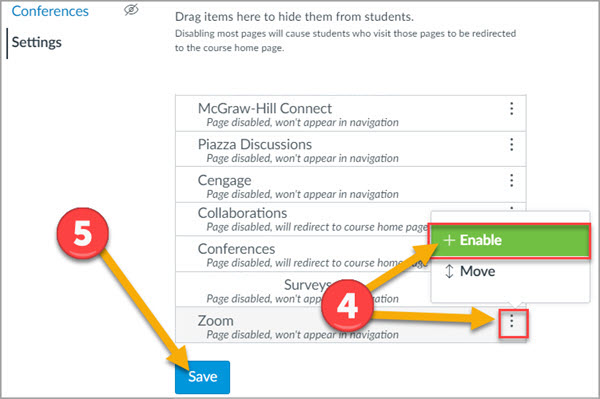
Click the 3 dots to the right of Zoom and select Enable.
Click the Save button
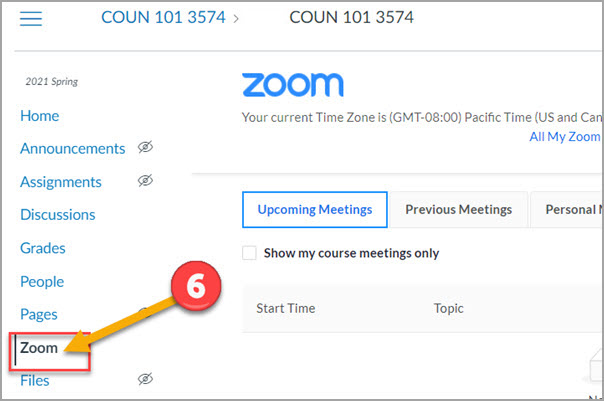
Click the Zoom course menu item which will appear in your course menu.
Now you can schedule and access Zoom meetings from inside of Canvas.
Viewing All My Zoom Meetings in Canvas
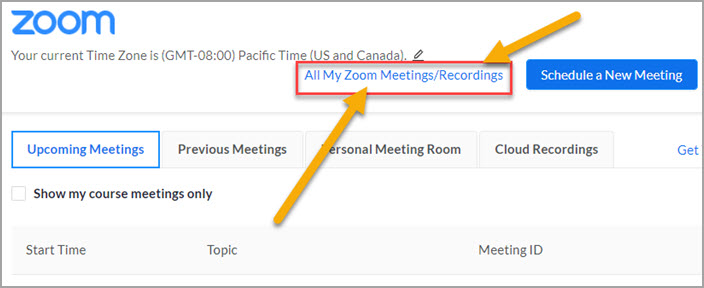
When you first enter Zoom on Canvas you will see only the Zoom meetings associated with the Canvas course you entered from. To see and access all Zoom meetings within your account, click the link ‘All My Zoom Meetings‘.
SensusAccess offers two ways for MiraCosta faculty, classified professionals, and students to convert all kinds of documents and files into alternative and more accessible formats:
A website in the portal (MiraCosta login required) that allows you to upload files including Word or PPT documents, scanned images, PDFs, or web pages and generate accessible alternative types of files and media, including PDF, audio, e-books, Braille, and large print. This helps meet accessibility standards and enhance inclusion by supporting preferences and needs of diverse users.
A Canvas integration that automatically enables conversion of files uploaded into Canvas into alternate file and media types.
Key Features
Automated conversion of files into a range of alternative media and file formats
Remediation of inaccessible documents such as image only PDFs into accessible formats
Sensus Access in Teaching and Learning
For faculty, Sensus Access offers an important pathway to one element of Universal Design for Learning – enabling students to access course materials in the format that works best for them. Some examples of how students are likely to benefit from Sensus Access:
Conversion of Canvas pages or documents shared in Canvas into MP3 files for listening rather than reading
Conversion of course materials into formats that can be viewed offline, if the student does not always have reliable Internet access
Conversion of course materials into eBook format for students who prefer use of an eBook reader (such as a Kindle)
Faculty may choose to proactively use Sensus Access to generate alternative formats of course materials. Faculty may also, or alternatively, wish to remind students about the availability of Sensus Access to them, empowering them to make their own decisions about how and when to use this tool. For example, when faculty create an introductory screencast guiding students through the Canvas navigation and organization of a course, simply adding a few moments to point out the Sensus Access function on a Canvas page, and describing what it can do, can be a quick way to raise student awareness and agency!
Pope Tech is an accessibility remediation tool available to instructors in Canvas. This tool gives instructors a quick but powerful way to check for and fix common accessibility concerns in Canvas content. Ensuring your Canvas courses are free of accessibility concerns helps support inclusion and equity for all students, and also is a requirement of MiraCosta policies as well as state and federal regulations.
MiraCosta College has two Pope Tech Canvas LMS tools:
Accessibility Guide – a page-by-page accessibility checker and remediation assistant for Canvas
Accessibility Dashboard – a course-level dashboard allowing you to review and correct accessibility issues throughout an entire Canvas course
Pope Tech Accesibility Guide Overview (PDF) is a handy 2-page overview. You may also watch this 7-minute video for a helpful demonstration of how Pope Tech works in Canvas:
Instructor Accessibility Guide: Demo for Canvas LMS
Pope Tech Detailed Guidance
Click any of the items below to view more details, including video guides, for using Pope Tech.
What Canvas elements can be tested? What does Pope Tech check for?
What Canvas elements can faculty test with Pope Tech?
Most areas where faculty use the Canvas Rich Content Editor can be tested with Pope Tech:
Canvas pages
Syllabus
Quiz descriptions
Discussion Topics
Assignments
Announcements
To test a Canvas item for accessibility concerns, activate Pope Tech by selecting the button at left of the Cancel and Save buttons while editing any of the Canvas items above. Pope Tech works even when the item is not yet published.
What does Pope Tech check for?
If headers are present or skipped
Flags suspicious alt text for images (contains “image of”, “image”, etc.)
Color contrast between text and highlighted colored-background (Note: doesn’t check color contrast within images)
If font size is readable
Flags non-descriptive links such as “click here”, “link”, “more”, “read more”
Flags redundant links
Flags tables that lack at least one header and caption.
Flags YouTube, Canvas embedded video and Canvas embedded audio to bring awareness media will need to be manually reviewed for captions
Flags potential inaccessible files that need to be manually reviewed
How do I use Pope Tech?
Using Pope Tech is simple and intuitive.
Step 1: Open Pope Tech
To access the PopeTech Course Dashboard tool, click Pope Tech Accessibility in any Canvas course menu.
To test an individual Canvas item for accessibility concerns, activate Pope Tech by selecting the icon next to the Cancel and Save buttons on a Canvas item while using the Rich Content Editor.
Step 2: Use Pope Tech to Locate and Fix Accessibility Issues
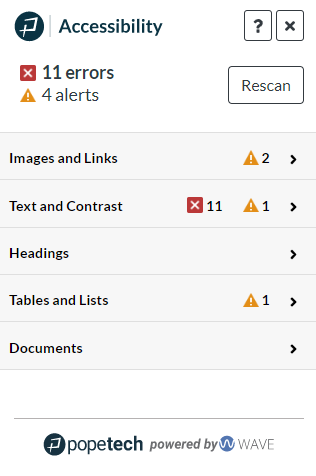
When Pope Tech is activated, the Pope Tech menu appears on the right-hand side of the screen. At the top of the interface, the number of errors and alerts will need to be addressed.
Errors are accessibility errors and should be looked at for remediation.
Alerts are suspicious areas. Alerts may or may not be an accessibility error. The user should review these and fix if necessary.
Rescan can be used once errors and alerts are fixed. This will allow the user to scan the page a second time and verify that all fixes were applied correctly.
Note: Files, videos, and audio will always be listed as alerts, as these require manual review with human eyes!
In the example below, we have 11 errors and 4 alerts.
In the Pope Tech interface, results are organized by the following categories:
Images and Links
Text and Contrast
Headings
Tables and Lists
Documents and Videos
Each of the categories can be expanded to show the errors or alerts. To view the content raising an error or alert:
Select the arrow displayed next to any category name. Once you expand a category, Pope Tech will display fields grouping together issues within that category.
Click any field to view detailed results and how to fix them.
Click a particular result to highlight the indicated content within the Canvas editor, enabling you to fix that content.
This quick (42 second) video demonstrates the process described above:
Video Demos: Fixing Alternative Text, Color Contrast, and Table Errors
Fixing Alternative Text
Alternative Text errors are listed in the Images and Links category of the Pope Tech tool. This video demonstrates how to fix such errors:
https://youtu.be/sHs7gQLaihs
Fixing Color Contrast
Color Contrast errors are listed in the Text and Contrast category of the Pope Tech tool. Users can fix color contrast errors by one of two methods:
Adjust the color in the Canvas rich text editor.
Adjust the contrast by using the sliders in the Pope Tech interface until the interface displays a “Pass” message.
This video demonstrates how to fix such errors:
https://youtu.be/2aDRvb-VGBA
Fixing Table Captions and Headers
Table errors are listed in the Tables and Lists area of Pope Tech. Using Pope Tech, it is very simple to add a table caption and designate whether the first row or the first column must be the header. This video demonstrates how to fix such errors:
https://youtu.be/AFPkAQ4knDw
Accessibility Issues Explained, from PopeTech
Click any link below for details about common accessibility issues, why it matters, and what to do to fix/avoid the issue.
Thanks to Tracy Schaelen of Southwestern College for originally developing content represented here, and to Liesl Boswell of the CCC Accessibility Center for some modifications and suggestions.
MiraCosta College has a site license for TechSmith Camtasia and Snagit. The software is available at no cost to employees for on campus and home computers.
Obtaining the Software
On Campus Computer
This software is included in computer installations as part of MiraCosta’s basic software configuration. If your campus computer does not have these tools, submit a helpdesk ticket, requesting the latest version of Camtasia and Snagit.
Contact the IT Helpdesk at 760-795-6850 for questions and assistance.
Home Computer
E-mail Shanon Macintyre[email protected] or call (760) 757-2121 ext 6731 if you are interested in the Camtasia or Snagit software for home usage.
For screen recording (creating a video), either within Snagit or Camtasia Studio, Karen Turpin recommends the following settings for a clear YouTube video output.



 button at left of the Cancel and Save buttons while editing any of the Canvas items above. Pope Tech works even when the item is not yet published.