Pronto

Pronto Flex Workshop Recordings


Pronto is an app that works within and outside of Canvas to enable seamless, fun, and effective communication between faculty and students, and among students. Many California Community Colleges are now using Pronto. An initial pilot in 2021-22 went extremely well, and Pronto has been institutionalized going forward!

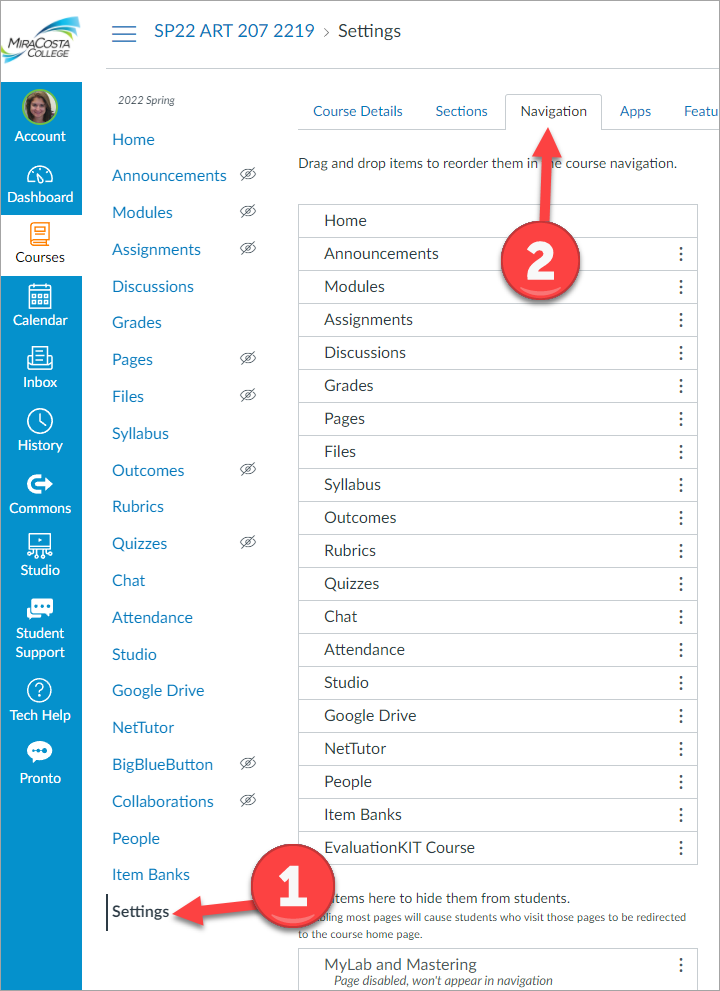
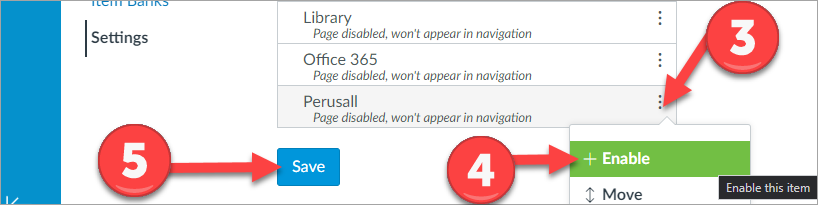
If you do not want Pronto to be available for any class, opt out via the Pronto Course Management tool.

Some stats as of the start of 2024, after two years of using Pronto at MiraCosta:

  • nearly 11,200 MiraCostans signed in to Pronto
  • over 214,000 messages have been sent across more than 6,000 groups

What Pronto Offers

  • Real-time Chat Without having to share phone numbers or other contact information, now you have real-time messaging across each class and to individuals. Send text messages, files, images, emojis, and GIFs!
  • Message Translation Pronto gives everyone a voice by allowing them to send messages in their preferred language, and Pronto then automatically translates messages into the recipient’s preferred language.
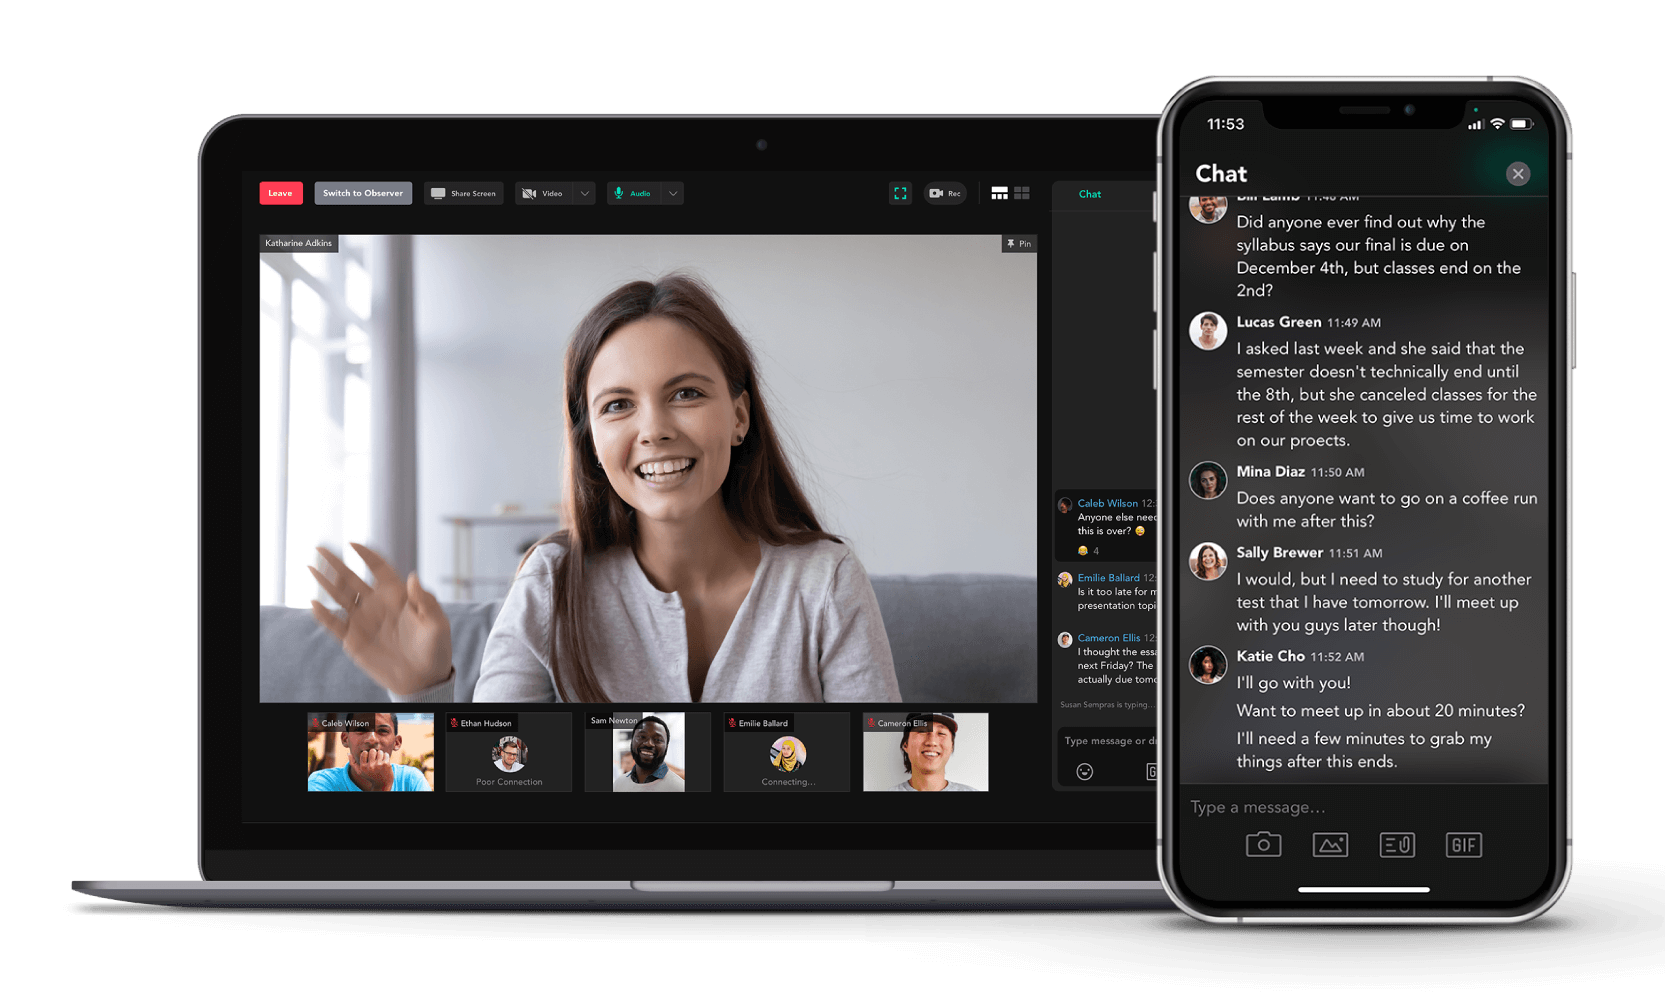
  • Live-stream & Group Video Chat
    • Broadcast live video to your classes, and record your video sessions for replay. This may be a nice alternative to Zoom for things like office hours, group meetings, and more. Viewers interact using the chat button. It keeps the process smooth. Here is a video from Fabiola Torres of Glendale CC on how she uses the live-stream feature for class.
    • Chat via live video with up to 10 people simultaneously. Perfect for group projects!
    • Live 1:1 video chat any time for face-to-face interaction with a student. Or live-stream with a student and they can chat (they don’t have to be on camera).
  • Announcements Keep your entire course in the loop by sending a message to the whole class. It’s like sending a real-time announcement to your entire class. Keep everyone updated on assignments, tech glitches, emergency alerts, and any other important information you need to get out instantly. You can send one Announcement to multiple Pronto groups at once if you wish.
  • File Sharing & Storage Share any file type—documents, spreadsheets, slideshows, photos, videos, and more. All files stored in Pronto remain available through Pronto for easy retrieval with no storage limits. Pronto integrates with all reputable cloud storage repositories, including Dropbox, OneDrive, iCloud, and Google Drive.
  • Task Management Keeps students organized and accountable by assigning tasks. Tasks allows you to create reminders for yourself or others in groups—attach files, photos, or videos and assign due dates with auto-reminders for each task. Here is a video from Professor Gomez of Glendale CC demonstrating how to assign a task.
  • Accessibility and Privacy Pronto is both WCAG 2.0 AA and FERPA compliant. Pronto keeps you connected to everyone without sharing personal contact information.
  • Viewing Data Pronto lets you know who has seen your messages, so you can decide whether to follow up in different ways with those who may not have viewed a message.
  • Group Creation Groups you set up in Canvas automatically get a Pronto group. But anyone can also create Pronto groups on their own. Pronto groups created within the Pronto app remain available indefinitely, while Pronto groups tied to a Canvas class will end once the class is completed.

Check out this brief introduction to Pronto from MiraCosta faculty member Tanessa Sanchez:

Pronto Faculty Introduction

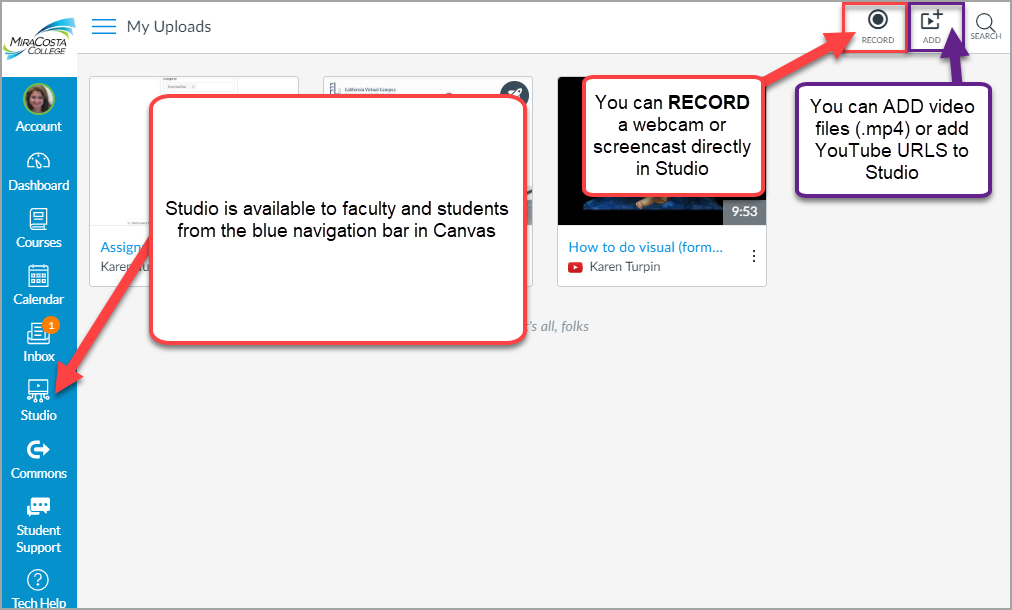
Where Can I Access Pronto?

Pronto is available 4 ways:

  1. Pronto icon 
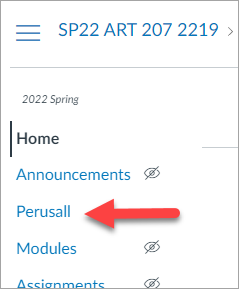
Directly within Canvas. If you are enrolled in any published course where Pronto is active, you will see the Pronto icon at the bottom left of Canvas, in the Global Navigation menu (you may need to scroll the menu down).
    Selecting the Pronto icon will open up Pronto to the latest chat you have had open or the course/group with which you are currently engaged.
  2. Through any web browser at miracosta.pronto.io .
  3. Via the mobile app, which is available for free in the Apple and Google app stores (search Pronto: Team Communication).
  4. Via a desktop app, available at pronto.io/download

Getting Started with Pronto

To jump in and try out Pronto, self-enroll in a MiraCosta faculty Pronto practice course in Canvas. Once you are in, you’ll see some directions to get started and try it out!

The first time you use Pronto, you’ll need to provide your MiraCosta email address and then enter a code that Pronto will send to your email. If you are not yet enrolled in any course that is published and uses Pronto, you may need to wait until that occurs for this step to work.

To get started on your own, review the Canvas/Pronto integration guide, check out Pronto’s 3-part YouTube introductory series for faculty, and/or watch this 6 minute video:

When does Pronto become available in a class?

Pronto only becomes active for a Canvas course after it is published. NOTE: this doesn’t happen automatically – Pronto becomes active for a newly-published course once the next synchronization between Pronto and Canvas occurs – this happens daily at 7 pm PST. But if you want to make Pronto active immediately after publishing a course, you can manually enable Pronto in the Pronto course management tool.

Do I have to use Pronto?

No, Pronto is available but you can ignore it. Doing so will still allow your students to use it. If you wish to turn off Pronto temporarily or permanently for a class, you can do that too. (Even if you like having Pronto on most of the time, you may wish to shut it off during an exam, for example.)

Use the Pronto Course Management tool to turn off Pronto for a particular class. Learn more about Pronto Course Management.

Technical support, tips and resources

Support for Pronto is provided via the Pronto support site or by contacting help@pronto.io

A few important notes/tips:

  • Students added to your Canvas class will not be able to use Pronto for the class until the next Pronto synchronization occurs. You can use the Pronto Course Management tool to manually force Pronto to synchronize with a course if necessary.
  • Faculty can’t see Pronto in Canvas’s Student View. If you wish to experience Pronto within your course as your students would, you need to use your “fake student” account. But rest assured that the student experience with Pronto is just about identical to what you see on the faculty side.
  • On mobile devices, Pronto will not show up within the Canvas app or inside of Canvas in a mobile browser. Use the free Pronto app (search “Pronto: Team Communication”)

Here are some excellent additional Pronto resources:

Credits

Thanks to Fabiola Torres of Glendale CC, MiraCosta’s Tanessa Sanchez, and Matt Baugh from Pronto for resources that helped to develop this page.

PlayPosit in Canvas

Playposit logo

PlayPosit Flex Workshop Recordings


PlayPosit is an interactive video learning tool that is fully integrated with Canvas. Playposit allows instructors to create activities using videos from 3C Media, YouTube, or other video sources.  

MiraCosta has piloted PlayPosit for several years. As of 2020-21, PlayPosit is now available to all MiraCosta faculty through a CCC system license.

PlayPosit allows you to:

  • Layer a variety of assessment activities within a video, creating a quiz with results going automatically into the Canvas gradebook. (Canvas Studio has similar functionality, but with fewer and simpler question types than PlayPosit.)
  • Track detailed viewing analytics for videos

PlayPosit Guides

See the Quick Start Guide, or view more detailed guides embedded below.

Building a Bulb in PlayPosit 3.0

CCC TechConnect – 3CMedia Hosted Video

Assigning Bulbs in Canvas

Monitor Analytics

Playposit in MiraCosta College Canvas

Playposit is an external tool. One of the most common places you will find it is within the RCE (Rich Text Editor).

New RCE

Additional Support

Turnitin

Turnitin logo

Turnitin Flex Workshop Recordings & Updates


Turnitin is a cloud-based service for originality checking, online grading and peer review that saves instructors time and provides rich feedback to students. Turnitin is used to support the submission, tracking, plagiarism prevention, and evaluation of student work online. As of March 2024, MiraCosta College upgraded our Turnitin account to include AI writing detection. Turnitin can now provide an evaluation of the likelihood of student writing being generated by AI (artificial intelligence).

It’s a good practice to use Turnitin to support student learning about academic writing through a formative process, and not as a policing tool. The following Dos and Don’ts are from a Turnitin presentation about best practices.

Dos:

  • Set clear expectations regarding academic integrity
  • Help students understand the relationship and differences between similarity and plagiarism
  • Use the Similarity Score formatively
  • Ensure that students understand the Similarity Score and what it means about their writing

Don’ts:

  • Use the Similarity Score as a “gotcha” or punitive measure
  • Conflate similarity and plagiarism
  • Use the Similarity Score exclusively as a summative measure 
  • Implement the use of the Similarity Score without ensuring that students understand what it means and how they can use it to improve their writing

Turnitin is available in Canvas.  MiraCosta College has an unlimited license to Turnitin, GradeMark, and Peer Review for all courses.

Canvas integration with Turnitin

Turnitin is available within Canvas in two different ways. As of August 2019, Turnitin says that both of these integration methods will be supported indefinitely. The links below provide more details about how to use each method.

  • Turnitin LTI 2.0 for Canvas
    • Offers a tighter integration between Turnitin and Canvas within Canvas Assignments.
    • The Turnitin experience still “feels” like Canvas.
    • For faculty who like to use the Canvas grading tools along with Turnitin’s plagiarism checking capabilities.
  • Turnitin LTI 1.0  for Canvas (Classic LTI Version)
    • Uses Canvas’s “External Tool” feature to connect seamlessly from Canvas over to Turnitin.
    • Users clearly notice that they have gone from Canvas into Turnitin.
    • For faculty who like to use Turnitin’s grading and feedback tools along with its plagiarism detection.

Turnitin Help & Support

Turnitin errors are often due to issues with the entire Turnitin service and are not something we control locally. Turnitin has support services for your questions or problems:

Learn More About Turnitin

Professional development opportunities are available from Turnitin:

Turnitin AI Resources

Plagiarism Prevention & Student Intellectual Property

MiraCosta faculty using Turnitin for plagiarism prevention should be aware of these key points from MiraCosta’s administrative procedure on intellectual property:

When an instructor makes use of software that incorporates student works into its database, as is common with plagiarism-prevention software, the use should be governed by the following guidelines:

–  Student work may not be submitted to plagiarism-prevention software or other software that incorporates a student’s work into its database without the student’s knowledge.
–  Students should be informed in the syllabus that such software is used in the course and that the software incorporates any student work submitted into its database.
–  Students should be given alternatives, such as requiring students who do not submit their work to plagiarism-prevention software, to document their references using an annotated bibliography and/or photocopies of the first page of all sources used and/or to write a brief paper describing their research methodologies.

Perusall

Perusall Flex Workshop Recordings

  • Social Annotation with Perusall (Zoom Recording, 1 hour 5 minutes) – 1/16/2023 workshop by Jim Julius, Michael from Perusall, Rob Bond, John Kirwan, & Aaron Roberts

Perusall

Perusall makes it possible to have students comment, discuss, and share by annotating a document or image. Some possibilities might include:

  • annotating the textbook together (Perusall offers many common textbooks within its framework — see the catalog)
  • uploading pdf files and having students highlight and annotate
  • uploading images or videos and having students annotate

Perusall has been used independently by a number of MiraCosta faculty for several years, but starting in 2022 the college has licensed it, making it easier for all faculty to engage students in these kinds of rich, interactive learning opportunities. Perusall can be quickly added to any Canvas course. MiraCosta instructor and online mentor Lisa M. Lane has been using Perusall for some time, and has provided instructions and videos below to help faculty get started. You can also reach out to Lisa (email: llane@miracosta.edu ) to arrange for 1-1 mentoring support.

Before class starts: set up Perusall

To get started, you need to set up a site in Perusall. Perusall calls this a “course”. There are two ways to do this.

1: For Canvas courses organized around activity types

If your course materials for students are already set up by type (quizzes, lectures, readings) in Canvas, you may want to add Perusall to the menu. 

  1. Click Settings at the bottom of your course menu
  2. Click the Navigation tab
Settings, then Navigation

3. Click the gear icon to the right of Perusall

4. Select +Enable

5. Click the Save button

The Perusall link now appears in your course menu. You can click on the Persuall menu link and a new browser window will open. The first time you do this, Perusall will establish Perusall account and sync it with your Canvas account. If you already had a free Perusall account using your MiraCosta email address, Perusall will merge that account with the one being set up under MiraCosta’s institutional Perusall license.

Click on the Perusall course menu link in Canvas
A new window opens in your browser connecting your Canvas account with Perusall.  

Upon first launch (for anyone), they will be guided on a tour of the platform. If they ever need to restart the tour, they can click their profile icon in the top right corner. 

2: For Canvas courses organized in modules or units

If your course materials are organized for students to use Modules or units, you may want to use a test assignment to open the Perusall course.

  1. Add an Assignment, call it Test Perusall
  2. Don’t worry about points, instructions, and other settings
  3. Use External Tool – Find – Perusall
  4. Check the box to open in a new window
  5. Save
  6. In the assignment, click on the box “Load Test Perusall in New Window”

After doing this to connect your Canvas class and Perusall, you’ll follow the same process for setting up each Perusall assignment, and you can change this first Test Perusall assignment later to use it as an actual assignment.

The video below demonstrates both of the above methods for adding Perusall to your Canvas class.

Set up an assignment in the Perusall course

On the Get Started page: fill in boxes, but be sure that if you are not using groups, the number of students is set to your maximum

Library: choose the type of content for the first assignment and upload or put in URL

Assignments: click Add Assignment and select the content from your Library, choose your parameters for that assignment

Copy the name of the assignment exactly — it must be the name of your assignment in Canvas (that’s how Canvas knows which Perusall assignment to use).

Watch the video below for a demonstration of this:

Perusall settings and grading

Here is a video overview of the Perusall settings for a course:

One big settings choice for scoring or grading is this:

  1. Do you want the work graded as it is done, with student scores increasing as they go? or
  2. Do you want the work graded at the end by the instructor?

These are included in Settings, above. Each has advantages and disadvantages. Having grades go up as the student works can provide extrinsic motivation, but can also force the student to work to Perusall’s standards. Grading at the end means working quite a bit with the gradebook in Perusall, and it causes a problem with due dates. If the due date in Perusall matches the due date in Canvas (as it should so students cannot work past the due date), and the instructor grades after that date, Canvas will show the assignment as late. This will need to be explained to students, or manually changed in the Canvas gradebook.

Preventing problems with students going to the wrong assignment

There are two ways this can happen.

The student may go to Perusall.com trying to find the work

If a student gets locked out of the assignment, they may try to get in through Perusall.com, making an account. If they are successful, they will be able to annotate, but their grades will not be pushed back into Canvas, and they won’t get a score (you will see this with a red warning exclamation mark in the Perusall grades).

Solution: Encourage students to only enter Perusall through Canvas, through your assignment.

The student may navigate inside Perusall and click on the wrong assignment using the Library

Once inside Perusall, students, like instructors, can click on the left-hand list of both the Library and the Assignments. That means they can jump ahead to the wrong assignment or even in some cases jump back to an assignment that has already been graded, and work within it when you don’t want them to.

Solution: The best way to prevent this is to set the availability period for assignments, then make a hidden folder in the Library, and put all the Library items in there. Then make sure all Assignments have a due date. That way they can only click on an assignment, and only when it is open.

The video below discusses both of these potential issues:

During the class: Participating in annotating and discussing

Some instructors participate in the annotations as they occur. When participating, it’s good to use the @ symbol to alert particular students that you have a public question or annotation on their annotation. Perusall also allows students to upvote, and for you to upvote, particular annotations. The interactive nature of social annotation allows it to be a replacement for discussion if that’s how the instructor wants to use it.

Set up advance annotations if desired

You can set up questions, add video clips, or annotate your assignment yourself before the class begins as well as during the class. Instructor annotations are saved and can be rolled over to the next semester.

Grading assignments

It is usually not advisable to rely on Perusall’s automatic scoring algorithm.

Perusall’s algorithm attempts to analyze the depth and usefulness of a student’s comment, and that may not align with your goals. For example, an instructor who wants students to post five short superficial annotations or one long in-depth annotation will find that Perusall cannot make this distinction, and may give the student posting one long annotation a lower score.

Until you know the system is scoring like you want it to, it’s a good idea to check each student’s contributions. This can be done using the Students tab from the Course home page in Perusall:

view of student tab

Other options

Perusall is a complex program and can do many things. Scoring can be refined with multiple parameters. Student scores can be averaged and turned into a single Perusall grade rather than individual assignments. The recommendations above are designed for those who are new to Perusall.

Canvas Student View Warning

Canvas’ Student View button will not work with Perusall, since Canvas doesn’t send an email address to Perusall as part of that launch. To see what students will see once they launch into Perusall, utilize the Student View link on the left navigation bar within your Perusall course.

Perusall Faculty Support

Perusall Support for Your Students

Students should always launch Perusall from inside of Canvas

https://youtu.be/0wmCPeAqYjk

Studio Online Video Learning Platform

Studio Logo

Studio Flex Workshop Recordings


Studio is a video tool integrated inside of Canvas, which MiraCosta began piloting in spring 2019 when it was known as ARC. It is now available to all faculty and students indefinitely through state funding.

With Studio:

  • Faculty and students can easily record webcam and screencast video within Canvas
  • Faculty and students can create and manage a library of videos for use in Canvas (and to share outside of Canvas)
  • Faculty can create discussion activities that are based on video (discussion comments are tied to specific points in the video)
  • Faculty get data on student viewing of video
  • Faculty can add quiz questions into videos; students respond while watching the video; results go directly into the gradebook
  • Students can submit video assignments; faculty can provide feedback directly on specific moments in the video
  • Videos can be automatically captioned and the captions can be easily edited

Studio is available to faculty and students from the blue global navigation bar in MiraCosta Canvas.

Studio is also available to faculty only on the navigation menu within a MiraCosta Canvas course to RECORD or ADD video content.

Studio is also available to faculty only on the navigation menu within a Canvas course to RECORD or ADD video content.

Within the Canvas Rich Content Editor, faculty and students can select Studio from the second row of icons to add a Studio video they’ve previously recorded, or to create and use a webcam or screencast video right there.

Studio location in Canvas Rich Content Editor.

Helpful Guides

Check out an excellent website about Studio that MiraCosta associate faculty member Laura Paciorek created in summer 2020.

Studio tutorials/videos to get you started:

Browser Support for WebCams

Q. I tried using Studio but it keeps saying that it needs to access my webcam.

A. Follow the directions below for either the Chrome or Firefox browser to fix this problem.

To learn more about Studio and Canvas, view the full set of Studio tutorials.

Adding Videos Captioned in YouTube or 3CMediaSolutions to Studio

Unfortunately, videos you’ve already created in YouTube or 3CMediaSolutions will not have their captions preserved when you add them to Studio. Rather than starting captioning over again in Studio, here are some tips from Greg Beyrer of Cosumnes River College:

YouTube: Download the captions file from YouTube. The video must be set to allow community members to contribute captions. If the video already has English captions provided by the creator those cannot be downloaded, but you can tell YouTube you are contributing captions in a friendly language, say Canadian English, and then one-click copy the published captions to the new language. That could then be downloaded. YouTube does not download captions in a file that is recognized by Studio, so you have to convert those captions (.sbv file) into a Studio-friendly format (.srt file). This site does this: https://captionsconverter.com. (from YouTube Captions to Arc – Workaround Guide, where you can also find a video demonstrating the process.)

3CMediaSolutions: Simply download the (.vtt) caption file from a 3CMediaSolutions video, and then upload that file into Studio for the same video. If your video is lengthy, it may even be quicker to first upload it to 3CMediaSolutions and request the free professional captioning rather than going through the auto-caption and edit process in Studio. (from Making Arc Work with 3C Media Solutions, which includes a video demonstrating the process)

1 2 3