For a distraction-free, seamless learning experience, you can migrate embedded YouTube videos in Canvas into Studio, whether they were added with embed code or through the YouTube LTI.
In September 2025, Canvas Studio implemented the YouTube Player for Education. Starting September 22, 2025 any existing or new YouTube videos added to Canvas may display ads. To avoid this you can migrate the videos manually to Canvas Studio or use the YouTube Migration tool in Canvas. The YouTube Migration tool helps teachers identify videos in their course that may display ads.
What happens when you migrate YouTube videos into Studio?
No ads or pop-ups will appear during playback.
Overlays (like recommendations, channel info, or “watch later” buttons) are removed.
You gain Studio tools, including analytics to see how students watch your videos.
Captions are preserved (only for videos with ‘public’ visibility).
Migrating manually → videos are saved to your Studio library.
YouTube Migration Tool
Watch this video to learn how to use the Migration Tool in Canvas to migrate any YouTube videos in your course.
Scan Embedded YouTube Videos
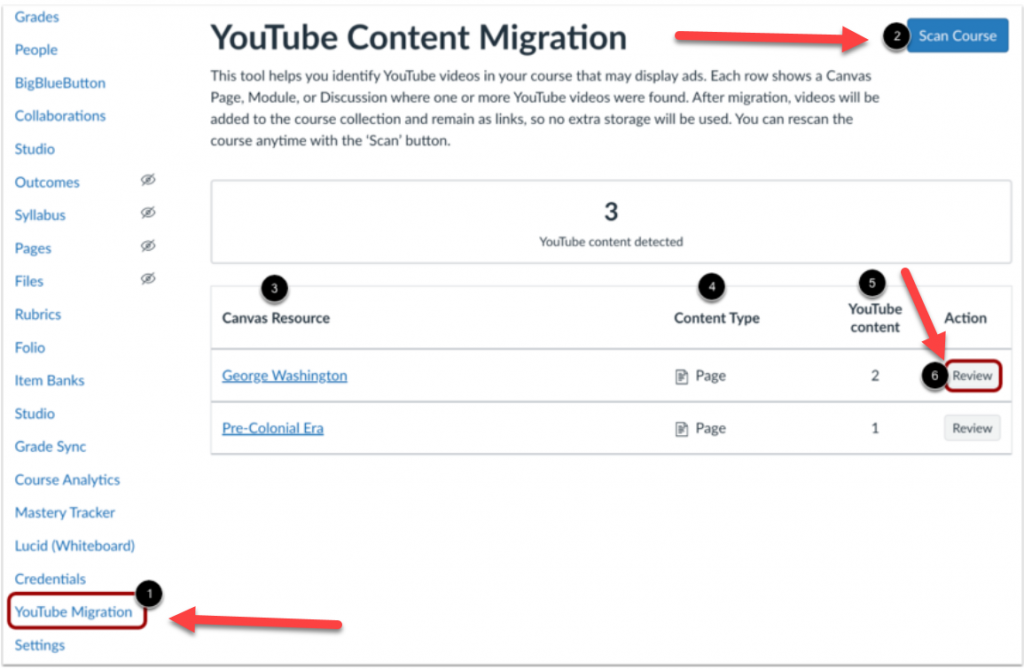
You can use the migration tool via the Course Navigation Menu. It is only visible to teachers and appears at the bottom of the course navigation menu on the left.
In Course Navigation, click the YouTube Migration link [1]. To filter embedded YouTube videos, click the Scan Course button [2].
A list displays the Canvas resources where the YouTube videos are embedded [3], the content type [4], and the number of YouTube content detected for each Canvas resource [5].
To migrate the videos into Studio content, click the Review button [6].
Only embedded videos and videos added through the YouTube LTI can be migrated through the Migration tool. YouTube links (which are external) cannot be migrated.
The migrated videos will only be visible in the Studio ‘Course Collection’; these will not be visible/available through the Studio user library. However, YouTube videos directly added to Studio will be available in the user library.
Migrated YouTube videos will NOT import in a different Canvas account when shared through Canvas Commons. These will, however, import within the MiraCosta instance of Canvas.
Captions will NOT automatically appear for migrated videos set to ‘unlisted’ visibility. Captions will need to be created or uploaded for such ‘unlisted’ YouTube videos. Caption will automatically appear for any migrated YouTube video set to ‘public’ visibility.
For more information or if you have questions, please contact Nadia Khan: nkhan@miracosta.edu
Beginning October 2, 2025, all Zoom recordings created between 2017 and July 31, 2024, will be automatically deleted in accordance with the California Community Colleges Chancellor’s Office directive. It is advised to download all Zoom recordings that you would like to keep prior to this date and hosting those Zoom recordings on an alternate media server.
Step 1: Download the Zoom recording files.
View a webinar by Jill Ringer that will walk you through the Zoom download process.
Step 2: Upload your Zoom recording files to a streaming media service.
Canvas Studio
This option is integrated directly in Canvas. At this time we do not have any storage limits so this is the most ideal and probably easiest place to store your Zoom recordings. For future zoom recordings you can even have those recordings automatically upload to Canvas Studio.
Canvas Studio supports an integration with Zoom that allows Zoom to automatically upload future recorded meetings into Studio. Here is how you can authorize the Studio Zoom integration in your Canvas Studio Settings.
LabArchives is an electronic lab notebook that can help instructors and learners better manage, share, and publish research notes, data, protocols, and related documents.
MiraCosta College’s institutional license gives all MiraCosta College students, staff, and faculty free access to LabArchives. Log on with your MCC login and password to access LabArchives. Faculty can also integrate Lab Archives with Canvas.
Features of LabArchives
Share and collaborate on notebooks by multiple parties.
Store multiple file types, including images, GraphPad Prism, FlowJo, PDFs, and Office documents
Create templates, forms, and custom applications for routine laboratory tasks.
Instructors can provide feedback on students’ notebooks.
Storage of every version of every file, recording the date, time, and username.
The following will help instructors understand how the end of semester is handled in Canvas, and how to update related Canvas course settings if necessary. By default, students who complete a class continue to have read-only access to the concluded class’s course materials, discussions, and grades. If you wish to restrict concluded class access, you must change the class settings before the end of the term, or get a Canvas administrator to help you after the end of the term.
Everything below applies to typical term-based Canvas classes. Canvas sandbox classes and Canvas shells used for organizations, departments, groups, etc. are not tied to any particular terms and thus remain available indefinitely.
Closing your Course
There is nothing you have to do to close your Canvas course; at the term end date (see below), your course will be set to Concluded status and moved onto the Past Enrollments course list for you and your students. By default you and your students will continue to have read-only access to the course.
Canvas Term End Dates
Semester
Date
Time
Summer 2026
August 12
12 am
Spring 2026
June 6
12 am
Fall 2025
Dec 31
12 am
Concluded Course Access
For both instructors and students, concluded courses can be found by clicking Courses in the main Canvas menu, then the All Courses link. Concluded courses are listed there under Past Enrollments. Concluded courses may notbe moved back onto the Dashboard – they must be accessed in this way.
Instructorscan perform the following actions with a concluded course
Access material using visible navigation links (any links that were hidden from students will be hidden in concluded courses)
Instructorscannot perform the following actions within a concluded course (do these before the end of the term!)
Edit course content
Edit Grades
View/download Analytics
View/download Item Analysis within Quizzes
Send a message to the class within Canvas
Change class access settings
Change class navigation
Studentscan perform the following actions by default within a concluded course
View Grades
View course content
View Discussions and Assignments
Send a message to the instructor
Students cannot perform the following actions within a concluded course
View Quiz questions and answers
Submit discussions, assignments, quizzes, and other course activities
Restricting Students from Viewing Some or All of a Completed Course
As described above, by default in Canvas, students have ongoing read-only access to course content in Canvas after the term ends. This can be a great feature, allowing students to review key learning resources from previous semesters. If, however, you wish to limit this access, follow one of the methods below before the end of the term. (If you need to make these changes to a course that is already concluded, contact Karen Turpin for assistance at kturpin@miracosta.edu)
Method 1: Hide Course Navigation menu links
If an instructor would like to limit access to major areas of course content, one method is to hide Navigation menu links. Note that if Navigation menu links are hidden, the instructor will also be unable to access them after the course concludes. This may be appropriate if you would like to leave Grades available to students, yet close off certain course content. The instructor may copy the course into another course to regain access to hidden menu items.
How to hide Course Navigation menu links
Click Settings in the Canvas course menu
Click Navigation in the tabs at the top.
Drag and drop the menu items from the top (viewable) area to the bottom (hidden) area or click the gear icon to the right of the menu item and select disable.
Click the Save button.
Method 2: Hide select course content
For more fine-grained control, certain course content such as files, pages, modules, or module items (but not assignments or discussions where students have participated) may be unpublished. As with hidden Navigation menu links, unpublished items are also inaccessible to the instructor after the course concludes.
If you wish to hide course items where students have participated, such as discussions or assignments, you cannot unpublish those. But there is a trick: simply set the availability date to sometime far in the future.
These options may be useful if you want students to be able to access most course content, but have select content that you prefer not to be accessed/shared in the future. The instructor may copy the course into a current course to be able to revisit/reuse hidden content.
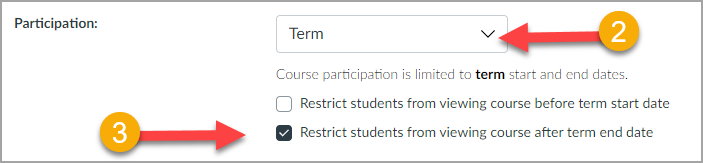
Method 3: Restrict students from accessing entire course after term end date
The term end date is the final date in the current semester as listed in the table above. If an instructor would prefer the entire course and its course materials not be visible to students after the term end date:
Click Settings in the Canvas course menu.
For Participation: Select Term (this should be selected by default)
3. Select the checkbox for ‘Restrict students from viewing course after term end date‘.
5. Click the Update Course Details button at the bottom of the settings page.
This option will completely remove the course from the student’s view in Past Enrollments after the end term date passes. Students will not see the course and will have no access to course materials or grades. Instructors will continue to be able to access the course in Past Enrollments.
Resolving Incompletes
If you have assigned a student an incomplete ‘I‘ grade for the semester, contact Karen Turpin at kturpin@miracosta.edu or as soon as the paperwork is complete with Admissions and Records. Karen will create a new Canvas course section based on the original course. This new section will allow the student access to the course with the ability to submit work, and will give you access to grade the student’s work, for the time allowable by the Office of Admissions and Records.
Working with Concluded Courses to Build New Courses
As noted above, you may always export a concluded course for import back into Canvas (Text instructions), or use a concluded course as the source for copying into a new course (Text instructions). If you wish to update the content of a concluded course for use in the future, but you do not have a current term course in which to do that, you may wish to request a Sandbox course to copy into and work with, since you cannot edit a concluded course directly.
Teaching a short course and/or need to close your course prior to the official term end date?
You can manually end your course by updating the course end date. This will disable the ability for students to submit any more work, and, if you select the setting enabling students to view the course after the end date, will move the course off of the students’ Canvas dashboard and into the Past Enrollments area. If you do not enable that access for students, the course will disappear from their Canvas altogether.
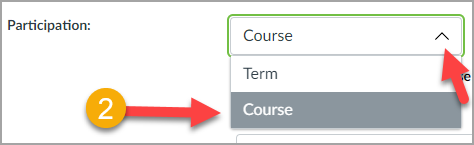
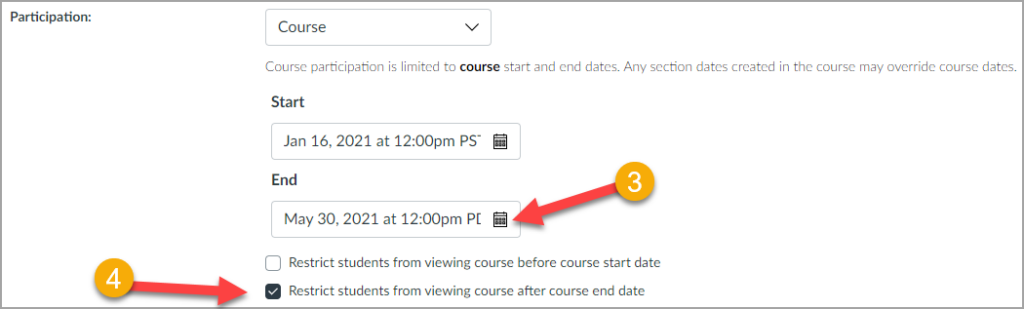
To change the Course Start and/or End Date
Click Settings in the Canvas course menu.
2. For Participation: Select Course
3. Change the Course Start and End Dates to reflect when you want students to have full access to the course.
4. If desired, select the checkboxes for ‘Restrict students from viewing course before course start date’ and/or ‘Restrict students from viewing course after the course end date’.
In the example below, students will not be able to participate in the course, even if it is published, until Jan 16 at 12 pm. The students will no longer be able to participate in the course after May 30 at 12 pm and the course will not be available to students for viewing.