Welcome back to fall semester! I’m excited to share Flex workshops and other resources for your professional learning as you prepare for another semester of mostly or entirely online teaching!
Flex Week starts tomorrow with a Friday the 13th full of online ed workshops!
We’ve been offering online workshops and recording them for years! Explore what’s available in the Online Education workshop archives page, including the fantastic sessions from our Equity Online day last April. If you’re looking for inspiration with a tool or online teaching topic that’s not on this fall’s Flex schedule, you can probably find a recording that’s just what you need. And viewing those recordings is, of course, Flex-eligible.
Return of the MiraCosta Online Mentors!
Many of you met with a MiraCosta peer faculty helper last year for support with your online course preparation and teaching. Happily, this program will continue this fall! More information on this will be coming soon, but if you can’t wait to get connected with a peer, feel free to reply to me.
Completely Updated: MiraCosta Online Class Quality Guidelines
Last year, the MiraCosta Online Educators committee undertook a major revision of the MiraCosta Online Class Quality Guidelines to place a greater emphasis on equity and to reflect updated regulations. Check out the document, which is intended “to help faculty develop and redesign online classes and foster conversation in departments about effective and equity-minded teaching practices in online education.”
Professional Learning Opportunities through @ONE
Many MiraCosta faculty looking for deeper professional learning about online education have let me know how important the @ONE program has been to them. Some events and classes are free while extended, facilitated classes typically have a fee. If you’re interested in having my office cover a fee for an @ONE class just reach out to me!
MiraCosta faculty no longer need to sign up for Flex activities in advance. After attending a Flex workshop, record your participation on your Flex transcript under the “Record Activities” tab, selecting the “Scheduled Activities or Workshops” activity type. Visit the Flex website for more information.
Archives
After Flex week, go to the Workshop Archives to see recordings and resources from workshops below that were held online.
Fall 2021 Workshops
A full updated list of all Flex workshops – including many other great workshops supporting online education – can be found at Fall 2021 Flex Workshops
Sean will kick off our Online Education-focused day of workshops with an overview of what’s to come, and an opportunity to reconnect with colleagues through open sharing and discussion.
Overview of the new MiraCosta Online Class Quality Guidelines, with Examples
In spring 2021, the Academic Senate approved significant updates the MiraCosta Online Educators committee made to the MiraCosta Online Class Quality Guidelines to reflect updated external regulations as well as an increased emphasis on equity. Learn how this document can be a useful tool for faculty as you create, update, and teach online classes. And, learn about a Canvas-based resource full of local faculty-created course elements that exemplify these guidelines in action.
Online Support through STEM and MLC
9:30 AM – 10:30 AM Scott Fallstrom & Raymond Clark Audience: Everyone Recording: Online Support through STEM and MLC (Zoom Recording, 57 minutes)
The STEM and MLC are continuing with online tutoring and support services. Come learn about what is available, see the website/calendar, and consider how to integrate information about our services in your Canvas courses!
Emergent tools for creating activities and assignments around annotation (commenting directly upon and discussing a shared text, image, video, etc.) are making it easier for faculty to engage students in rich, interactive learning opportunities. In this session you’ll hear from faculty using Google Docs and Perusall for these kinds of activities, and you’ll learn about Canvas’s new built-in annotation assignment option.
The workshop is related to instructional improvement as it will be geared toward creating accessible course content but it also has information on how to make accessible Word and PDF documents for non-instructional staff. The workshop will demonstrate how to enact a few simple changes to the way you develop your documents that can have a huge impact on your students’ ability to access and understand them. This will include using Microsoft Word to create accessible Word and PDF documents. It will also provide guidance on layout/formatting as well.
Online Tools for Math Teachers
10:30 AM – 11:30 PM Scott Fallstrom Audience: Everyone Recording: Online Tools for Teaching Math (Zoom Recording, 24 minutes)
For statistics, we’ll take a look through the free art-of-stat webapps which contain a robust set of applications allowing students to participate, simulate, and conjecture based on pre-programmed data sets, or upload your own! For future teachers, we can use constructions with Desmos/Geogebra (geometry) as well as other OER resources that can help with possible online versions of these courses. And I’ll show how to embed these in canvas students to use… you’ll love it!
How are students accessing my courses? Strategies for Providing Increased Access for All Students.
The goal of this workshop will be to discuss the multitude of ways in which students access your course. We will discuss the physical and mechanical modes, including the use of devices and platforms, and the contextual experience students have navigating course content. Experiences from learners with diverse learning profiles will illustrate key strategies that you can use to increase and expand on the access points you already provide for students.
This session is designed to give you open time to work with Canvas in a collaborative, supported environment. This is intended to be useful for anyone from beginners to advanced Canvas users, and is open entry/exit – show up anytime and stay as long as you like. Come with your Canvas questions and your fall classes-in-progress!
Equity & Humanizing Your Course: The Liquid Syllabus
1:00 pm – 3:00 pm Robert Kelley & Lisa Lane Audience: Everyone
“Humanized online teaching practices support the affective dimensions of student learning. Many students who enroll in online courses, particularly those from minoritized backgrounds, do not successfully log in and complete the first week successfully. Weeks 0-1 comprise a high opportunity zone for increasing the percentage of students who succeed online… An equity-minded strategy [for overcoming] these barriers is to transform your syllabus into a Liquid Syllabus… A Liquid Syllabus is a mobile-friendly, public website with a friendly welcome video that is written with inclusive, validating language” (Michelle Pacansky-Brock). Come for an overview of the Liquid Syllabus and then stick around to make one yourself.
Curious: Watch a 3 minute video overview:https://youtu.be/90BmvCuXMoI. The subsequent “hands on” activity (for the first 20 participants; please register at https://forms.gle/fwwgGTJTmi245uoq5) requires having or creating a google account and access to an internet connected computer.
Increase Student Connection and Interaction with Pronto
Learn how to get started with Pronto, an app that integrates with Canvas and enhances communication beyond what Canvas provides, enabling group messaging, file sharing, video chat, announcements, and more in a very mobile-friendly way. Hear from MiraCosta faculty who began using this last year and are excited to share their experiences!
Happy Hour, Open Discussion, and Sharing
3:30 pm – 4:00 pm Jim Julius & Sean Davis Audience: Everyone
Wrap up the day by connecting with colleagues to share your plans and discuss your lingering questions about all things online as you look ahead to the fall!
The student annotation assignment allows the teacher to upload a file to Canvas that the student can then, without leaving Canvas, mark up using the built-in annotation tools (highlight, make comments, draw marks, etc.) as their submission.
See the end of this page for some ideas for how you might use this feature.
Screencast Video
Canvas has published a one minute overview video of the new feature.
Under online entry options, check student annotation.
Choose an existing file (such as a PDF, Word document, or JPG), or upload a new one, that will be the template for the annotation assignment.
Finish completing your assignment with the normal process.
Limitations
Annotation assignments use the same annotation tools available to teachers with SpeedGrader. While a variety of file types are supported, PDF or Word files will have the best compatibility. Here is a list of file types the DocViewer can preview.
These assignments are not currently available for use with with peer assessment, but this is planned for the future.
This type of assignment cannot be made a group assignment. (For these, consider using a full collaboration tool, like Office 365.)
This is not a multi-user live collaborative document (like Office 365, Google Documents, etc.).
Keep in mind that most students do not have a stylus for detail drawing, and drawing with a mouse is imprecise at best.
All annotations exist as a layer in Canvas displayed over top the original; it is not actually editing the original document. You can export the annotations to a PDF file, where the annotations will exist on the PDF comment layer.
Here are some ideas to get you thinking about how you might use this new tool in your course. Do note that many of these are possible to do in other ways (like using Office 365 documents). The tool in Canvas can make some of these quicker or easier, but, in some cases, it may be appropriate to continue to use the other tools.
Have students analyze, critique, or respond to prompts (texts, images, or both).
Train academic paper reading skills. Reading academic papers can be challenging to read and learn from without training. Upload a paper (either relevant to this course, or perhaps in a similar field, but not exactly related to this course) and ask the students to read it. Have them use the annotation tools to highlight passages they consider important, make margin notes for questions that remain or their thoughts at that moment of reading, or to make commentary about the structure, flow, and formatting of the paper.
You can provide feedback on important information the student did not take notes on, extraneous highlighting, and other details.
Ask for self-reflection and/or start a class discussion of errors in papers. Use a sample assignment submission like students might hand in and ask them to mark it up. Optionally, you can include a rubric in the template document for the students to fill in. This will allow you to have a discussion with them about the feedback that they find most important. This can also help them to review their own submissions before submitting.
Post a “find errors and correct them” assignment. Especially useful for a language or coding course (but also can apply to others, like math or logic), create an assignment of statements or solutions that have errors in them, and ask students to mark up what the error is, and suggest corrections. Do keep in mind the limitations of annotations as small corrections; do not have problems that require a significant rework. “True or False, but, if false, make it true” assignments are a narrower sub-type of this activity.
Ask students to label a diagram or image as their submission. The student can use point comment tools to label individual parts, or box comments for larger structures that cover an area. This is comparable to a “hot spot” question in some ways. This is only recommended for identifying parts of a diagram, image or document; other assignment types are better for whole image identification. This can be used not only for low-level identification (“label the parts of this building’s façade and attribute it to a period”), but also higher-level analysis (“discuss your interpretation of this x-ray”).
Collect student feedback in a specific format, such as providing a form or template that you would like students to fill in for a “360 degree” peer evaluation after a group assignment, but you do not want students to need to download or upload files (and a survey is too much for what is needed).
Fill out “lab notebook” or “observation notebook” documents in a course that does not make heavy use of them to utilize another tool specialized to that purpose.
Microsoft Word includes options for adding accessibility information to documents to support access by individuals with disabilities. This information also ensures that Microsoft Word documents converted into other formats (e.g., tagged PDF, ePub, DAISY, etc.) maintain this level of accessibility. The best practices for Microsoft Word accessibility include attention to:
Headings & Structure
Images
Links
Tables
Color
Accessibility Checker
Exporting to Other Formats
Structure
Page structure provides visual references to help readers scan the content. Microsoft Word Accessibility can be improved by adding the following:
Headings
Lists
Headings
Headings can provide an organizational and navigational framework for a document’s content, communicating both the informational hierarchy and relationship between different sections. Headings also provide a simple mechanism for an individual using assistive technologies to “jump” from one heading to the next when navigating the document.
From the Home tab, choose the Styles Pane. This will open the list of heading and other styles for use in the document.
Place focus on the appropriate content and choose the relevant heading style.
Headings can be marked with the following
Mac keyboard shortcuts:
+Option+1 applies the Heading 1 style
+Option+2 applies the Heading 2 style
+Option+3 applies the Heading 3 style
Windows keyboard shortcuts:
CTRL + ALT + 1 applies the Heading 1 style
CTRL + ALT + 2 applies the Heading 2 style
CTRL + ALT + 3 applies the Heading 3 style
Important considerations
Technical guidelines:
Headings should follow a logical structure that identifies content based on the organizational content and hierarchy of information in the document.
Avoid skipping heading levels – modify the style of the heading if you prefer a specific font or appearance.
Formatting guidelines:
For additional guidance on formatting, please review the information on Structure.
Headings should be short and succinct
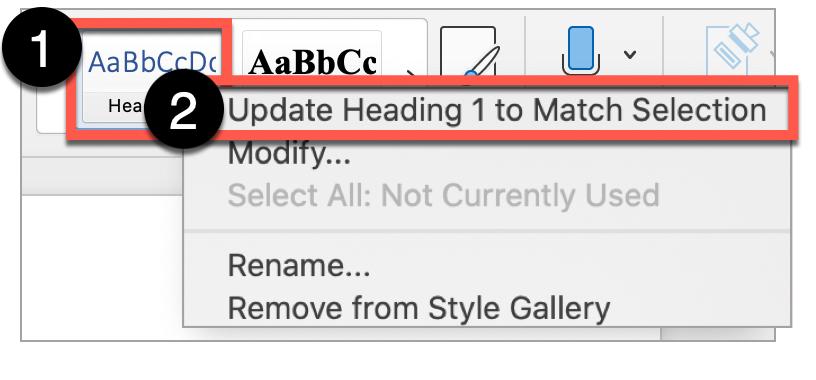
To change the appearance of a heading, read Modify a Style for more information or follow the directions below:
Highlight the heading.
Use the font and formatting tools to change the appearance.
Right-click the heading style.
Select Update Heading to Match Selection. This option will automatically update all of the heading styles in the document to the desired format.
The default Heading 1 and Heading 3 styles lack sufficient color contrast.
Lists
Lists provide a structured order to a group of connected or sequential content. A numbered or bulleted list may present the same information more effectively than simple data tables with fewer steps.
Lists in Microsoft Word
Highlight the grouped list of items.
In the Home tab, select the appropriate list style (i.e, numbered list or bulleted list).
Important considerations
For additional guidance on formatting lists, please review the information on Structure.
List guidelines:
Remove any lists manually created, such as those using dashes or asterisk characters. Manual lists are not “true” lists.
Avoid using indentation to provide a visual list in lieu of the list style button.
Ordered or numbered lists are used to present a group of items (words, phrases, sentences) that follow a sequence
Unordered or bulleted lists are used for a group of items without a sequence
Lists should contain at least two or more list items, unless being used to create an outline.
Nested lists are acceptable, such as a numbered list that contains a nested bulleted list.
Images
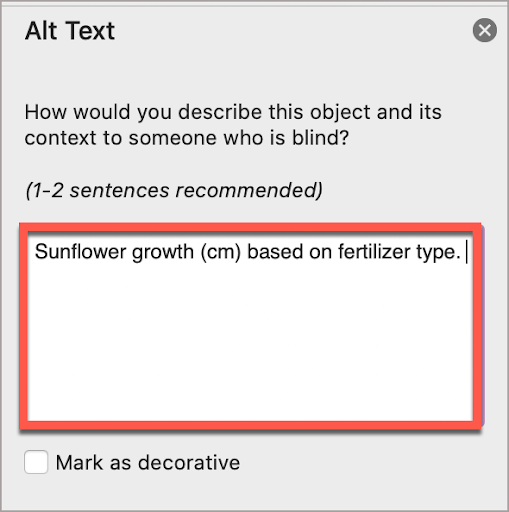
Images that support the content require a text description (also called “alt text”) that communicates the purpose and/or content of the image. This information is presented to the individual using assistive technologies, allowing them to hear the description of the image. Image descriptions should be short and communicate the main purpose of the image. Images that are considered decorative can be marked as such and are ignored by assistive technologies.
If a longer description of the image is necessary to fully explain its content, consider inserting a more detailed description of the image within the document text that precedes and/or follows the image.
Adding Alt Text
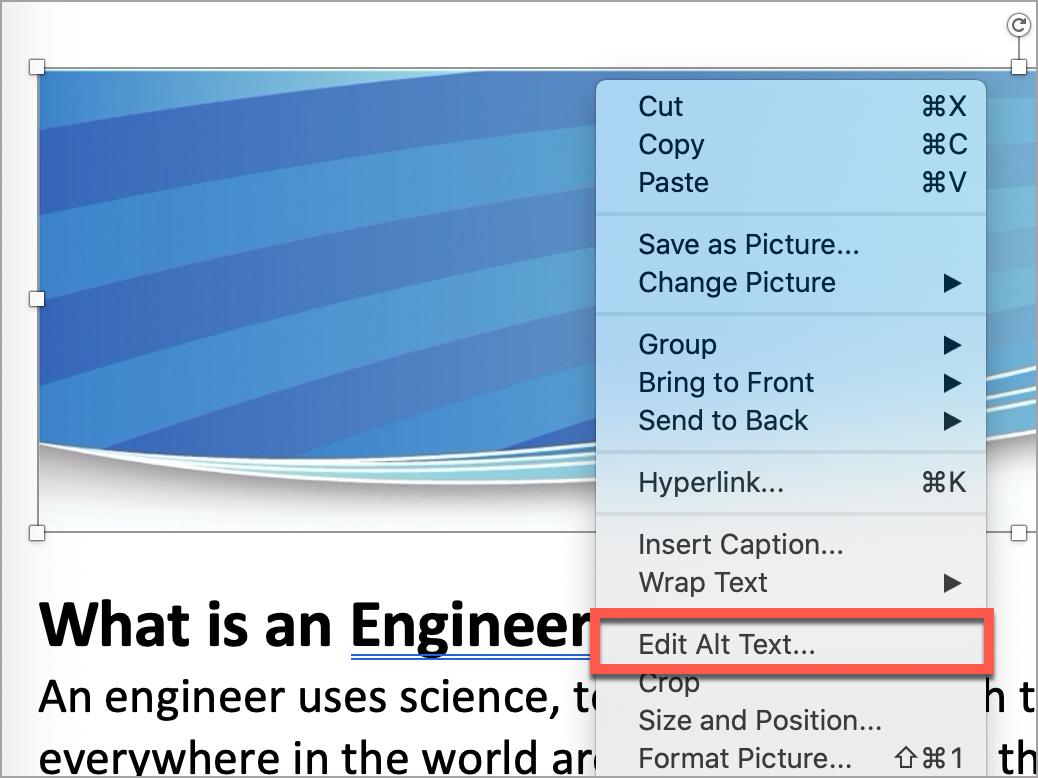
Select and right-click the image.
Select Edit Alt Text…
Provide a brief and concise description and “X” or close the window.
Marking a Decorative Image
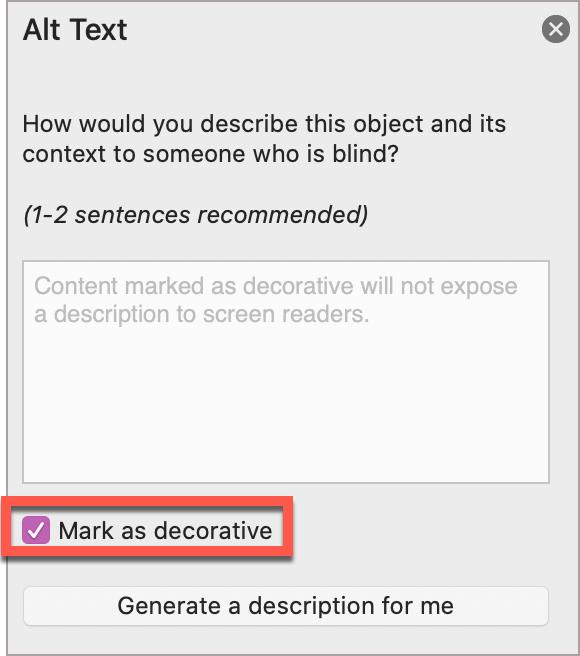
Select the image. Right-click the image.
Select Edit Alt Text…
Select Mark as decorative and “X” or close the window.
Important considerations
For additional guidance on writing effective text descriptions (i.e., alt text), please review the information on Images.
Technical guidelines
“Behind Text” or “In Front of Text” is not recommended due to how this format setting can obscure text and make the content difficult or impossible to read.
For older versions of Microsoft Word, leave the Title field bank, and only use the Description field for alt text.
Formatting guidelines
A text description should convey the purpose or content of the image in approximately 120 characters or less. Avoid repeating the same information as contained in the surrounding text.
If the image is complex, consider providing additional information in the surrounding text of the document while providing a shortened text description.
Do not include the file format in the alt text (Example: .JPEG, .PNG)
Do not include “picture of” or “image of” in the alt text.
For older versions of Microsoft Word, leave the Title field bank, and only use the Description field for alt text.
Hyperlinks
Documents containing hyperlinks to websites or other online resources can be improved by including hyperlink text that is understood by the reader. Using the full URL as the hyperlink text may not make sense to the reader, particularly if it is long.
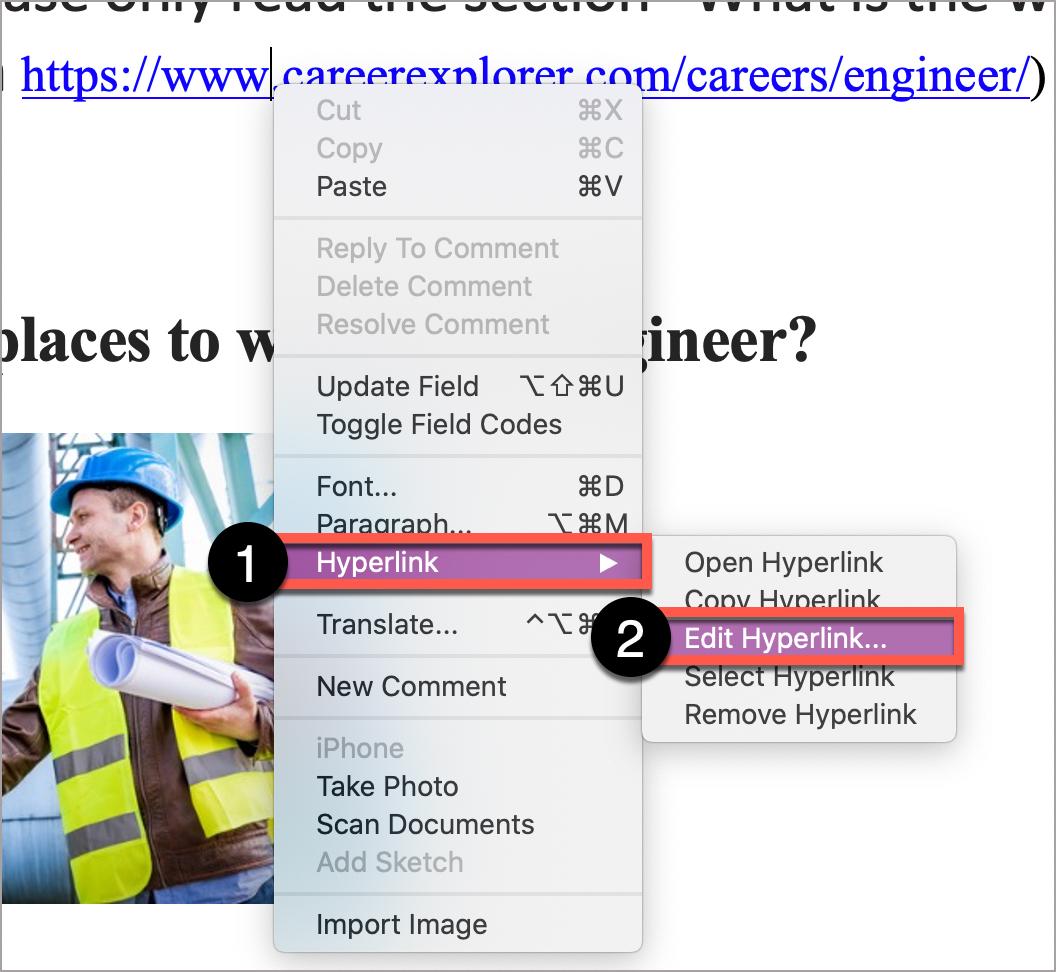
Place the cursor anywhere on the desired hyperlink. Right-click the hyperlink.
Select Hyperlink, then Edit Hyperlink.
Under Text to Display, write the descriptive text for the hyperlink, keeping the text name short and descriptive.
Select OK.
Important considerations
Use link text that is descriptive and or informs the person as to the link’s destination. For additional guidance on formatting and why descriptive text is important for hyperlinks, please review the information on Links.
Tables
Tables in Microsoft Word should be used for data and not layout purposes. An accessible table includes the following:
At least one header (row and/or column).
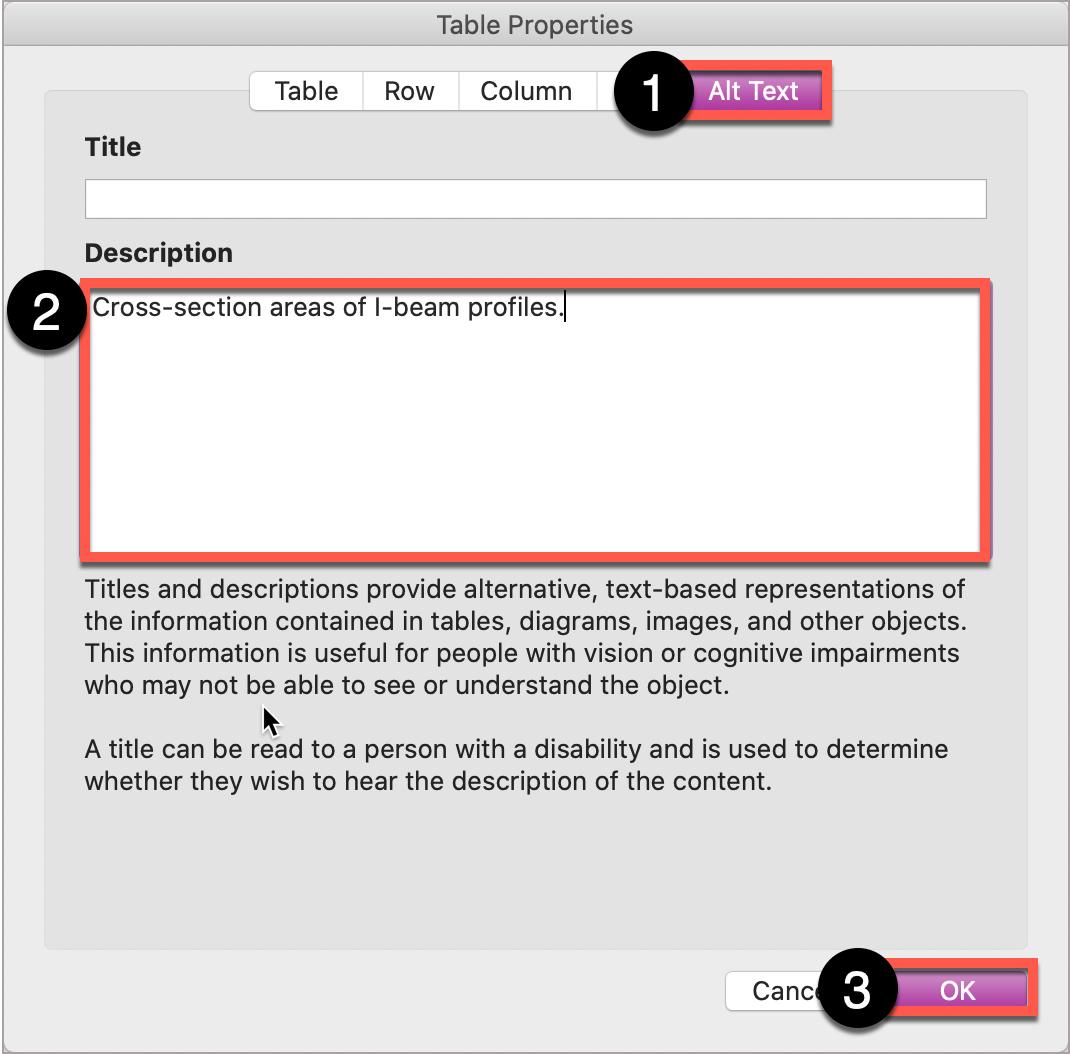
Alt Text description summarizing the table
Apply At Least One Header
To mark a header row for a data table:
Select the table to reveal Table Design. (Note: this tab will only appear if the table is selected.)
In the far left-hand section, determine the required header type:
Header row: check the box Header Row.
Column header: check the box First Column.
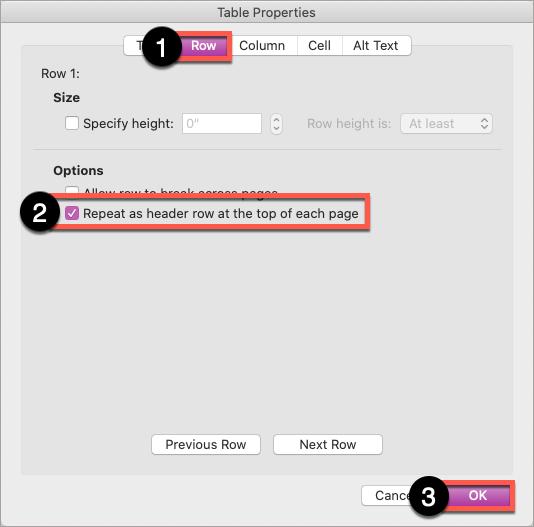
Highlight the header row of your table. Right-click the table. Select Table Properties.
In the Row tab, check the box Repeat as header row at the top of each page.
In the Alt Text tab, write a short, one sentence description of what the table information presents.
Select OK.
Alt Text description summarizing the table
Right-click the table. Select Table Properties.
In the Row tab, check the box Repeat as header row at the top of each page.
In the Alt Text tab, write a short, one sentence description of what the table information presents.
Select OK.
Color
Color can be an effective method to communicate ideas and draw attention to information. Ensuring there is sufficient contrast as well as using color in combination with other formatting can support a diverse campus community, including individuals with visual disabilities.
Contrast
When choosing colors to present text information in documents, choose color options that provide a contrast ratio of:
4.5:1 for regular text
3:1 for 18 point font and larger, or 14 point font and bold
In general, pastel colors or the “light” version of a particular color do not provide sufficient contrast against a white background.
Contrast ratios may be evaluated using tools such as:
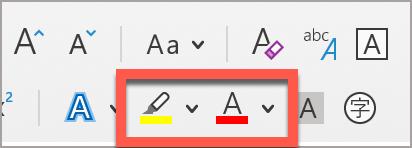
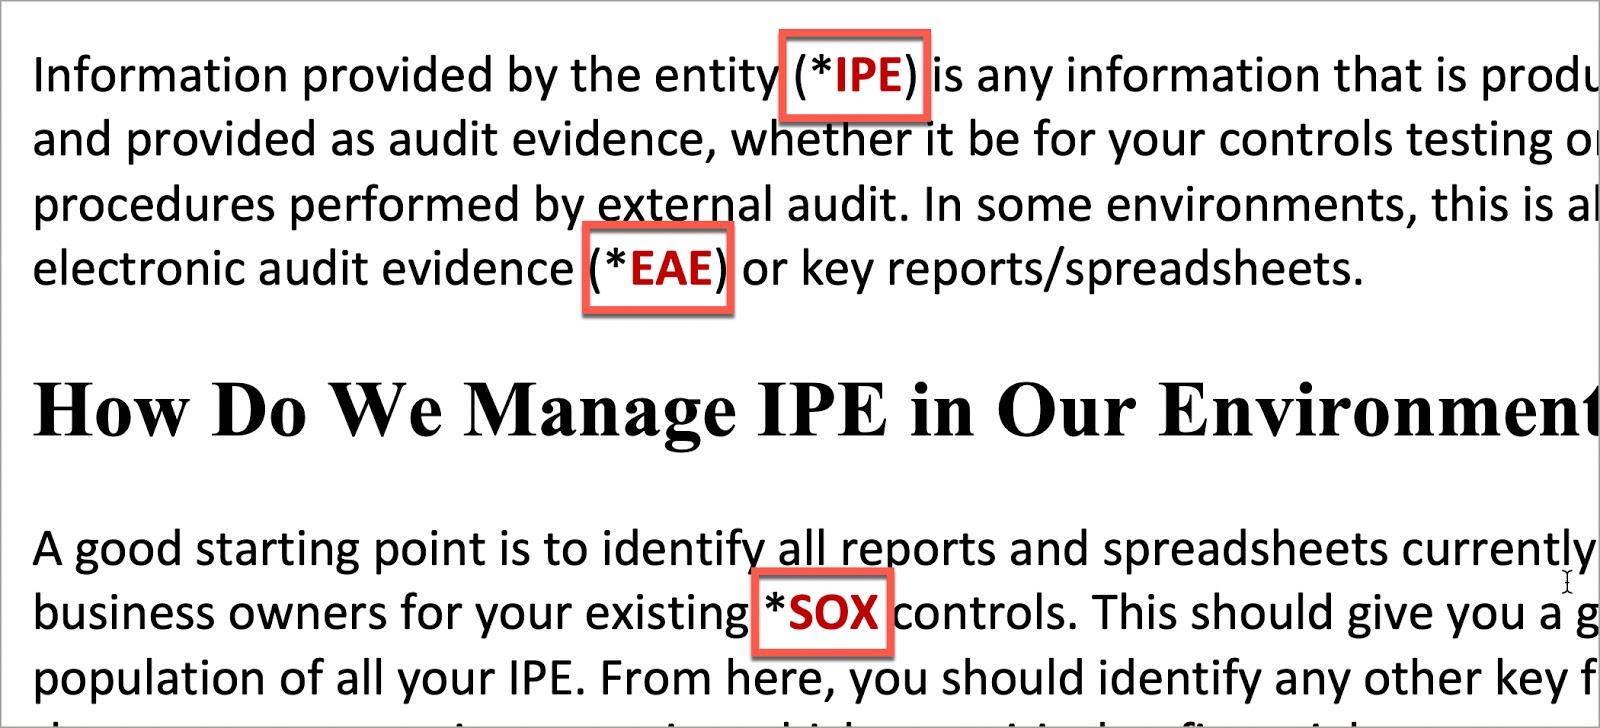
When using color to indicate a specific condition or state, include some formatting attribute to also provide a distinguishing characteristic. For example, if a list of vocabulary words were identified only in red text, this could present difficulties for an individual who had some type of color-blindness.
Options to support accessibility can include a combination of color AND formatting, such as:
Red text with Bold formatting
Using an asterisk, brackets, or other annotation symbols in addition to color
For more information on using color or these tools, please review the information on Color.
Accessibility Checker
Microsoft Word features an accessibility checker that can assist in identifying accessibility issues.
On the ribbon, select Review.
Select Check Accessibility.
The Accessibility checker will appear on the right-hand side.
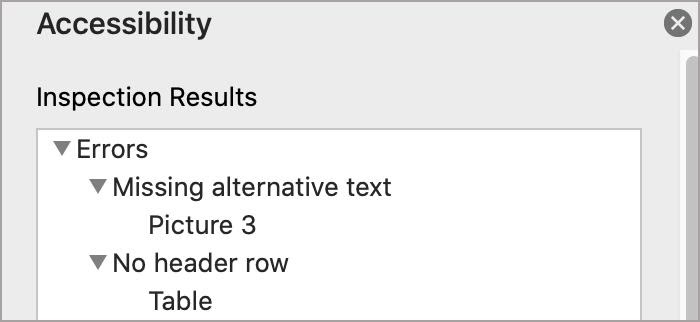
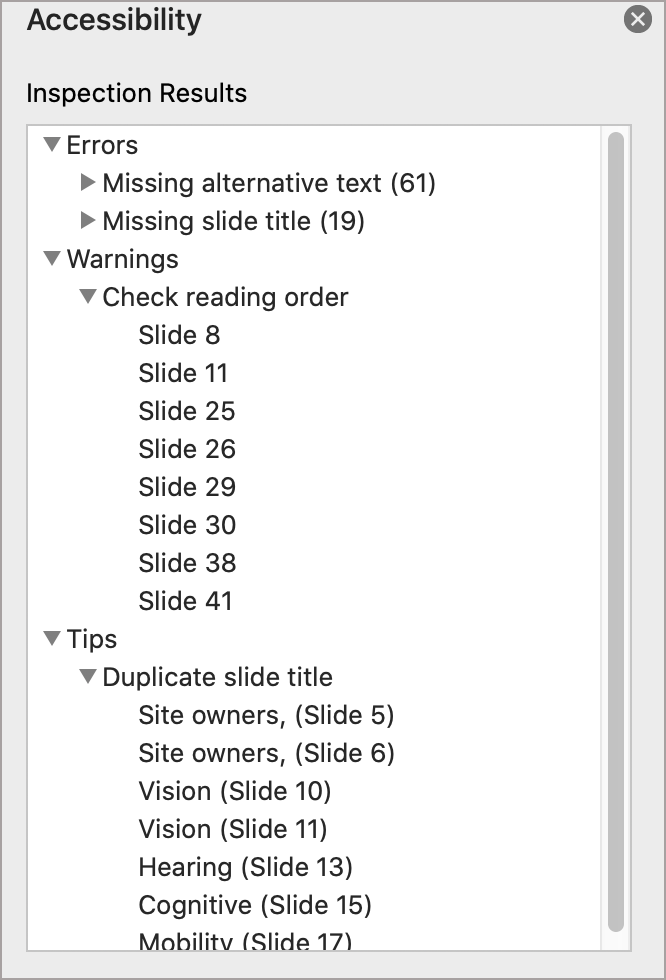
Errors, Warnings, and Tips
The Accessibility Checker presents the results in a pane on the right-hand side of the interface. It organizes the results into three categories: Errors, Warnings, and Tips.
Errors – Must Fix Errors are issues which indicate content that contains an accessibility issue and is extremely challenging, if not impossible, to read or understand.
Note the following cannot be completely resolved – these results will continuously appear:
Warnings – Most Likely Will Need to Address Warnings indicate that the content may be challenging for individuals with disabilities to read or understand. Resolving some Warning may require the author to consider a different visual or organizational layout.
Tips – Very Helpful Tips are pointers intended to help you improve the user experience of your audience by streamlining and organizing your content in certain ways. Tips provide additional guidance and will appear depending on the content.
The Accessibility Checker is a good starting point towards identifying potential accessibility issues in a document. Microsoft continually updates the Accessibility Checker rules and so newer versions of Microsoft products may result in a different list of accessibility results. Using the Accessibility Checker can help identify some of the more significant accessibility issues present in a document.
Exporting to Other Formats
Including accessible authoring practices into Microsoft Word documents allows for versions exported as other formats to retain most, if not all, accessibility features.
Important
Never choose a “Print” to PDF option in Office, or in any other program. A screen reader user may still be able to access the text of a PDF created in this way, but heading structure, alternative text, and any other tag structure will be lost.
Create PDF with MS Word
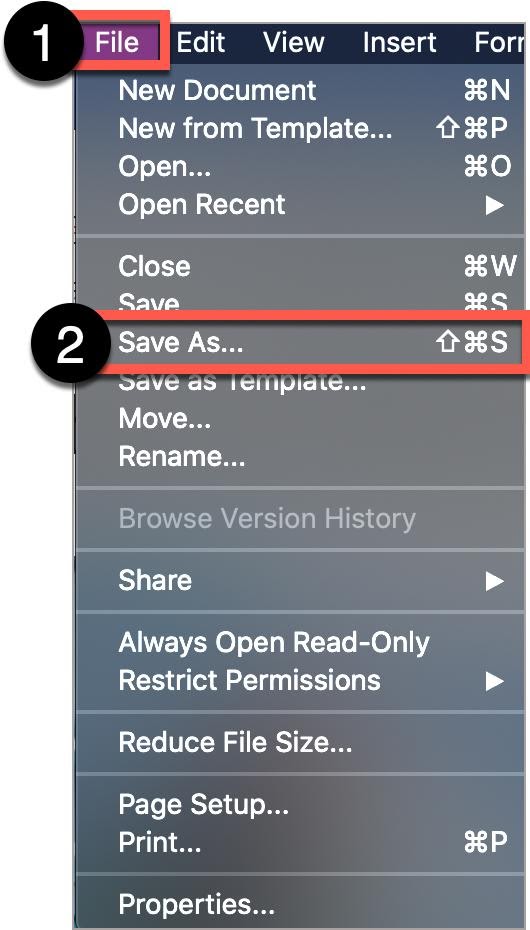
Mac
For Mac users, read Microsoft Word’s Support for converting to PDF on your Mac for additional guidance.
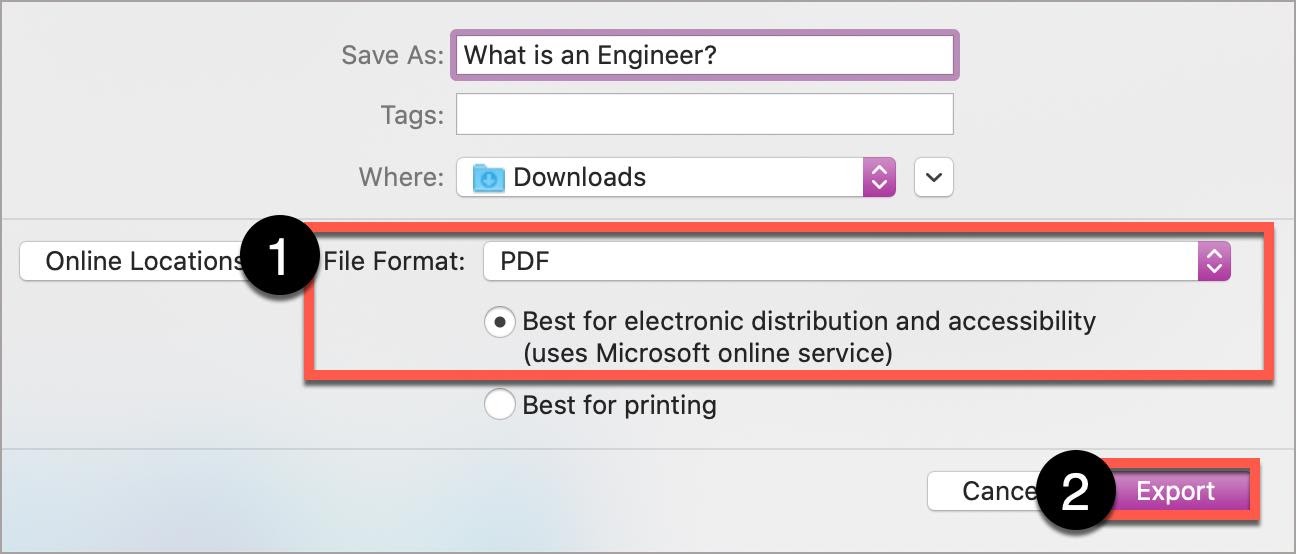
In File, select Save As…
Select PDF
Select the radio button, Best for electronic distribution and accessibility (uses Microsoft online service).
Select Export.
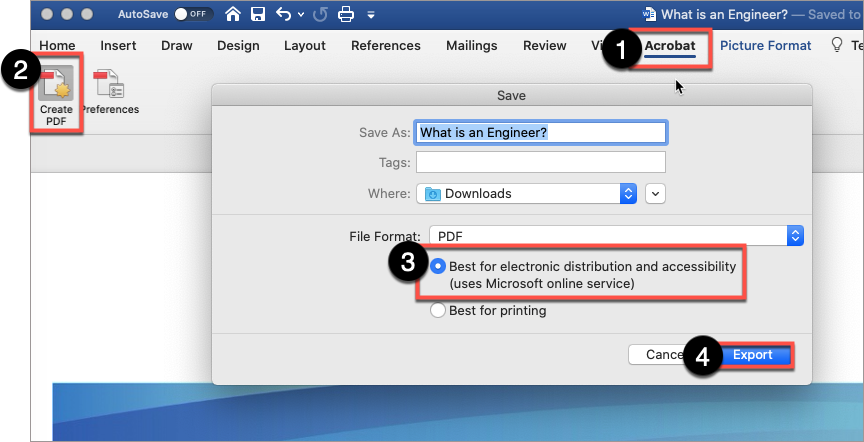
Create PDF with Acrobat
It is easier to create an accessible MS Word document rather than trying to fix accessibility issues in a PDF document.
Use the Acrobat plug-in in the ribbon. Select the Acrobat tab.
Select Create PDF.
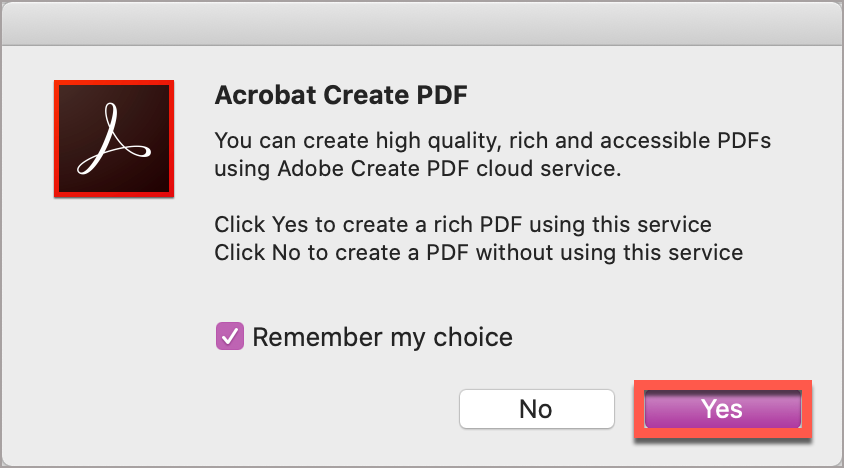
If using a Mac with Acrobat Adobe installed, select Best for electronic distribution and accessibility (uses Microsoft online service).
Microsoft PowerPoint includes options for adding accessibility information to slides to support access by individuals with disabilities. This information also ensures that Microsoft PowerPoint files maintain a level of accessibility when converted into other formats (e.g., tagged PDF). The best practices for Microsoft PowerPoint accessibility include:
Structure
Images
Links
Tables
Accessibility Checker
Exporting to Other Formats
Structure
In Microsoft PowerPoint presentations, the structure of the content can provide an organizational and navigational framework for individuals to understand the informational hierarchy and relationship between different sections of content. These structural elements can help determine the organization and logical reading order of the presentation for an individual using assistive technologies.
Slide Title
The Slide Title is used to provide a heading for the slide’s content. Slide titles should be unique and descriptive to help users navigate to specific content on the slides.
View and edit all titles quickly:
Select View.
Select Outline View.
Edit the titles according.
If slide titles that are the same, provide a numerical reference to differentiate the first slide from subsequent slides. For example, if there are two consecutive slides that cover the same topic, “Muscle Atrophy”, consider using “Muscle Atrophy 1” and “Muscle Atrophy 2”.
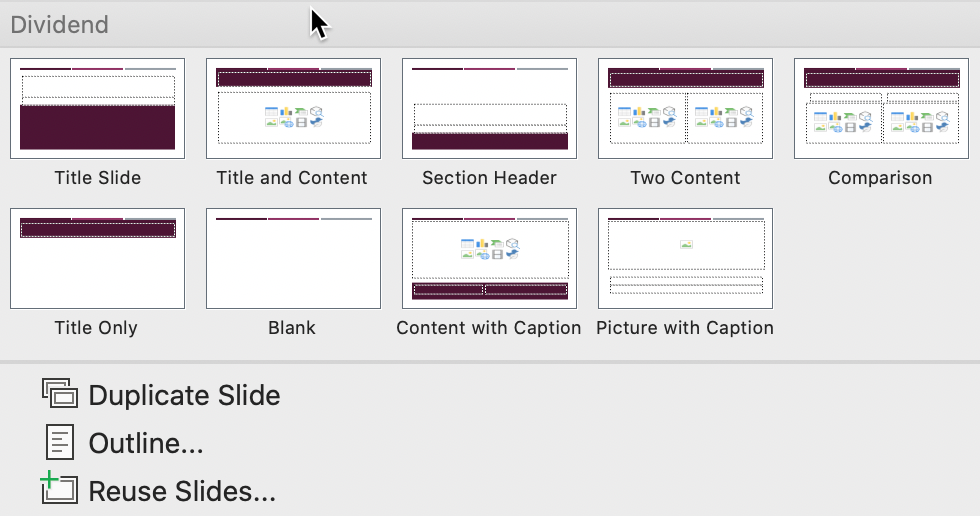
Slide Layout
Using preset slide layouts will automatically control the reading order and structure of content placed on the slide.
To choose a slide layout:
To locate Slide Layout, select Home > select New Slide.
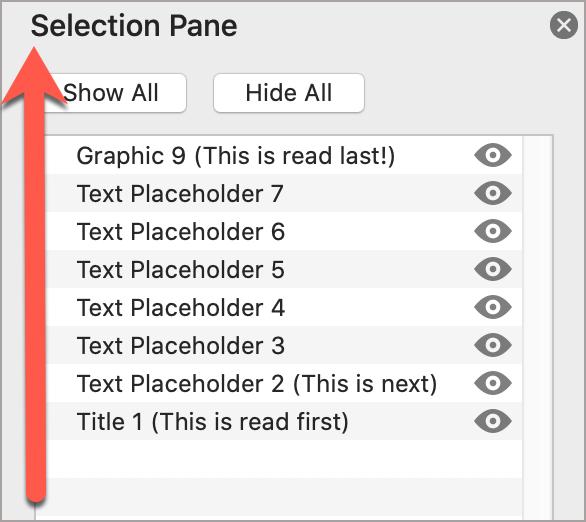
If text boxes are separately created from the preset slide layouts, this information may not be in the correct reading order. If content is manually placed onto a blank slide, you will need to assess and manage the reading order using the Arrange button.
To review and fix reading order:
Select Home > Arrange > Selection Pane
Reading order begins at the bottom of the list. First highlight the “Title” and use the Up Arrow to view the reading order on the slide.
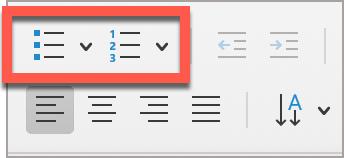
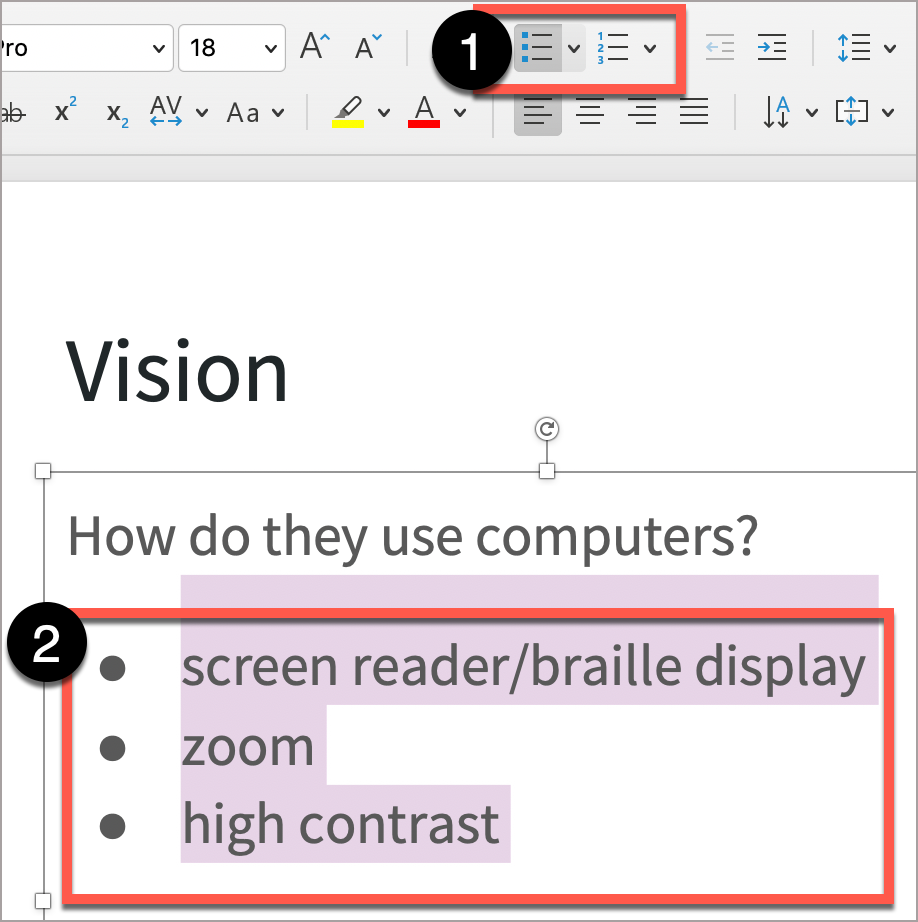
List
Use the built-in list styles to provide users additional guidance.
Do the grouped items convey a process or have a logical sequence? Use the number list style.
Is this grouped list of items in no particular order? Use the bullet list style.
Select Home.
Select either the bullet or number list style.
Images
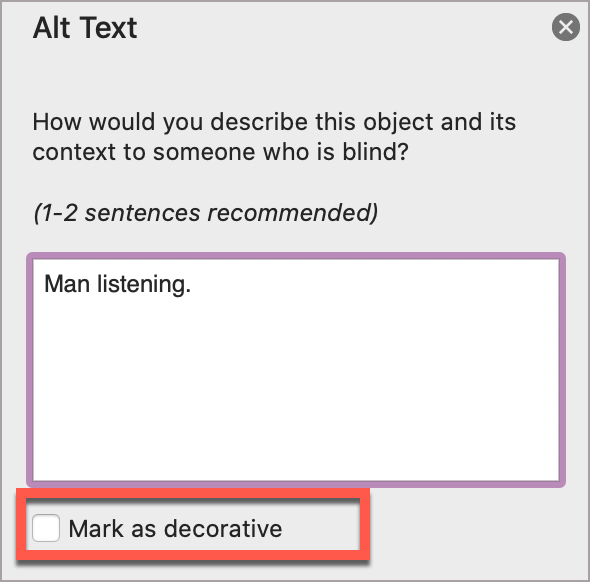
Images that support the content require a text description (also called “alternate text”) to communicate the purpose and/or content of the image. Image descriptions should be short and communicate the main purpose of the image. If a longer description of the image is necessary to fully explain its content, consider alternate strategies outlined on the Images page.
To add the alternate text:
Right-click the image.
Select Edit Alt Text…
In the Alt Text window, write a descriptive text.
For images that are not supplementary to the content, consider using the check box Mark as decorative.
Important considerations
For additional guidance on writing effective text descriptions (i.e., alt text), please review the information on Images.
Formatting guidelines
A text description should convey the purpose or content of the image in approximately 120 characters or less. Avoid repeating the same information as contained in the surrounding text.
If the image is complex, consider providing additional information in the surrounding text of the document while providing a shortened text description.
Do not include the file format in the alt text (Example: .JPEG, .PNG)
Do not include “picture of” or “image of” in the alt text.
For older versions of PowerPoint, leave the Title field bank, and only use the Description field for alt text.
Hyperlinks
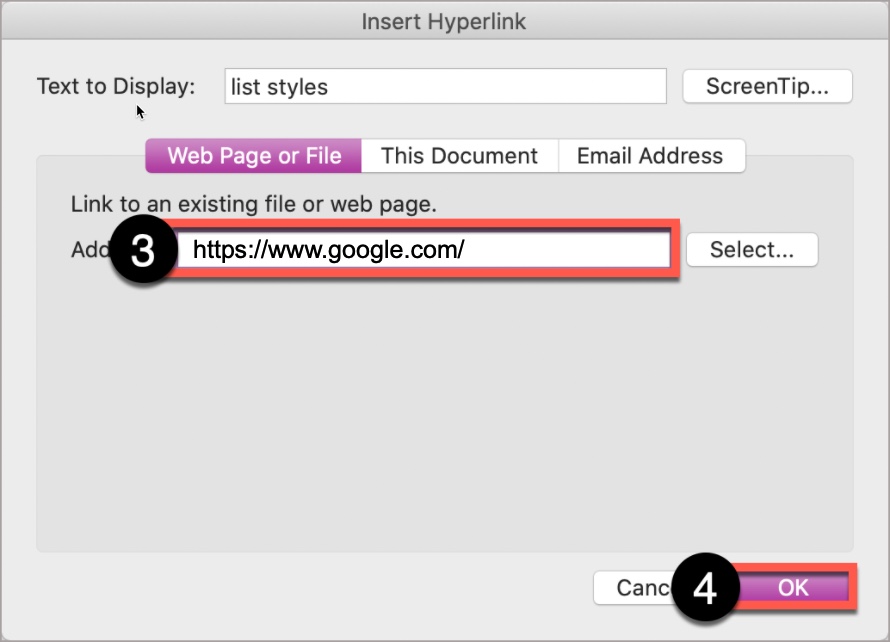
Documents containing hyperlinks to websites or other online resources can be improved by including hyperlink text that is understood by the reader. For instance, using the full hyperlink URL may not make sense to the reader without some context.
Highlight the short descriptive phase or words that will become the descriptive hyperlink.
Select the Link button in the menu.
In the Address field, add the desired URL.
Select OK.
For additional guidance, please refer to Links.
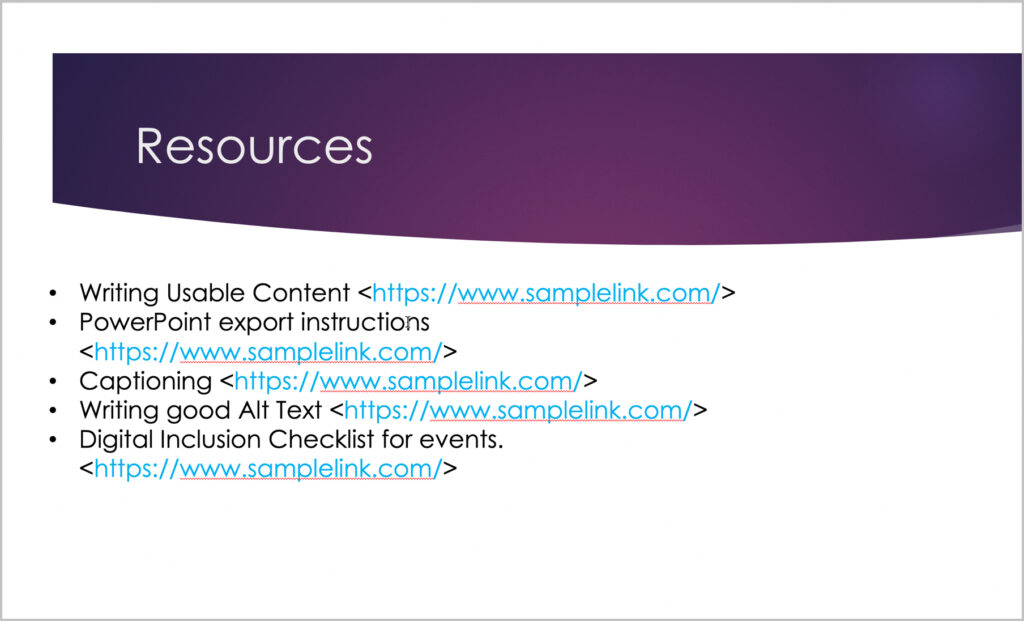
If the PowerPoint presentation is intended to also serve as a handout with resource hyperlinks, content authors may want to create a reference slide at the end that lists the full URL of the hyperlink.
Tables
When possible, use a simple table structure for tabular data. Using tables with split cells, merged cells, or nested tables can lead to issues with assistive technologies recognizing the appropriate column and row header information in a data table.
Avoid using a table to manage layout. Instead, use a Slide Layout that orients content into the appropriate visual layout as desired.
Tables should include the following:
At least one header (the row and/or column).
Alt Text description summarizing the table
Specify the Header
To mark a header row for a data table:
Select the table to reveal Table Design. (Note: this tab will only appear if the table is selected.)
In the far left-hand section, determine the required header type:
Header row: check the box Header Row.
Column header: check the box First Column.
Add Alt Text
Right-click on any of the white perimeter squares.
Select Edit Alt text…
Write descriptive Alt Text in the Alt Text field.
For additional guidance, please read Complex Graphs and Layouts.
Color
Color can be an effective method to communicate ideas and draw attention to information. Insufficient color and contrast can limit the ability of others to perceive and understand the presentation.
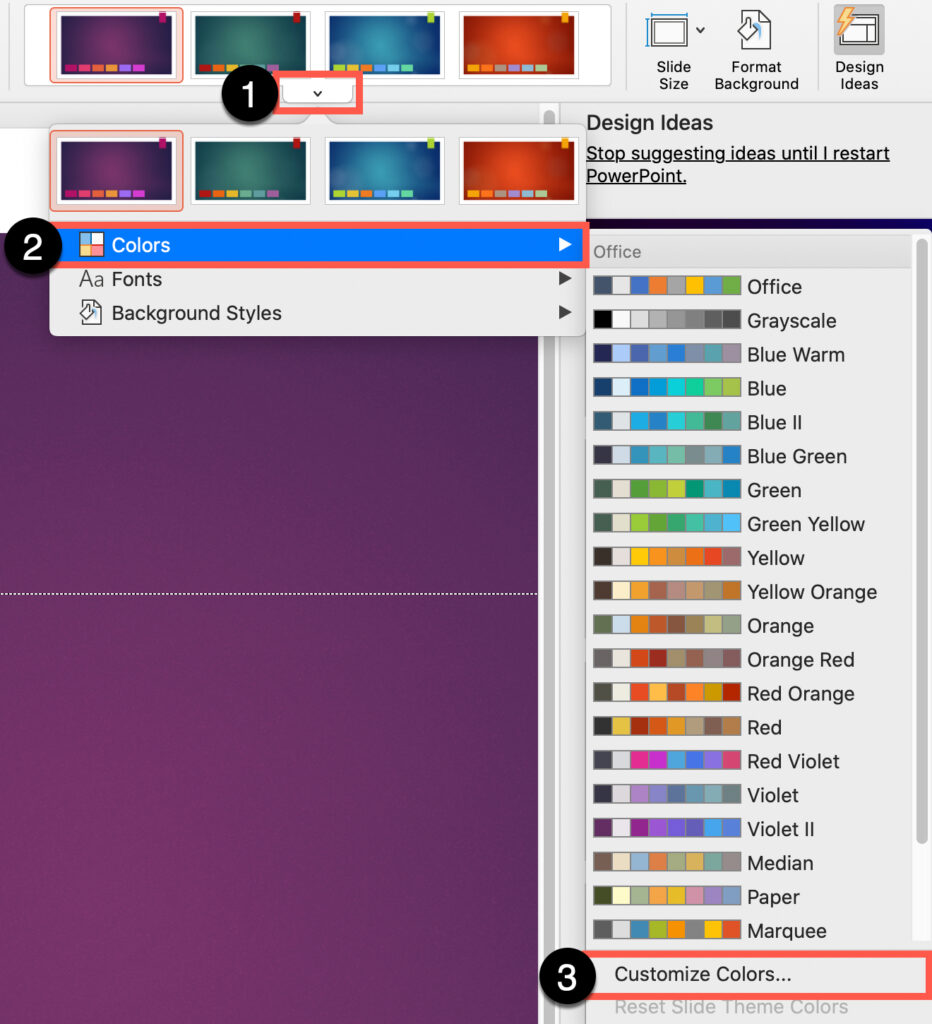
PowerPoint offers a variety of slide themes, but not all of these will provide sufficient contrast. To edit Slide Theme colors:
Select Design > expand the Color Palette Menu to reveal available color combinations.
Select Colors to review the pre-built color palettes or select Customize Colors…to create a slides that have appropriate color contrast.
Select one with accessible contrast, or select Customize Colors… to manually select the colors. Alternatively, you can use other methods in Microsoft PowerPoint to remove or change the current theme in your presentation.
Accessibility Checker
Evaluate your PowerPoint accessibility using the Accessibility Checker. Please read Microsoft’s support to learn how to improve accessibility with the Accessibility Checker.
Errors, Warnings, and Tips
The Accessibility Checker presents the results in a pane on the right-hand side of the interface. It organizes the results into three categories: Errors, Warnings, and Tips.
Errors – Must Fix Errors are issues which indicate content that contains an accessibility issue and is extremely challenging, if not impossible, to read or understand.
Note the following cannot be completely resolved – these results will continuously appear:
Warnings – Most Likely Will Need to Address Warnings indicate that the content may be challenging for individuals with disabilities to read or understand. Resolving some Warning may require the author to consider a different visual or organizational layout.
Tips – Very Helpful Tips are pointers intended to help you improve the user experience of your audience by streamlining and organizing your content in certain ways. Tips provide additional guidance and will appear depending on the content.
The Accessibility Checker is a good starting point towards identifying potential accessibility issues in a document. Microsoft continually updates the Accessibility Checker rules and so newer versions of Microsoft products may result in a different list of accessibility results. Using the Accessibility Checker can help identify some of the more significant accessibility issues present in a document.
To check accessibility:
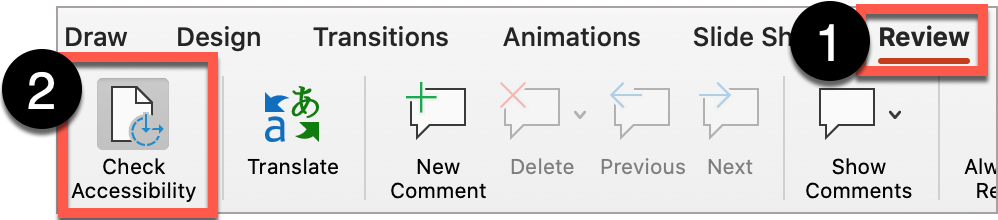
Select Review.
Select Check Accessibility.
Exporting to Other Formats
Important
Never choose a “Print” to PDF option in Office, or in any other program. A screen reader user may still be able to access the text of a PDF created in this way, but heading structure, alternative text, and any other tag structure will be lost.
Creating a PDF
Mac
Create PDF with PowerPoint using “Save As”
Users of PowerPoint for Mac should be cautioned that exporting to PDF will not yield an accessible, tagged PDF document, it must be remediated using Acrobat Pro.
Create PDF with Acrobat
Use the Acrobat plug-in in the ribbon. Select the Acrobat tab.
Select Create PDF.
Adobe Acrobat will automatically open and present your content in PDF format.
Windows
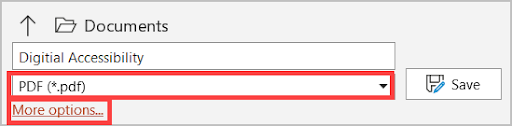
Create PDF with PowerPoint using “Save As”
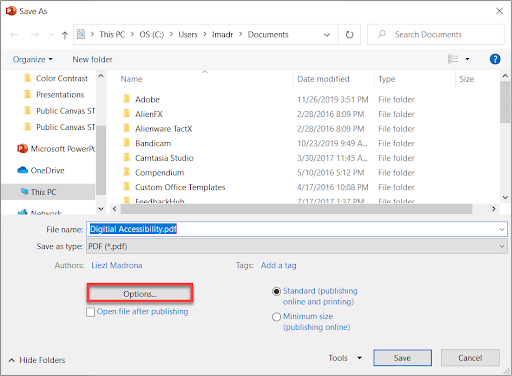
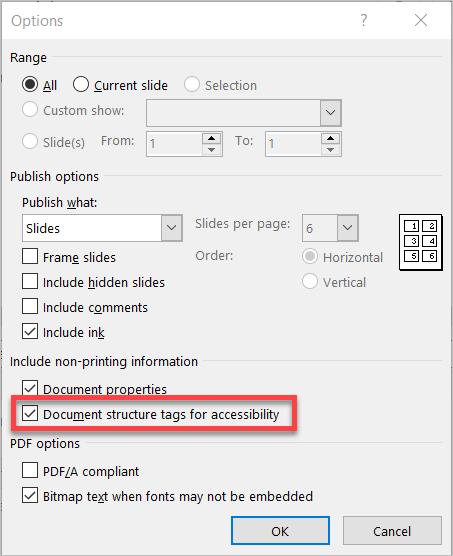
Select File > Save As
Select PDF > More options… Alt Text: In the Windows version of PowerPoint, select file, then Save As. Choose PDF from the file format menu, then More Options.
In the Save As dialog, select Options.
Verify in Options dialog that Document structure tags for accessibility is selected. Select OK.
Create PDF with Acrobat
Use the Acrobat plug-in in the ribbon. Select the Acrobat tab.
Select Create PDF.
Windows
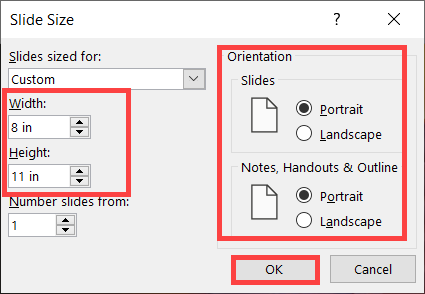
Specify your flyer dimensions via the Design tab, select Slide Size > Custom Slide Size…
Determine the Width and Height in inches & select OK. Standard paper size:
Width: 8 in
Height 11 in
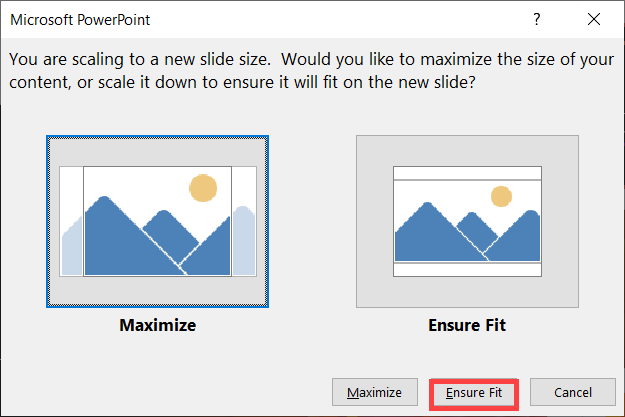
The Microsoft Powerpoint dialog will appear. Select Ensure Fit to avoid cropping out content from the slide size frame.
Select Arrange to manage reading order. Apply accessibility principles such as alt text, descriptive hyperlinks,
Creating a Lecture Video of Your PPT presentation
Here are some guidelines for creating and posting PowerPoint lecture presentations.
Create a transcript to read from or prepare an outline of points to help you create concise videos.
An audio recording needs a transcript to allow individuals who are deaf or hard of hearing to access your content.
The transcript is a text equivalent of the audio recording and should include not only the spoken information, but also identify any speakers or other sound effects as part of the recording. A transcript may be useful in its own right as a learning tool for students, who can read the text and search for keywords.
When screencasting, provide a brief description of on-screen content and actions. This provides concept reinforcement and allows students to easily follow along whether they rely on listening or prefer to listen to just the audio to study. Read more about audio description.
Provide your students an accessible version of your presentation and transcript (if available).