The Online Ed team in collaboration with MiraCosta College’s Access Specialist bring the 2025-26 Accessibility Support Workshop series focusing on Accessibility and Universal Design for Learning. Recordings from this series are below.
Fall 2025
The Big Picture in Accessibility- Federal, State, and Local policies on Accessibility (Zoom Recording- 27 mins) 9/10/2025 workshop by Aaron Holmes. Nadia Khan shared the connection between Universal Design for Learning and Accessibility. View slides
At MiraCosta College, we view accessibility as an essential equity-minded practice and are committed to fostering welcoming, accessible, and inclusive digital spaces for everyone. Just as Universal Design for Learning (UDL) strives to provide all individuals with equal opportunities to learn by designing flexible environments that account for the wide variability of learners, we encourage an approach that ensures that digital content is perceivable, operable, understandable, and robust for all users. This dedication helps transform the digital realm from a potential barrier into a powerful solution, increasing independent access to information and engagement for all. To embark on your journey toward creating these empowering digital learning environments, select the relevant tile to choose your path.
Accessibility Essentials
Learn why accessibility matters and gain strategies for creating inclusive content through the lens of Universal Design for Learning (UDL).
Evaluate your digital content using this accessibility-focused checklist. For information on accessibility and remediation of content visit the Accessibility section.
1. Initial Accessibility Check
Run an accessibility checker to identify errors (tutorials for each are linked below):
PopeTech or Canvas Accessibility Checker for Canvas Pages
Ensure an alternate access plan to accommodate students who may run into trouble due to any of the above items not being complete.
Any third-party technologies that students are expected to use in the course are accessible to folks with disabilities. (Technologies supported by MiraCosta should be accessible to most or all students. If you are using other technologies, it is your responsibility to verify accessibility.)
Pope Tech is an accessibility remediation tool available to instructors in Canvas. This tool gives instructors a quick but powerful way to check for and fix common accessibility concerns in Canvas content. Ensuring your Canvas courses are free of accessibility concerns helps support inclusion and equity for all students, and also is a requirement of MiraCosta policies as well as state and federal regulations.
MiraCosta College has two Pope Tech Canvas LMS tools:
Accessibility Guide – a page-by-page accessibility checker and remediation assistant for Canvas
Accessibility Dashboard – a course-level dashboard allowing you to review and correct accessibility issues throughout an entire Canvas course
Pope Tech Accesibility Guide Overview (PDF) is a handy 2-page overview. You may also watch this 7-minute video for a helpful demonstration of how Pope Tech works in Canvas:
Instructor Accessibility Guide: Demo for Canvas LMS
Pope Tech Detailed Guidance
Click any of the items below to view more details, including video guides, for using Pope Tech.
What Canvas elements can be tested? What does Pope Tech check for?
What Canvas elements can faculty test with Pope Tech?
Most areas where faculty use the Canvas Rich Content Editor can be tested with Pope Tech:
Canvas pages
Syllabus
Quiz descriptions
Discussion Topics
Assignments
Announcements
To test a Canvas item for accessibility concerns, activate Pope Tech by selecting the button at left of the Cancel and Save buttons while editing any of the Canvas items above. Pope Tech works even when the item is not yet published.
What does Pope Tech check for?
If headers are present or skipped
Flags suspicious alt text for images (contains “image of”, “image”, etc.)
Color contrast between text and highlighted colored-background (Note: doesn’t check color contrast within images)
If font size is readable
Flags non-descriptive links such as “click here”, “link”, “more”, “read more”
Flags redundant links
Flags tables that lack at least one header and caption.
Flags YouTube, Canvas embedded video and Canvas embedded audio to bring awareness media will need to be manually reviewed for captions
Flags potential inaccessible files that need to be manually reviewed
How do I use Pope Tech?
Using Pope Tech is simple and intuitive.
Step 1: Open Pope Tech
To access the PopeTech Course Dashboard tool, click Pope Tech Accessibility in any Canvas course menu.
To test an individual Canvas item for accessibility concerns, activate Pope Tech by selecting the icon next to the Cancel and Save buttons on a Canvas item while using the Rich Content Editor.
Step 2: Use Pope Tech to Locate and Fix Accessibility Issues
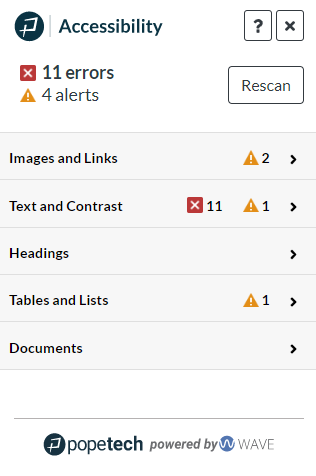
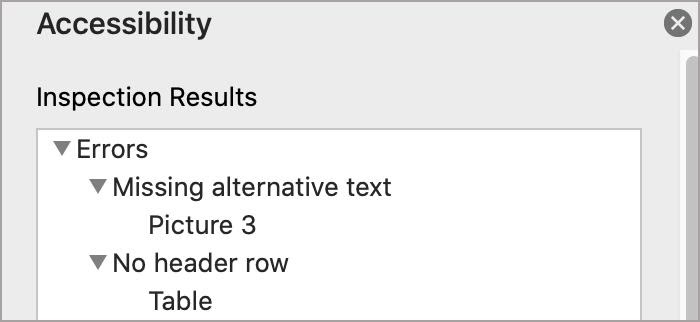
When Pope Tech is activated, the Pope Tech menu appears on the right-hand side of the screen. At the top of the interface, the number of errors and alerts will need to be addressed.
Errors are accessibility errors and should be looked at for remediation.
Alerts are suspicious areas. Alerts may or may not be an accessibility error. The user should review these and fix if necessary.
Rescan can be used once errors and alerts are fixed. This will allow the user to scan the page a second time and verify that all fixes were applied correctly.
Note: Files, videos, and audio will always be listed as alerts, as these require manual review with human eyes!
In the example below, we have 11 errors and 4 alerts.
In the Pope Tech interface, results are organized by the following categories:
Images and Links
Text and Contrast
Headings
Tables and Lists
Documents and Videos
Each of the categories can be expanded to show the errors or alerts. To view the content raising an error or alert:
Select the arrow displayed next to any category name. Once you expand a category, Pope Tech will display fields grouping together issues within that category.
Click any field to view detailed results and how to fix them.
Click a particular result to highlight the indicated content within the Canvas editor, enabling you to fix that content.
This quick (42 second) video demonstrates the process described above:
Video Demos: Fixing Alternative Text, Color Contrast, and Table Errors
Fixing Alternative Text
Alternative Text errors are listed in the Images and Links category of the Pope Tech tool. This video demonstrates how to fix such errors:
https://youtu.be/sHs7gQLaihs
Fixing Color Contrast
Color Contrast errors are listed in the Text and Contrast category of the Pope Tech tool. Users can fix color contrast errors by one of two methods:
Adjust the color in the Canvas rich text editor.
Adjust the contrast by using the sliders in the Pope Tech interface until the interface displays a “Pass” message.
This video demonstrates how to fix such errors:
https://youtu.be/2aDRvb-VGBA
Fixing Table Captions and Headers
Table errors are listed in the Tables and Lists area of Pope Tech. Using Pope Tech, it is very simple to add a table caption and designate whether the first row or the first column must be the header. This video demonstrates how to fix such errors:
https://youtu.be/AFPkAQ4knDw
Accessibility Issues Explained, from PopeTech
Click any link below for details about common accessibility issues, why it matters, and what to do to fix/avoid the issue.
Thanks to Tracy Schaelen of Southwestern College for originally developing content represented here, and to Liesl Boswell of the CCC Accessibility Center for some modifications and suggestions.
Microsoft Word includes options for adding accessibility information to documents to support access by individuals with disabilities. This information also ensures that Microsoft Word documents converted into other formats (e.g., tagged PDF, ePub, DAISY, etc.) maintain this level of accessibility. The best practices for Microsoft Word accessibility include attention to:
Headings & Structure
Images
Links
Tables
Color
Accessibility Checker
Exporting to Other Formats
Structure
Page structure provides visual references to help readers scan the content. Microsoft Word Accessibility can be improved by adding the following:
Headings
Lists
Headings
Headings can provide an organizational and navigational framework for a document’s content, communicating both the informational hierarchy and relationship between different sections. Headings also provide a simple mechanism for an individual using assistive technologies to “jump” from one heading to the next when navigating the document.
From the Home tab, choose the Styles Pane. This will open the list of heading and other styles for use in the document.
Place focus on the appropriate content and choose the relevant heading style.
Headings can be marked with the following
Mac keyboard shortcuts:
+Option+1 applies the Heading 1 style
+Option+2 applies the Heading 2 style
+Option+3 applies the Heading 3 style
Windows keyboard shortcuts:
CTRL + ALT + 1 applies the Heading 1 style
CTRL + ALT + 2 applies the Heading 2 style
CTRL + ALT + 3 applies the Heading 3 style
Important considerations
Technical guidelines:
Headings should follow a logical structure that identifies content based on the organizational content and hierarchy of information in the document.
Avoid skipping heading levels – modify the style of the heading if you prefer a specific font or appearance.
Formatting guidelines:
For additional guidance on formatting, please review the information on Structure.
Headings should be short and succinct
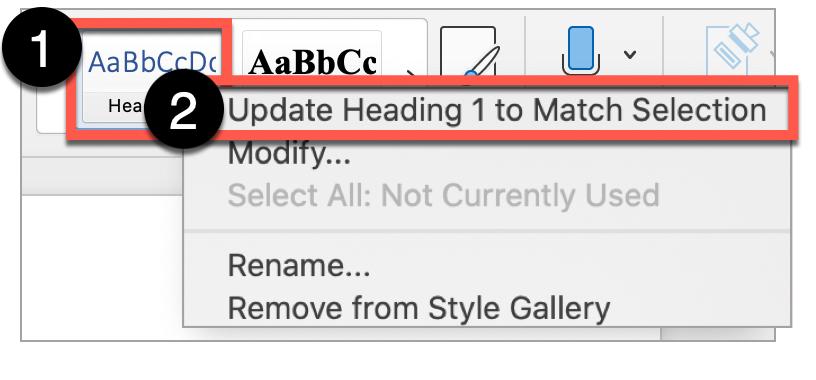
To change the appearance of a heading, read Modify a Style for more information or follow the directions below:
Highlight the heading.
Use the font and formatting tools to change the appearance.
Right-click the heading style.
Select Update Heading to Match Selection. This option will automatically update all of the heading styles in the document to the desired format.
The default Heading 1 and Heading 3 styles lack sufficient color contrast.
Lists
Lists provide a structured order to a group of connected or sequential content. A numbered or bulleted list may present the same information more effectively than simple data tables with fewer steps.
Lists in Microsoft Word
Highlight the grouped list of items.
In the Home tab, select the appropriate list style (i.e, numbered list or bulleted list).
Important considerations
For additional guidance on formatting lists, please review the information on Structure.
List guidelines:
Remove any lists manually created, such as those using dashes or asterisk characters. Manual lists are not “true” lists.
Avoid using indentation to provide a visual list in lieu of the list style button.
Ordered or numbered lists are used to present a group of items (words, phrases, sentences) that follow a sequence
Unordered or bulleted lists are used for a group of items without a sequence
Lists should contain at least two or more list items, unless being used to create an outline.
Nested lists are acceptable, such as a numbered list that contains a nested bulleted list.
Images
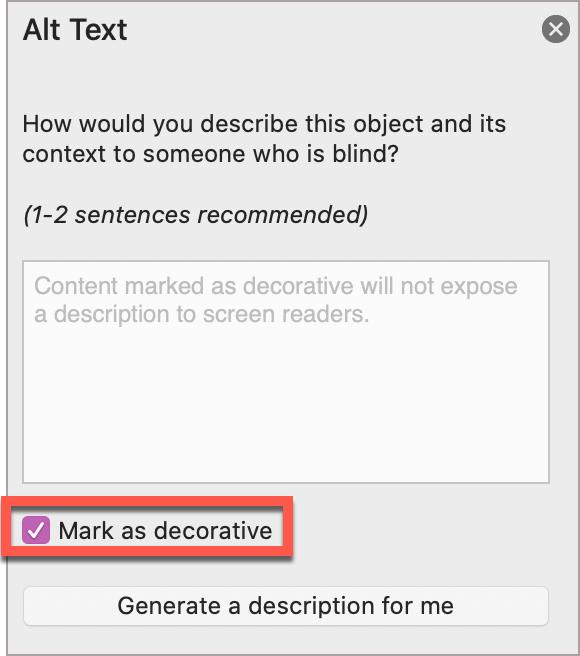
Images that support the content require a text description (also called “alt text”) that communicates the purpose and/or content of the image. This information is presented to the individual using assistive technologies, allowing them to hear the description of the image. Image descriptions should be short and communicate the main purpose of the image. Images that are considered decorative can be marked as such and are ignored by assistive technologies.
If a longer description of the image is necessary to fully explain its content, consider inserting a more detailed description of the image within the document text that precedes and/or follows the image.
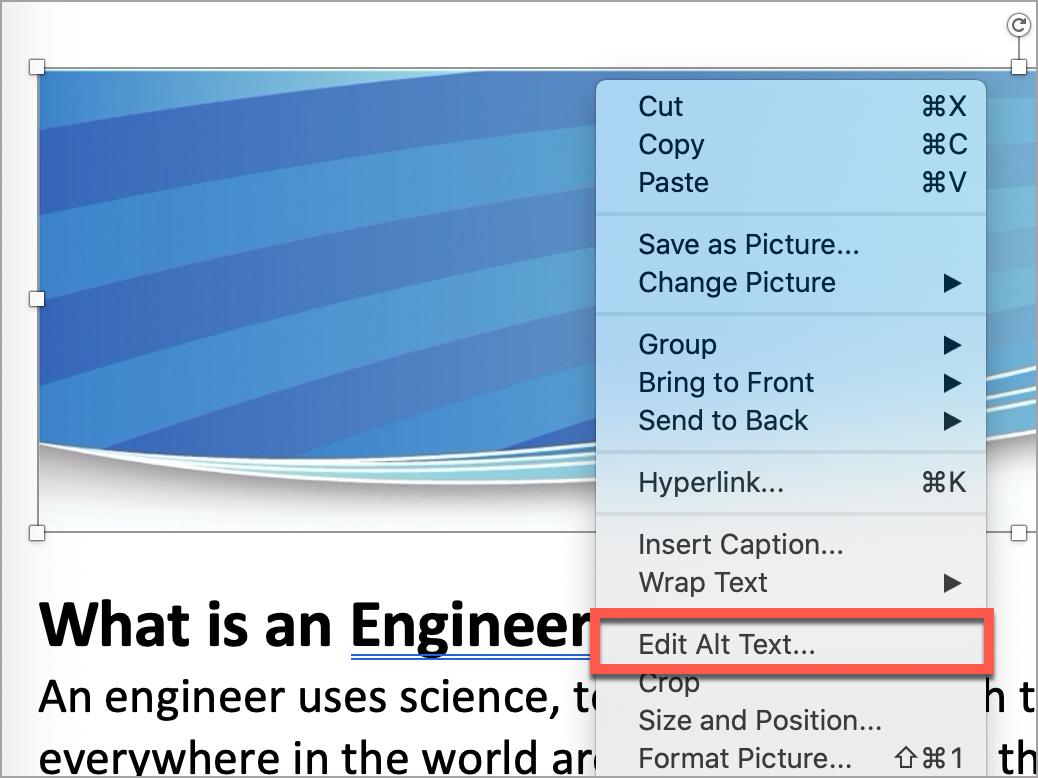
Adding Alt Text
Select and right-click the image.
Select Edit Alt Text…
Provide a brief and concise description and “X” or close the window.
Marking a Decorative Image
Select the image. Right-click the image.
Select Edit Alt Text…
Select Mark as decorative and “X” or close the window.
Important considerations
For additional guidance on writing effective text descriptions (i.e., alt text), please review the information on Images.
Technical guidelines
“Behind Text” or “In Front of Text” is not recommended due to how this format setting can obscure text and make the content difficult or impossible to read.
For older versions of Microsoft Word, leave the Title field bank, and only use the Description field for alt text.
Formatting guidelines
A text description should convey the purpose or content of the image in approximately 120 characters or less. Avoid repeating the same information as contained in the surrounding text.
If the image is complex, consider providing additional information in the surrounding text of the document while providing a shortened text description.
Do not include the file format in the alt text (Example: .JPEG, .PNG)
Do not include “picture of” or “image of” in the alt text.
For older versions of Microsoft Word, leave the Title field bank, and only use the Description field for alt text.
Hyperlinks
Documents containing hyperlinks to websites or other online resources can be improved by including hyperlink text that is understood by the reader. Using the full URL as the hyperlink text may not make sense to the reader, particularly if it is long.
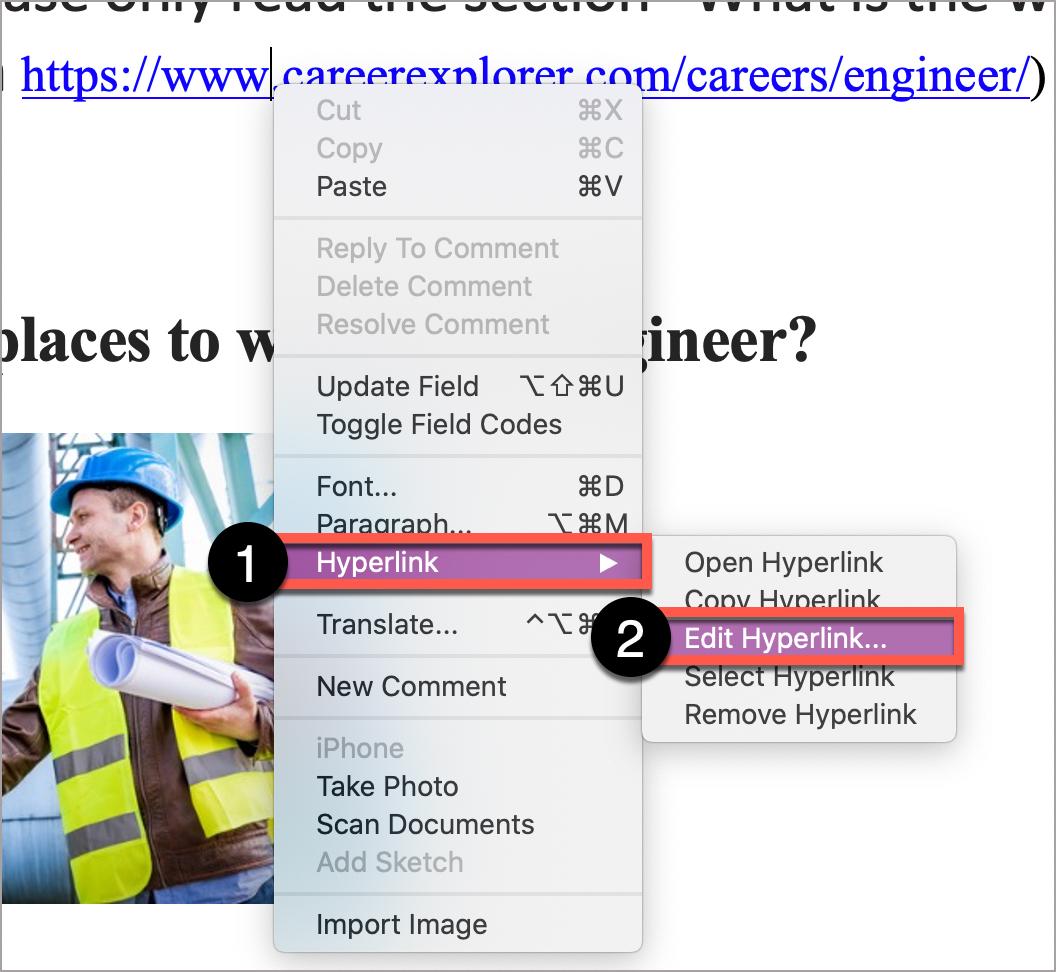
Place the cursor anywhere on the desired hyperlink. Right-click the hyperlink.
Select Hyperlink, then Edit Hyperlink.
Under Text to Display, write the descriptive text for the hyperlink, keeping the text name short and descriptive.
Select OK.
Important considerations
Use link text that is descriptive and or informs the person as to the link’s destination. For additional guidance on formatting and why descriptive text is important for hyperlinks, please review the information on Links.
Tables
Tables in Microsoft Word should be used for data and not layout purposes. An accessible table includes the following:
At least one header (row and/or column).
Alt Text description summarizing the table
Apply At Least One Header
To mark a header row for a data table:
Select the table to reveal Table Design. (Note: this tab will only appear if the table is selected.)
In the far left-hand section, determine the required header type:
Header row: check the box Header Row.
Column header: check the box First Column.
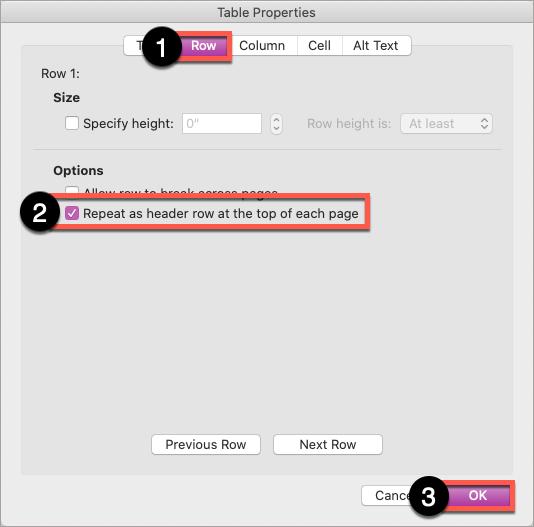
Highlight the header row of your table. Right-click the table. Select Table Properties.
In the Row tab, check the box Repeat as header row at the top of each page.
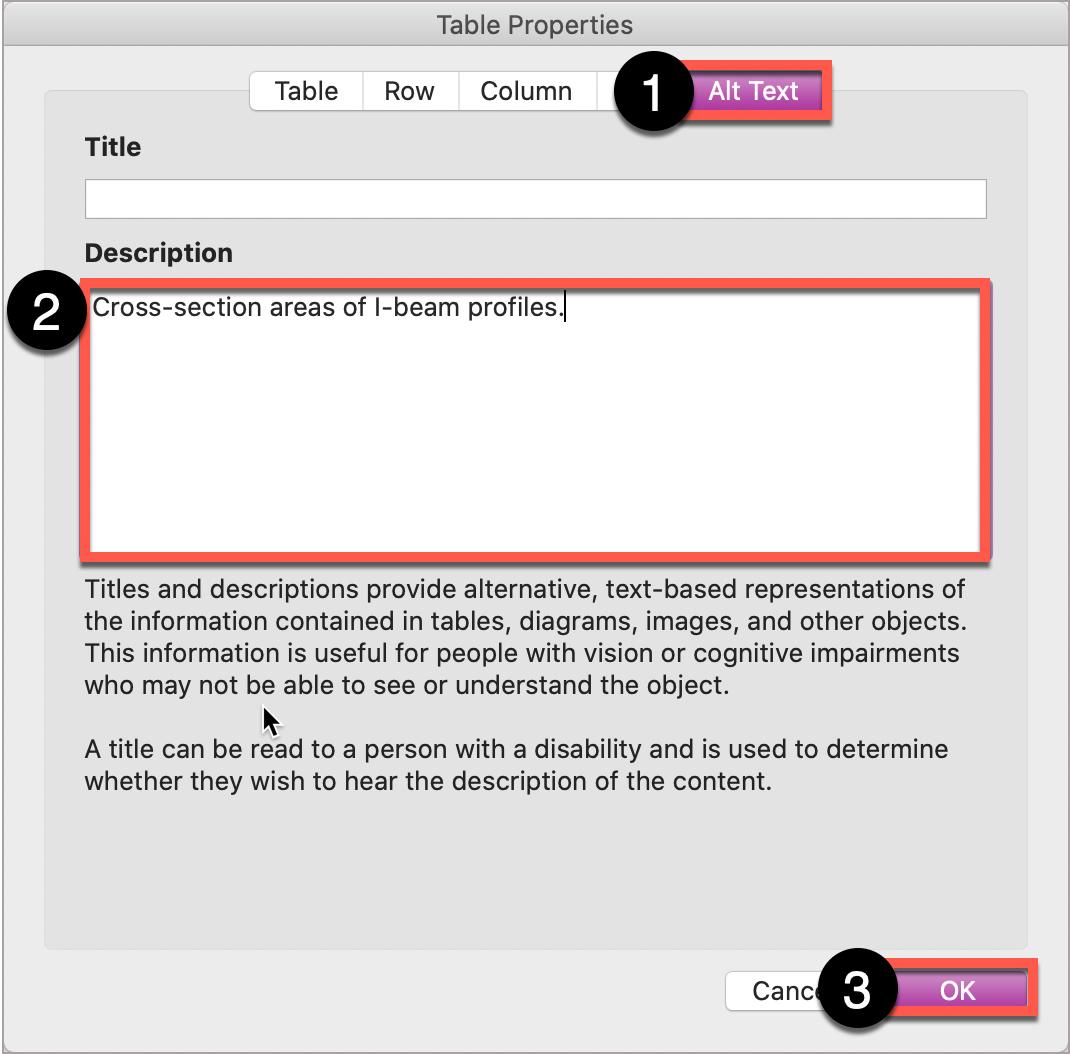
In the Alt Text tab, write a short, one sentence description of what the table information presents.
Select OK.
Alt Text description summarizing the table
Right-click the table. Select Table Properties.
In the Row tab, check the box Repeat as header row at the top of each page.
In the Alt Text tab, write a short, one sentence description of what the table information presents.
Select OK.
Color
Color can be an effective method to communicate ideas and draw attention to information. Ensuring there is sufficient contrast as well as using color in combination with other formatting can support a diverse campus community, including individuals with visual disabilities.
Contrast
When choosing colors to present text information in documents, choose color options that provide a contrast ratio of:
4.5:1 for regular text
3:1 for 18 point font and larger, or 14 point font and bold
In general, pastel colors or the “light” version of a particular color do not provide sufficient contrast against a white background.
Contrast ratios may be evaluated using tools such as:
When using color to indicate a specific condition or state, include some formatting attribute to also provide a distinguishing characteristic. For example, if a list of vocabulary words were identified only in red text, this could present difficulties for an individual who had some type of color-blindness.
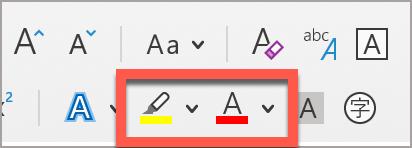
Options to support accessibility can include a combination of color AND formatting, such as:
Red text with Bold formatting
Using an asterisk, brackets, or other annotation symbols in addition to color
For more information on using color or these tools, please review the information on Color.
Accessibility Checker
Microsoft Word features an accessibility checker that can assist in identifying accessibility issues.
On the ribbon, select Review.
Select Check Accessibility.
The Accessibility checker will appear on the right-hand side.
Errors, Warnings, and Tips
The Accessibility Checker presents the results in a pane on the right-hand side of the interface. It organizes the results into three categories: Errors, Warnings, and Tips.
Errors – Must Fix Errors are issues which indicate content that contains an accessibility issue and is extremely challenging, if not impossible, to read or understand.
Note the following cannot be completely resolved – these results will continuously appear:
Warnings – Most Likely Will Need to Address Warnings indicate that the content may be challenging for individuals with disabilities to read or understand. Resolving some Warning may require the author to consider a different visual or organizational layout.
Tips – Very Helpful Tips are pointers intended to help you improve the user experience of your audience by streamlining and organizing your content in certain ways. Tips provide additional guidance and will appear depending on the content.
The Accessibility Checker is a good starting point towards identifying potential accessibility issues in a document. Microsoft continually updates the Accessibility Checker rules and so newer versions of Microsoft products may result in a different list of accessibility results. Using the Accessibility Checker can help identify some of the more significant accessibility issues present in a document.
Exporting to Other Formats
Including accessible authoring practices into Microsoft Word documents allows for versions exported as other formats to retain most, if not all, accessibility features.
Important
Never choose a “Print” to PDF option in Office, or in any other program. A screen reader user may still be able to access the text of a PDF created in this way, but heading structure, alternative text, and any other tag structure will be lost.
Create PDF with MS Word
Mac
For Mac users, read Microsoft Word’s Support for converting to PDF on your Mac for additional guidance.
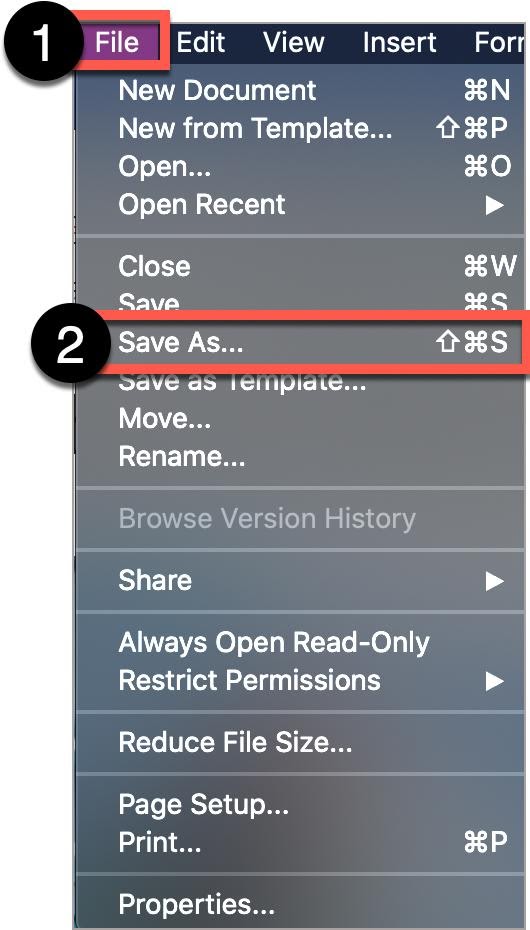
In File, select Save As…
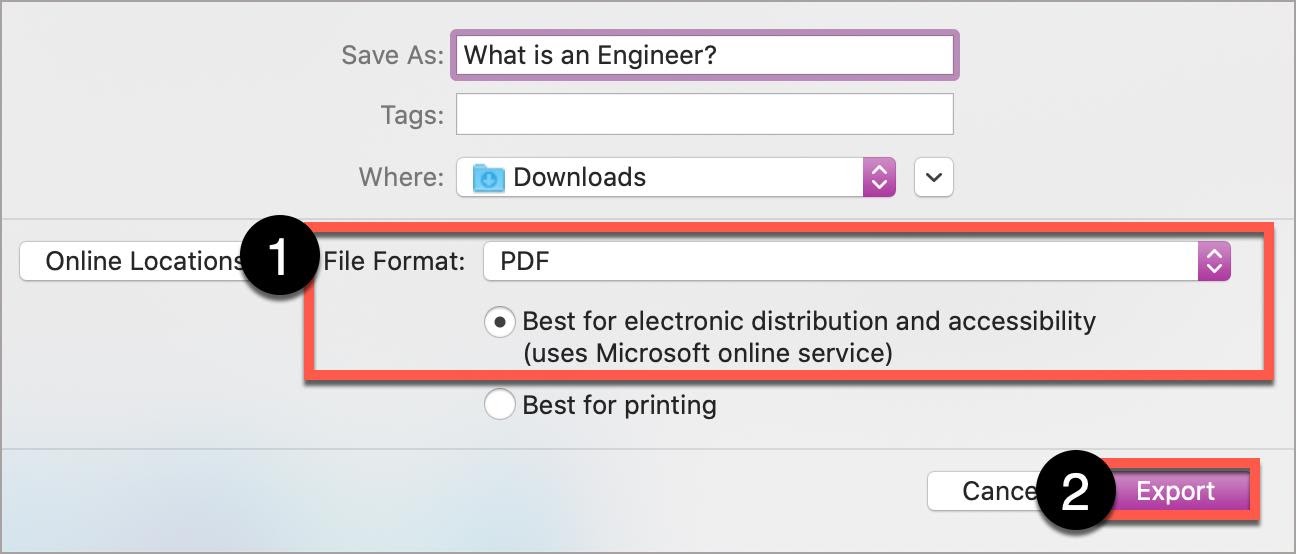
Select PDF
Select the radio button, Best for electronic distribution and accessibility (uses Microsoft online service).
Select Export.
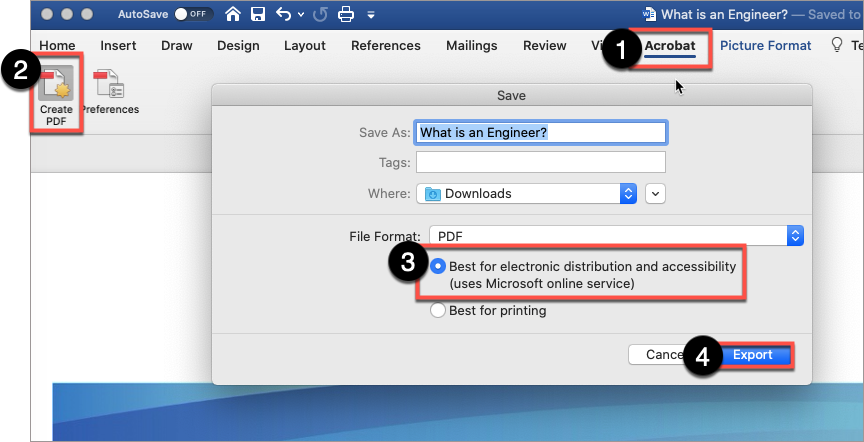
Create PDF with Acrobat
It is easier to create an accessible MS Word document rather than trying to fix accessibility issues in a PDF document.
Use the Acrobat plug-in in the ribbon. Select the Acrobat tab.
Select Create PDF.
If using a Mac with Acrobat Adobe installed, select Best for electronic distribution and accessibility (uses Microsoft online service).