Author: Karen Turpin
Copying into Canvas from Blackboard or Canvas
MiraCosta College has transitioned from Blackboard to Canvas. Starting in summer 2018, Canvas is the sole supported course management system for MiraCosta classes.
Canvas to Canvas
If you are teaching with Canvas, and/or you have created content within a Canvas course you can copy the entire course or parts of the course into one Canvas course from another.
- How do I copy content from another Canvas course? (text tutorial)
- Course Import Tool (video tutorial)
Blackboard to Canvas
When moving your course from Blackboard to Canvas, it is recommended to only export parts, not all, of your Blackboard course. Hopefully you exported what you needed prior to the close of Blackboard at MiraCosta. If you discover you still need to export material from Blackboard, contact Karen Turpin for assistance.
These documents will help explain the process.
- Blackboard to Canvas migration guide from Canvas includes links to both Blackboard and Canvas tutorials
- OEI Converting from Blackboard to Canvas Guide
- Rebuilding a Blackboard Course in Canvas: What to Expect – Notes from MiraCosta faculty member Robert Kelley.
Content from Blackboard that is most likely to import well into Canvas
- Announcements
- Assignments
- Discussion Boards – Only discussion prompts will transfer over.
- Tests, Surveys and Pools – These will transfer and be located in the Quizzes section of Canvas. Only multiple choice, fill in the blanks, essay, matching, numerical and formal will transfer. If not supported by Canvas, the question becomes a text only question.
For most other content and activities, it’s best to re-create/re-upload within Canvas. If you try to import entire courses or content areas into Canvas from Blackboard the work to re-organize and clean up the results generally exceeds the work to rebuild. Keep in mind that you can copy-paste text from Blackboard into Canvas – you don’t need to literally retype everything. It’s recommended that you use the “Paste and Match Style” command in your browser’s Edit menu, or first paste into an intermediate program where you can convert to unstyled text, to ensure that you don’t paste in unwanted code.
We have training classes and videos with ideas for Canvas. Check out the Canvas Information & Resources page.
Canvas Scheduler to Manage Appointments
The Canvas Calendar allows students to schedule appointments within defined time periods. Scenarios can range from individual students choosing a time to meet in your office, all the way to sign-up sheets for who wants to attend a field trip event.
The Scheduler is a tool within the Calendar which allows the instructor to set up days and times when students can make reservations. For the official description check out “What is the Scheduler?” The Scheduler is an optional tool that we do have available here at MiraCosta College.
You may be wondering “How do I create an appointment group in the Scheduler?” That documentation covers several different use scenarios, so I’d like to suggest two specifics:
- Set up office hour time windows, and allow students to reserve one or more half-hour appointment times.
- Set up a scheduled event, and allow up to twenty students to reserve seats at that event.
For the first scenario, you’d want to set up your appointment group with wide time periods, such as from 10 am until 4 pm on Friday. Then you’d want to tell the appointment group to apply to any number of your courses, so that all your students will be able to reserve into the same appointment group. (This will ensure no dual bookings!) Finally you would tell the appointment group to divide into equal slots of 30 minutes. You’d probably want to limit students to attend a single session, else you could end up with a student reserving multiple time slots in a row.
For the second scenario, you’d set up your appointment group for the times of the event, such as from noon to 2 pm on Saturday. If this event is at an odd location be sure to specify that in the Location field. If this event can only support twenty students, set the Limit each time slot to 20 users.
In each of these scenarios, once you have the appointment group set up, students would follow the same procedure to reserve time. They can go into the Calendar in Canvas, and click the Scheduler button, then click on the appointment group, and finally click on the time slot they want to attend. This process is also detailed in “How do I sign up for an appointment using the Scheduler?”
And if you want to message students about signing up using the scheduler, you can go into your appointment group, copy the address from the address bar of your browser, and send that link to your students. If they click the link, they’ll be prompted to log in to Canvas, and then should be taken directly to the appointment group. But of course they can always navigate to the Calendar and click the Scheduler button too.
Changing Your Sample Student Account Password
The following steps will to assist you with changing your sample student account password. Your password is reset two times a year at the same time your employee password is reset. Follow these directions after your employee password is reset, or when you need to reset the password for security purposes.
( Download Handout )
Part A: Navigate to the Password Reset Web Page
- Open your web browser (Chrome, Firefox, Safari, or Internet Explorer).
- Navigate to the web address: https://pw.miracosta.edu/Staff
- Notice that the title of the web page is MiraCosta Password Management
System Employee Password Information.
Part B: Changing Your Password
- Enter your sample student login into the Staff/Faculty Active Directory Your sample student account is the same as your MiraCosta faculty account with a –student at the end.
Example: kkorstad-student
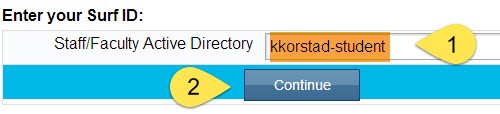
- Click the Continue button.
- Enter your current password in the box. This is the password you have used prior to the password reset. If you do not know this password, call the Employee Helpdesk at 760-795-6850 for a temporary password.
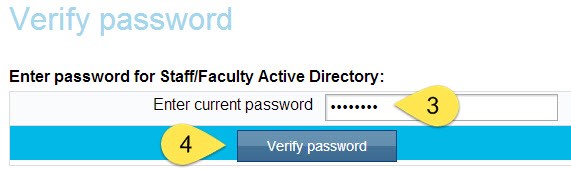
If you answered the Security Questions during a previous session in the password reset tool that option will display here and you can use those instead of a password to verify your identity.
- Click the Verify password button.
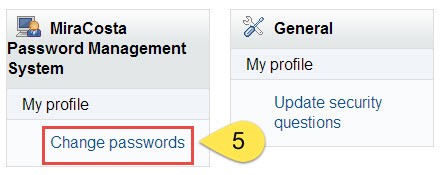
- Click the Change passwords link.
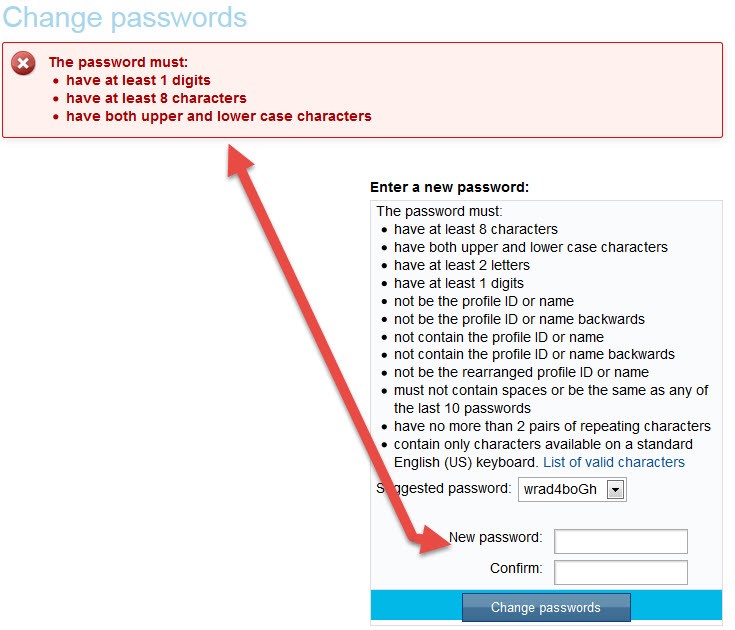
- Enter your new password in the New password box, then type it again in the Confirm Your password must meet the requirements listed below. Use the drop-down to view example/suggested passwords.
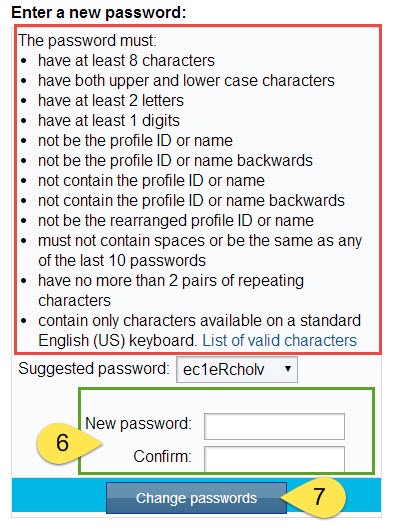
- Click the Change passwords button.
- View the results of your password reset.
Successful Password Change
Congratulations, you have successfully changed your password and may now log on to Blackboard as a sample student with your sample student login and password.

Unsuccessful Password Change
You will be prompted to enter the new password again. A reminder about password format requirements will display in the red box at the top of the page.