DO NOT attempt to add anyone to Canvas using a Student or Teacher role. Students and Instructors are automatically enrolled from SURF to your Canvas course several times a day.
It is possible to add MiraCosta College employees to your Canvas course with the Canvas TA role when appropriate – see this set of instructions. This should only be used for employees who have full permissions to edit your course and access your gradebook. Do not add users described on this page to your course as TAs.
For the roles called out below, follow the specified directions to have the user enrolled within your course with the appropriate role.
Faculty Evaluator: Contact Heidi Willis at (760) 795-6827 or hwillis@miracosta.edu in the Office of Instruction when you need to provide access to a peer, your chair, etc. to conduct an evaluation. On the People roster, within Canvas, the user will be assigned the ‘Evaluator ‘ Canvas role. The Evaluator Canvas role has the same permissions as the student role.
The Learning Centers (TLC Staff)
STEMLC & ASI: Contact Amy Paopao at (760) 757-2121 ext. 6389 or apaopao@miracosta.edu. On the People roster, within Canvas, the user will be assigned the ‘TLC Staff ‘ Canvas role.
Writing Center: Contact Sarah Pultz at (760) 757-2121 ext 6320 or spultz@miracosta.edu in the Writing Center. On the People roster, within Canvas, the user will be assigned the ‘TLC Staff’ Canvas role.
Community Education Student: Contact Karen Turpin at kturpin@miracosta.edu. Include the confirmation of student enrollment through community education. On the People roster, within Canvas, the user will be assigned the ‘Student Other’ Canvas role.
Substitute Instructors: Work with your dean to provide access to Canvas for the substitute. Approved substitute instructors are handled by your dean through the Office of Instruction’s procedures. The substitute instructor will be added on SURF and uploaded to Canvas for the period of time they are subbing. During that time, the substitute instructor will have the Teacher Canvas role .
Instructors of Canvas classes can add a TA or other MiraCosta College employee to your Canvas course with the TA role.
Youcan not add studentsor instructors to your course on Canvas. Students and instructors are automatically enrolled from SURF to your Canvas course several times a day.
For Canvas access for other special cases such as faculty substitutes, faculty evaluators, TLC Staff, or community education students, please see this post.
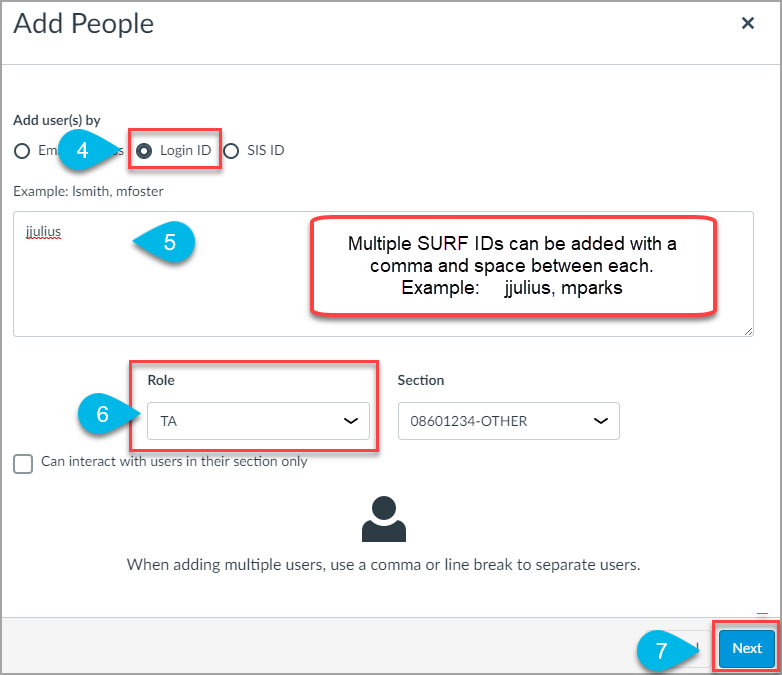
You can enter one user at a time. Example: jjulius
Or multiples with a comma and space between each. Example: jjulius, mparks
Select the appropriate role for the user.
Available role options are TA (see below for details on these options)
Click the Next button
Some IDs may already be used in Canvas at other colleges. If you get a prompt about this, select the ID that is associated with MiraCosta College.
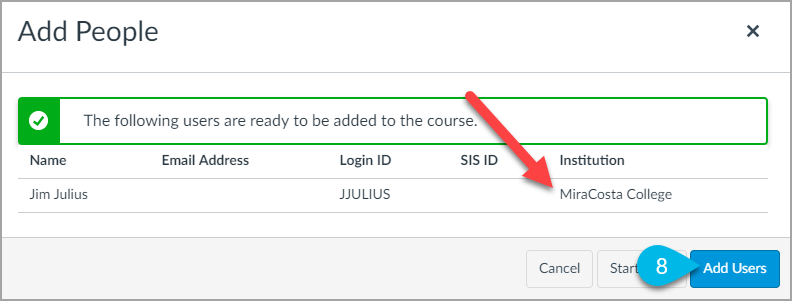
Click the Add Users button
Course Roles Explained
Note: None of the following should be used for substitute instructors,faculty evaluators, TLC Staff, or community education students. See separate instructions if you need to add any of those.
Teaching Assistant (TA) Role
Primary use: TAs assigned to a specific class to help the instructor.
Permissions: TAs have permissions equivalent to the Teacher role. They have all course-level permissions, including the ability to add, edit and delete all content in a course; grade students; and edit course settings.
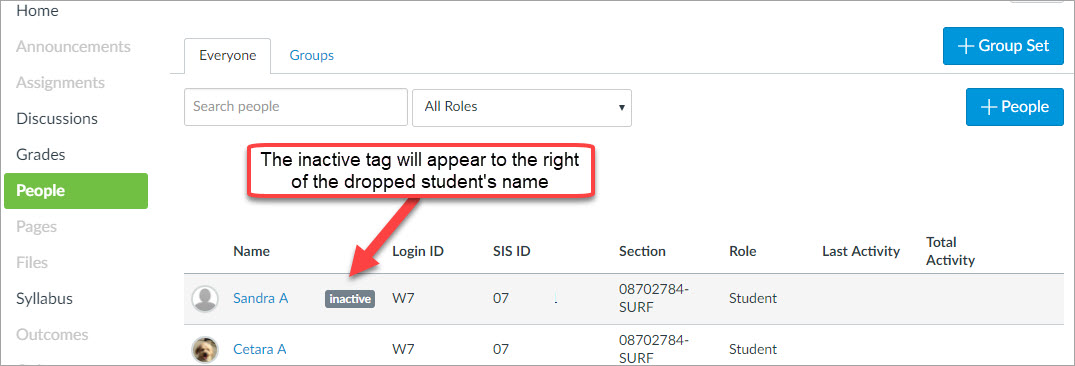
Students that drop a course in SURF after the semester has started remain on the People roster in Canvas, but with an inactive role. Students in the inactive role do not see or have access to the Canvas course, but faculty may access activities and grades of an inactive student. This is particularly helpful when a student grade is challenged or if a faculty member is evaluating whether a dropped student is eligible to be reinstated to a course.
People
Within the People roster on Canvas, students that have dropped will have the inactive tag displayed to the right of their name. This identifier will remain next to the student’s name throughout the course unless the student is reinstated to the course. Click the student’s name to access additional information about the student and review the student’s completed activities.
You cannot hide inactive students in the People roster.
Please download a PDF or download a Word version of this guide for future reference as you develop and teach merged Canvas courses.
Faculty may request to merge Canvas courses when they are teaching multiple sections of the same course in order to more efficiently share the same content across course sections, freeing up time for other instructional activity. This must be done prior to the start date of the course sections. For detailed steps on how to request combining of course sections, download the Combine your Class sections in SURF for Canvas guide. However, there are critical privacy issues faculty must be aware of if they choose to combine sections in Canvas.
*NOTE: If instructors combine multiple sections in Canvas, they are not able to offer an Honors Contract in that course.
According to Family Educational Rights and Privacy Act (FERPA) regulations, students cannot have access to student information (including the fact of their enrollment) of students in course sections other than their own (with the exception noted below). Because of this requirement, students are not allowed to interact within a Canvas course with students from another course section.
Canvas limits the visibility of students from other sections in a merged Canvas course. However, this does not cover all Canvas tools, so if you request to merge Canvas courses, you’ll need to take additional steps to protect your students’ privacy, as outlined in this document.
NOTE: FERPA restrictions do not apply to a merged Canvas course if students physically meet in the same classroom at the same time (i.e. “true cross-listed courses”). Course sections that meet simultaneously typically are combined in Canvas by default, and this document is not relevant for those merged courses.
What Canvas Does for You
In Canvas courses merged upon faculty request, students are prevented from seeing students in sections other than their own in
the full roster view of the People tool,
and the Inbox (Conversations).
[Technical note: MiraCosta enables this by setting the limit_section_privileges field to true In the enrollments feed file for students in sections being combined in Canvas.]
What You Must Do to Maintain FERPA Compliance in a Merged Canvas Course
Click Settings in your course menu and:
Under the Navigation tab, be sure that the Chat and Conferences items are hidden from students. If they are active (appearing in the top grouping of navigation items), drag them to the lower grouping or click the gear icon at the right of each and click Disable. Be sure to scroll down and click Save at the bottom.
Under the Course Details tab, scroll down and click more options. Make sure that: Let students create discussion topics is NOT checked Let students organize their own groups is NOT checked Disable comments on announcements IS checked
Click the Update Course Details button at bottom.
Ensure that each section has its own separate discussion
For graded discussions, restrict each discussion to an individual section using the Assign to option. See Canvas guide for details. See further details on section restriction under the What You May Do section below.
For ungraded discussions, use the Post to option (immediately below the discussion description) to select an individual section for the discussion.
Note – if you want each section to engage in discussions about the same topics, simply Duplicate the original discussion and modify it so it is available to a different section of students.
If/when you create Groups
Select the option to Require group members to be in the same section when creating a group set. See Canvas guide for details.
If/when you create Collaborations
Be sure to add students to Collaborations who are enrolled in the same course section. The Collaboration setup screen doesn’t display section information for students, so you will need to refer to the People area.
If/when you send a Canvas Inbox message to students from multiple sections
Select the option to Send an individual message to each recipient. This will send a separate copy to each recipient and hide the names of the recipients in the message header. You may also compose messages addressed to all members of a specific course section.
If/when you offer synchronous (live) online sessions (e.g. use Zoom)
If a synchronous meeting is required, hold separate synchronous meetings with each section. If a synchronous meeting is optional, you may hold one meeting for both sections, but make sure students understand how to participate anonymously. If you record a synchronous meeting where student identities are revealed, share the recording only with the section that participated in the meeting. If you wish to share a recorded synchronous meeting more widely, you must ensure that student identities are not revealed. Please review the Guidance for Synchronous Instruction at MiraCosta College to Protect Student Privacy document for more details.
What You May Do: Setting Calendar Events and Assignment Due Dates by Section
Note: This section is not required for FERPA compliance but may be helpful for managing a merged course if you would like to create differentiated events/activities for different sections.
The following Canvas Guides will help you create Canvas activities/assignments specific to a particular section within a merged course:
(Discussions must be separated by section – see notes in the What You Must Do section above.)
Note that when creating events/activities that are differentiated by section, you will need to select the section name in the Assign to area, which displays only a few options and is not scrollable. If your desired section is not displayed as an option, you will need to type in the section name until it shows up as an option to select.
Section names can be seen if you click Settings in the Course Menu and then the Sections tab. You may also click People in the course menu to see which section each enrolled student is assigned to. Sections with students have names ending in -SURF; to include your test student account in any differentiated activity in a merged course, you would also need to include one of the -OTHER sections available within the merged course.
Acknowledgements
Portions of this document are adapted from material originally developed by Seattle University and modified by the Grossmont-Cuyamaca Community College district. Additional portions are adapted from material developed by Indiana University and modified by Cornell University.
Get Support
If you have any question or need assistance with combining courses in SURF for Canvas contact the MiraCosta College Employee Helpdesk at (760) 795-6850 or open a helpdesk ticket in the portal.
The first and last name displayed in your Canvas profile is stored in the preferred name field within the Workday HR system. Once your preferred name is updated in the Workday HR system it will then update to Peoplesoft / SURF and update to Canvas during the next scheduled data transfer.
To update your first or last name for your Canvas profile:
Any questions about Workday should be directed to the Workday Help Desk. When a ticket is entered there, it is routed to the individual who can assist.
Note: If you update your preferred name in the Worday HR system for Canvas it will also update your instructor name on the SURF class schedule.
Please be advised that your permanent HR and payroll record will reflect your legal name unless you legally change your name and notify HR.
Students
The first and last name displayed in your Canvas profile is stored in the preferred name field within the Peoplesoft / SURF registration system. Once your preferred name is updated in Peoplesoft / SURF it will update in Canvas during the next scheduled SURF data transfer.
Please be advised that your permanent record will reflect your legal name unless you legally change your name through the courts and complete MiraCosta College Change of Information form.